You will probably need to replace flooring in a mobile home eventually, especially if it’s an older home or you have encountered a leak. For many years, mobile homes were constructed with sub-flooring made of particle board which essentially acts like a sponge – even a small amount of water can cause bowing, warping, rot, and soft spots.
Even in newer homes, where particle board wasn’t used, flooring can become warped or softened due to a small leak or routine encounters with water. Most newer homes now use a higher grade plywood or OSB because it can withstand water better. Still, if you have a soft spot or bowing in any area it’s best to replace flooring in a mobile home quickly before it causes further damage. You don’t want the joists or walls to become damaged due to contact to the flooring.
Hopefully, this article will give you enough information to replace flooring in a mobile home yourself. I’ll try my best to provide a step-by-step guide of the process and offer as many references as possible for further reading.
Of course, if you have any questions feel free to add them in the comments and I’ll do my best to help.
To replace flooring in a mobile home, you will want experience doing other DIY home improvement projects. On a scale of 1 to 10, I would rank it a 7 because no specialty tools are required and the material list is short. It is a tedious job though because you are dealing with major components of your home and that’s always intimidating!
“On a scale of 1 to 10, I would rank replacing the subfloors in a mobile home a 7..”
Your biggest concern will be avoiding joists, pipes, and wires – especially in bathroom and kitchen project.
The most difficult parts of the job is removing the old flooring, building out the perimeter joists, and keeping everything level. We’ll deal with all of those issues in the step by step process.
Material List
You will need to measure your existing flooring to see if it is 3/4″ or 5/8″ thick (most are 3/4″). In addition to the screws, you will want to use a liquid nail or other construction adhesives between the joists and the new floor so it won’t squeak.A circular saw is great because you can control the depth of the cut. If you have experience with circular saws or ‘sawzalls,’ you should do just fine.
As stated above, one of the most tedious parts of replacing flooring in mobile homes is the removal of the original sub-flooring and the caution you’ll need to take so you don’t cut a joist.
This is a great time to add new insulation between the joists. Every little bit helps!
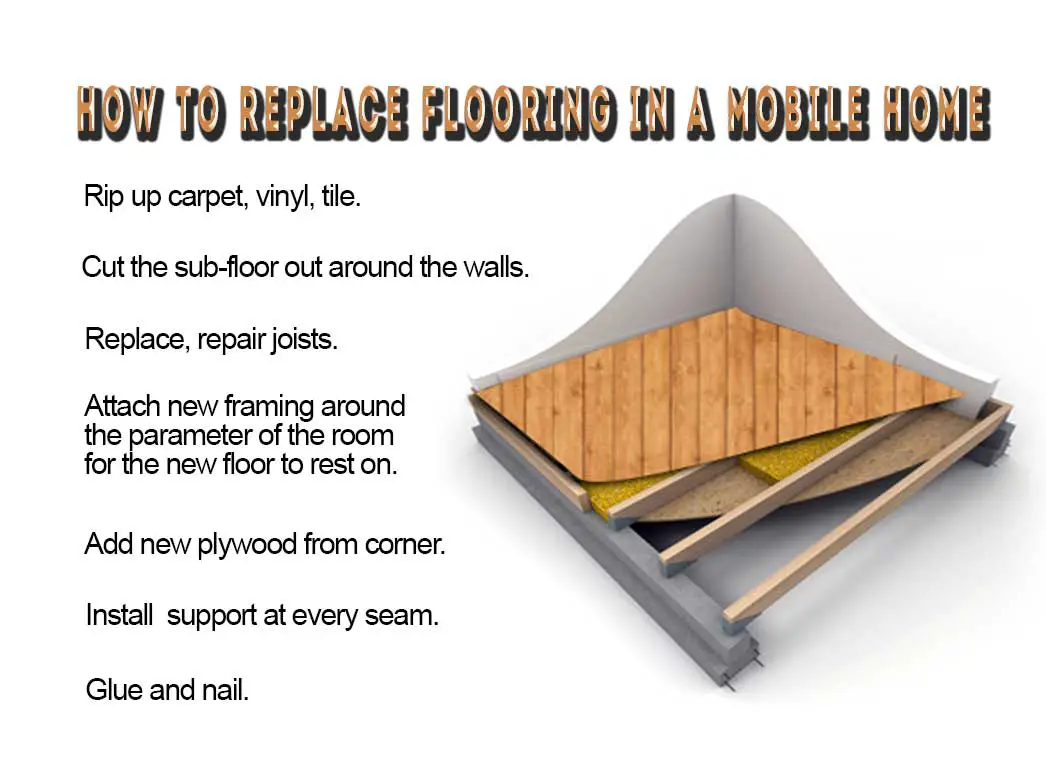
We’ve created a ‘quick and dirty’ list below of the basic steps to replace flooring in a mobile home. We’ll go through each process thoroughly.
The first step will be removing the trim and floor covering. If it’s carpet you will need to remove the strips. Vinyl will usually need to be cut around the parameter (perimeter) of the room and tile will need to be ripped up.
If a leak caused the damage, find it and repair so the same thing doesn’t happen to your new floor. With the covering removed you may be able to trace the leak better.
This is one of those tedious jobs no one likes to do! If your flooring is 3/4″ set your circular saw to that and follow the perimeter along the edge of the room. You do not want to touch the joists below.
Now that you’ve cut the sub-flooring around the edges, you will need to cut them down so you can remove them. The smaller the pieces, the easier it is to get them out of your way. If you have ensured there are no pipes or wires between the joists you can simply saw between the joists and remove each piece. Remember to keep the saw set to the same thickness of the flooring to keep accidents to a minimum.
You may need to use a Dremel tool or knife to get the sub-flooring out from underneath the walls.
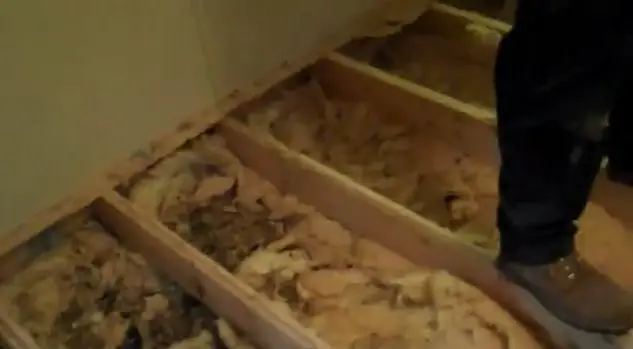
At this point, all the sub-flooring has been removed and you have a perfect opportunity to inspect the joists for any damage. If you do see damage you can reinforce it by adding an additional 2 x 4 to the original or removing and replacing. If there’s not much damage, reinforcing is probably easier.
This is not necessary but it should be a top priority. Spending an extra $30 can save you a lot more in energy costs in the future. Remember, wiring and piping should be above the insulation so that the heat from the home can get to it.
The sub-flooring should be laid in the same direction as the original, usually opposite the direction of the joists. You will cut the plywood to the correct size to fit the necessary width of the room.
Around the perimeter of the room, you may need to attach an additional 2 x 4 to the original so that you have a shelf or lip to lay the new sub-floor down, then nail and glue.
At each seam, where one piece of plywood ends and another begins, you will need to reinforce under it. This means you will need to add a 2 x 4 between the original joists so you have a place to nail and glue down the plywood. You can see this happening in the photo above, where the small boards have been added between the long joists.
All the while, you want to make sure your floor is level. You can always add what you need to the joists or you can remove a bit if needed.
Your choices are endless when it comes to floor covering. If it’s in a bathroom, it’s probably best you go with vinyl or tile – something with some protection against water will help protect your floor.
Congratulations! You did a fine job and it’s a great looking floor that will last for many years.
Below are some Youtube videos that may help you understand the process a bit better.
Note: People do things differently, especially when it comes to construction projects. You’ll probably notice a few things done differently from what I just stated but don’t worry – no one is always right or wrong and what works for one person may not work for you. Take the collective knowledge and pull only what you need from each resource – don’t worry about the rest. Good luck!
Links that can help:
Ask an Expert Questions about Replacing Floors in Mobile Homes
Ask a Mobile Home Expert Questions about Mobile Home Subfloors
Tools Every New Mobile Home Owner Should Have in their Toolbox
[su_youtube url=”www.youtube.com/embed/74LhptFzXTw”]
[su_youtube url=”www.youtube.com/embed/6Opo8ADrf_k”]
[su_youtube url=”www.youtube.com/embed/duJE9EuFsMM”]
As always, thank you for reading Mobile Home Living!
Image Sources:
Image 1, Step-by-step images provided Phillips Place Renovation, a blog that shares a couple’s gorgeous mobile home remodel. We featured their beautiful home here.
Learn about mobile home additions and understand the pros, cons, and necessary steps for a…
Learn how to paint mobile home walls effectively, overcoming challenges with shiny surfaces and battens…
There're a ton of smart storage hacks to organize your camper on Pinterest and Amazon…
A small bathroom should be beautifully focused on function. Of course there are a few…
Over 100 beautiful manufactured home deck and porch designs plus free design plans and DIY…
If you own an older mobile home with a flat roof or have needed to…
This website uses cookies.