Air conditions are a must when it comes to beating the unbearable summer heat. There are typically two types of air conditioners that are used in a US household: window AC and split AC. While both of these types have the same primary goal of cooling the room or home, there are quite a few differences between the two.
Many homeowners are confused about which air conditioner type they should go for. And we have pieced this guide together to help you with the decision. In this article, we will discuss window AC vs. split AC to help homeowners make a choice.
Split AC vs. Window AC – Comparison
Here is a comparison chart highlighting the differences between the window and split air conditioners. This chart will help you to understand the differences at a glance.
Window AC
Split AC
Design
One single unit.
Divides into indoor and outdoor units.
Space
Requires more space, usually an entire window.
No specific installation point, and it does not require much space.
Energy Consumption
Consumes more energy than split AC.
Consumes less energy than window AC.
Noise
Creates a significant amount of noise.
Almost silent.
Cooling Capacity
Suitable for smaller rooms.
Suitable for larger rooms, halls, etc.
Maintenance
Low-cost and easy maintenance
High-cost and complicated maintenance
Installation
Very easy to install
Installation is a bit complicated
Installation cost
Costs a very small amount
Costs a significant amount of money
Price
Cost-efficient
Costs a decent amount of money
Range
0.75 to 2 tons
0.8 to 2 tons or more
Lifespan
15 to 20 years
10 to 15 years
Differences Between Window AC & Split AC
When it comes to window air conditioners and split air conditioners, there are several differences between the two. Take a look at some of the major differences between window and split air conditioners.
Design
The most basic difference between these two types of air conditioners is the fundamental design. Window air conditioners have a single unit, and all the components are enclosed into one piece of equipment. On the other hand, split air conditioners are divided into two units – indoor and outdoor.
Required Space for Installation
Another major difference between the two AC types is the space requirements. Window air conditioners require a comparatively bigger space. It typically requires an entire window for installation or a window-sized space on the wall to accommodate the air conditioner.
However, split air conditioners do not require as much space as the window AC. Even though there are two units in a split air conditioner, the units require very less space compared to window AC.
Noise
Both of these air conditioners make noise when operating. However, window air conditioners are quite loud while cooling, and it also makes loud noises when turning on or off. But split air conditioners are almost silent and do not make much noise even during switch on or off.
Installation
Window air conditioners are easy to install and can be installed without an HVAC technician. The installation cost of this type is low but relocating the AC is quite difficult. However, the installation of split air conditioners is quite complicated. Also, the cost of installation of split AC is quite high, and relocating this air conditioner type is quite easy.
Cooling Range/Tonnage
The range of air conditioner cooling depends on the tonnage. Window air conditioners typically range between 0.75 to 2 tons. And the range of split ACs varies from 0.8 to 2 tons or more.
Cooling Capacity
In case of an air conditioner, the cooling capacity is usually dependent on the range it offers. If we solely depend on the AC tonnage, both air conditioners should cool the same amount of space.
However, the split AC cools a larger area than a window AC. This is because the split air conditioners are placed at the top section of the wall. It helps the system to distribute the cold air through a larger space easily.
Maintenance
Regardless of which air conditioner type or model you have installed; ensuring proper maintenance is a must. Both window and split air conditioners require timely maintenance in order to avoid issues that result in major repairs. In terms of maintenance, window air conditioners are the easiest. These air conditioners have a single unit and do not require much maintenance. This ease of maintenance also results in a low service bill.
However, split air conditioners come in two separate units and require frequent maintenance. This includes cleaning, tune-ups, repairs, and so on. The cost of maintenance is also high for split AC.
In either case, it’s best if you can hire an air conditioner specialist or an HVAC contractor and set up an annual maintenance deal to keep the A/C unit in the best shape.
Energy Consumption
Energy consumption differs significantly between split and window air conditioners. It plays a major role in the energy bill.
The consumption of electricity depends on the technology and efficiency of the system. Window air conditioners are slightly less efficient compared to split air conditioners. This is because the components in window AC are compactly packed, whereas the split AC is equipped with all the latest technology. So, the energy consumption of window air conditioners is quite higher compared to that of split AC.
Lifespan
When it comes to the lifespan of air conditioners, window AC is the winner, without any doubt. Due to low damage and wear or tear, these systems last easily for about 15 to 20 years before requiring replacement. Split air conditioners last for about 10 to 15 years only if the system is properly maintained.
Price
Lastly, let us talk about the price of these two air conditioners. Window AC is cost-efficient in quite a few manners. The window air conditioners are available at a low price compared to the split air conditioners. Not only that, but the installation and maintenance costs of window AC are also low.
Summing Up
Surviving without an air conditioner in the era of rising global temperatures is a tough challenge. While there are several models and versions of air conditioners available, the types narrow down to window or split. According to the discussion above, both of these types have their pros and cons.
The window air conditioner helps to save money on installation and maintenance while ensuring long-lasting performance. On the other hand, split air conditioners provide even cooling with very little noise while consuming less energy than the window AC. So, the air conditioner type homeowners should install depends on their space, requirements, and preference.
Sealing heating ducts in a mobile home with forced-air heating is one of the best DIY home improvement projects you can do.
It’s fairly easy, doesn’t cost a lot of money, and has tremendous benefits. You can save a ton of money by sealing heating ducts in a mobile home!
We’ll give you easy step-by-step instructions on how to seal heating ducts in a mobile home, why it’s so important, and other ideas that can save you money on your heating and cooling costs.
Forced-air Heating Systems
Forced-air heating systems are very popular in manufactured homes. They work by forcing air over a hot metal heat exchanger and then blowing the warmed air through your heating ducts, or supply ducts, to each register in every room of the home.
Most mobile homes will have their duct work in the flooring but there are some, especially in the South, that will have their ducts in the ceiling. We are focusing on the duct located in the floor.
What are Heating Ducts?
Heating ducts, or just ducts or duct work, is the galvanized sheet metal formed in a rectangle under your home. Short pieces are snapped together to create a long tunnel that carries heated air (or cooled) throughout your home to warm it. It’s the veins of your heating system basically.
Ducts are usually made of very thin, pliable galvanized sheet metal. It’s lightweight and easy to form so it is perfect for mobile and manufactured homes. However, the qualities that make sheet metal so perfect also cause complications: it dents and bends easily.
Watch this video to see how sheet metal becomes heating ducts:
Why You Should Seal Heating Ducts in a Mobile Home?
Sealing the ductwork under your mobile home is a fairly straightforward project.
Holes and cracks in your underfloor venting increase drafts, moisture, dust, pollen, and noise. Sealing those holes and cracks and adding additional insulation around the duct work will improve your indoor air quality and reduce your utility bills.
Sealing heating ducts in your mobile home can greatly improve your home’s energy efficiency.
Leaky ducts are common in older manufactured homes and can dramatically increase heating and cooling bills.
It is not uncommon for an older duct system to lose 20% of the heated or chilled air to the outside.
. If your annual heating and cooling bills are $2,000 and your ducts are leaky, you could be spending $400 yearly to heat and cool the outdoors.
Mobile Home Energy explains:
“….duct systems, however, have not evolved. Downdraft furnaces, coupled with under-floor trunk lines and risers, are still the standard installation method, and the workmanship is often inferior. The techniques for duct sealing described below are relevant even in newer manufactured homes. Sealing the ductwork may reduce heating bills by 15-17%.
Even newer manufactured homes can benefit from sealing ducts. They can become loosened or damaged by transporting or settling.
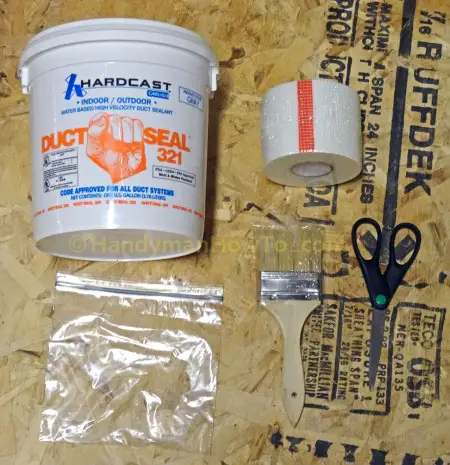
You only need a few basic materials to seal your mobile home heating ducts. You will have most of the items and what you have to buy is affordable and easy to find in home improvement stores.
Mastic (water-based, in a bucket)
Paint Brush (1.5″ or so)
Utility Knife and/or scissors
Metal Duct Tape – foil or cloth-backed tape that works with mastic
Old clothes (mastic is messy)
Gloves
Source: Handymanhowto.com
What is Mastic?
Mastic is the gooey grey stuff in buckets. It’s a great product for sealing heating and cooling ducts because it brushes on and stays flexible. The water-based mastic is easy to clean up and doesn’t create volatile fumes, so it is ideal for sealing ductwork.
Look for mastics with a low flame spread and smoke-developed rating. For most jobs, builders want to ensure that the mastic they use is UL 181-rated. UL 181-rated mastic is more flexible, adheres better to ducts, and lasts longer than other mastics. (Source: HGTV)
Mastic is preferred over duct tape or foil tape because it is non-hardening and doesn’t break down as quickly as tape. Its gooey properties make it easy to get the product into the cracks and holes.
Mastic is a permanently flexible, indoor and outdoor-rated, gap-filling sealant that sticks to sheet metal, foil-faced insulation, wood, and most materials. Because it’s a gooey (like peanut butter) brush-on product, mastic conforms to any shape and contour.
For long-term duct sealing, mastic is superior to metal foil HVAC tape. (Source: HandyManHowto.com)
But What About Using Duct Tape?
Duct tape has the words duct and tape, so it seems perfect to tape ducts, right? Technically, it can be used to seal ducts, but it isn’t going to last.
Duct tape is just a temporary fix to seal ductwork. When it first goes on, if applied meticulously and thoroughly, it will seal the leaks. Then, it will deteriorate over time. Duct tape does not expand and contract with heat. As the ductwork expands and contracts with the flow of heat, the duct tape will be repeatedly stretched and relaxed until it falls apart. In the process, the tape and its adhesive will dry out and lose its air seal. (Source: St. Louis Energy Saving).
Consider Code and Regulations
Before starting any DIY home improvement project, it is important to consider your local codes and regulations. While sealing your heating and cooling vents is fairly easy and usually doesn’t require any structural modifications, your local and state laws may require inspections.
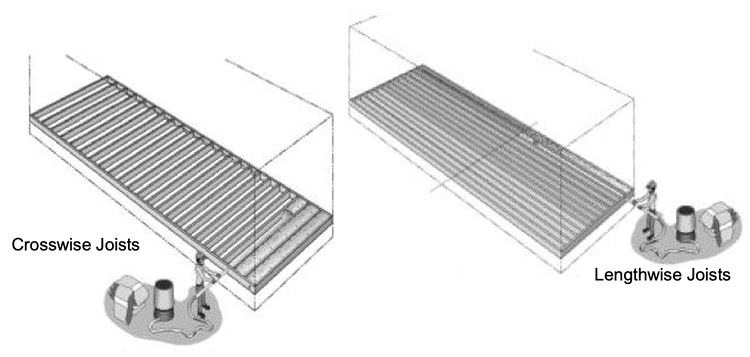
Learn About Mobile Home Duct Systems
One advantage of manufactured homes (among the many) is the simple placement of their heating and cooling ducts. Single wides with lengthwise joists have ducts running right down the middle of the home, directly under the flooring. Single wides with crosswise joists have ducts running down the middle of the home, but the ducts are usually under the joists, not directly under the floor. Both setups reduce the corner connections needed and allow the forced air to better reach every room. Double wides are two single wides joined together, so their ductwork will usually run down the middle on each side, depending on the joists. Here’s a diagram that I found in Saving Money by Saving Energy:
Pay Special Attention to Crossover Ducts
Since double wides have two rows, a crossover duct, or branch duct, is used to connect them. This duct will need special attention to seal and insulate because it loses a lot of warmed or cooled air.
Dealing with the Underbelly
You will need to get above your plastic belly wrap, or underbelly, to reach the ducts. Cutting a straight line directly under the duct will work, and you can use belly wrap tape to tape it back. There are a couple of videos at the end of our article about installing foam insulation under your mobile home that will show you how to tape the plastic.
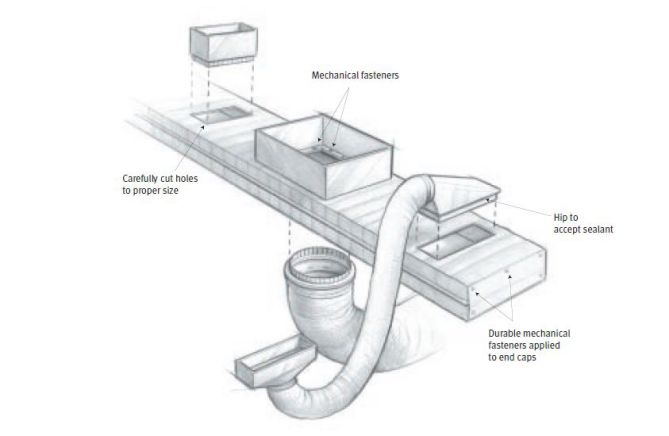
You’ll want to pay special attention to particular locations.
The trunk line itself should be taped at the corners.
The end of the duct work, technically called the termination cap, is an abrupt cutoff that forces the air straight up. This sudden change will cause air loss. You’ll want to tape all edges and add ample insulation on all three sides.
The boot is an arm that opens the main underfloor vent up to each floor vent location. You’ll want to use tape (or mastic) to seal all edges and angles.
The crossover vent on double wides is an area you will want to be especially attentive to. It forces the warm air to make a corner turn. The smallest crack can significantly reduce the ability of the warm air to go where it needs to go.
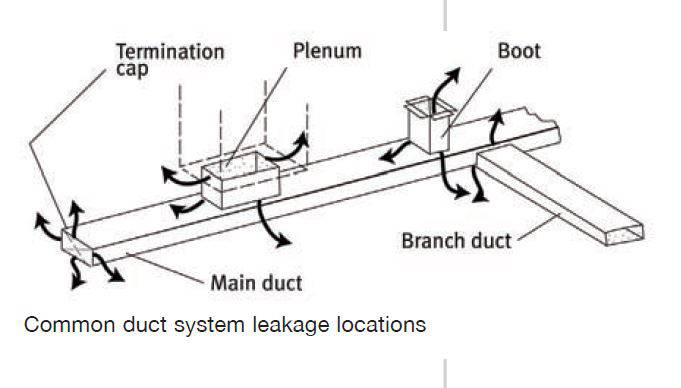
Below you can see the most common areas that need to be resealed in an older duct system:
How to Seal Heating Ducts
You don’t have to be an HVAC expert to inspect and seal your mobile home’s heating and cooling ductwork. It’s a fairly simple system and DIY project. Honestly, your biggest issue will probably be crawling under the home! Follow these easy steps for sealing heating ducts:
InspectFor Large Holes and Cracks:
Once you get to the ducts, you’ll want to inspect them thoroughly. Look for large dents, cracks, or blockages. If there are large cracks or holes, you will need to give those areas special attention:
Tape over large holes and cracks to reinforce the duct, then apply mastic over the tape.
Clean the Surface
Clean the joints on the sheet metal using a regular household cleaner and rag. Mastic bonds are better on clean surfaces.
Apply Mastic
Use your paintbrush or fingers to apply mastic to the joints or small cracks and holes. Don’t be stingy – goop it on and then spread it out. You’ll want a couple of inches of mastic on both sides of every joint. Using your fingers may work better since you can scoop the goop. However, remember that sheet metal has sharp edges so you need to wear protective gloves.
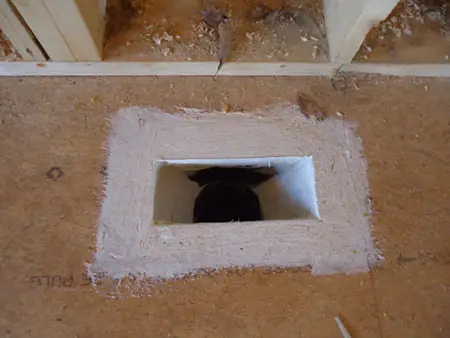
Sealing the Boot:
In the image above, you’ll see the boot. The Boot is part that connects your register/vent in your floor to the main truck line. You want the entire area sealed so no cold air from under your home can mix with the heated air. Hear’s what it should look like:
Inspect the duct’s interior and remove all objects that have fallen into the duct. Scrape and vacuum out the duct, then scrub it down thoroughly with rubbing alcohol and a rag.
Use a good respirator when using alcohol. Washing down the dirty metal ensures that the sealing materials will adhere to the duct when the metal is clean and dry. Tape all seams and joints with approved foil-faced butyl tape.
Do not use “duct tape,” which is an inferior product and will fail over time. Tape all sides of the bootup and over the edge of the subfloor.
Staple that tape to the subfloor. Then, use approved mastic to coat all seams and edges of the tape. Let the mastic dry and replace the register cover.
If the register has movable dampers, remove them with a plier or replace the register with an open cover. (Source: Mobile Home Energy)
Sealing the Crossover Vent:
The flexible duct between the two trunks on a double wide must be carefully sealed. You’ll want to seal the two connection points and the duct itself. The image below shows how to seal the connection points – you can reinforce them with tape too.
Sealing the End of the Ducts:
The abrupt end of the main trunk lines causes issues in forced air heating systems. You’ll want to add fiberglass (or foam) insulation to decrease air loss.
Roll up a 12-inch fiberglass batt and place it in a kitchen-sized garbage bag. Stuff this “poly bag” down the register boot and into the main trunk line just past the boot. Then use your butyl tape to create an airtight barrier. Coat this new duct barrier with mastic. (Source)
Solve Condensation Issues By Insulating Ducts
In addition to sealing your ductwork, you may want to wrap them with insulation. If you see water pooling at the bottom of a vent, you likely have condensation due to poor duct insulation. The warm air heats the sheet metal duct up. If the exterior of the duct is surrounded by cold air you will get condensation. Condensation can affect the warm air that you paid good money to get. Mobile Home Repair (a very informative blog) shows a great image and describes how to insulate your ducts:
The picture shows an ideal situation where you have access completely around the ductwork. This is not always the case. You can wrap all of the ductwork that you can and then staple the insulation to the floor or joists in a cradling fashion.
If you insulate under a mobile home you can save money. Over the last 3 decades, the National Renewable Energy Laboratory (NREL) has partnered with the US Department of Energy to test various methods of energy efficiency for old and new manufactured homes. Adding better insulation to the walls reduced heat loss by 13%. Coming in a close second was adding better insulation to the underbelly, under the sub-floor but above the belly wrap. It reduced heat loss by 11%. Installing storm windows also decreased heat-loss by 11%.
As with most everything involving mobile homes, there is confusion surrounding the mobile home underbelly or crawlspace under the home. One reason for the confusion is the numerous names used to describe the same thing. Mobile home belly board is also called a mobile home belly wrap, underbelly, bottom wrap, bottom board, belly, and belly barrier. Regardless of the word you use, it needs to be well-insulated.
In this article, we cover the best materials and method to insulate under a mobile home. We also share how one couple insulated and repaired their own mobile home underbelly using foam board.
Blowing Insulation into the Belly of your Mobile Home
As we shared in our complete mobile home insulation guide, blowing insulation into the belly and the ceiling of a mobile home is the most recommended method to insulate under a mobile home.
However, this method of insulating a mobile home underbelly requires specialized equipment and advanced knowledge of a mobile home’s construction. Therefore, blowing insulation can be expensive. Fortunately, there are many state and local government programs that may help mobile home owners to add insulation via energy grants and low-interest loans.
Depending on your location you may qualify for a program or financing help to get your mobile home insulated better, especially if it was built before 1976.
Top Materials to Insulate Under a Mobile Home
While blown insulation is the favorite method of insulating a mobile home underbelly it is also expensive because you have to hire it out. Using foam, fiberglass, or Rockwool panels gives the homeowner the opportunity to DIY which is usually always a cheaper option.
Spray Foam
Spray foam is most recommended for already enclosed areas such as the walls or ceiling/roofing of a mobile home. It’s fairly expensive because you have to have special equipment.
Spray insulation can be made of a variety of materials. Most common is cellulose (newspaper), foam, and fiberglass. Learn more about spray foam here and here.
Advantages of Foam Insulation
Foam insulation has many advantages. Here are just a few:
easy to cut with a utility knife, hand saw, or table saw
lightweight and easy to carry
flexible enough to easily maneuver into tight spaces – DIY friendly
doesn’t promote mold growth
water resistant
long-lasting – won’t decay
insecticide is used on most foam making
Since foam board can also act as both an insulator and a vapor barrier for your mobile home it’s ideal to install under your flooring.
Disadvantages of Foam
Fire is probably the biggest disadvantage of foam board insulation and meeting your local fire protection codes may be bothersome. Foam is fairly hard to ignite, but once it catches it emits a dense smoke and toxic gases. However, some manufacturers spray the foam with fire retardant. You’ll want to research your local codes.
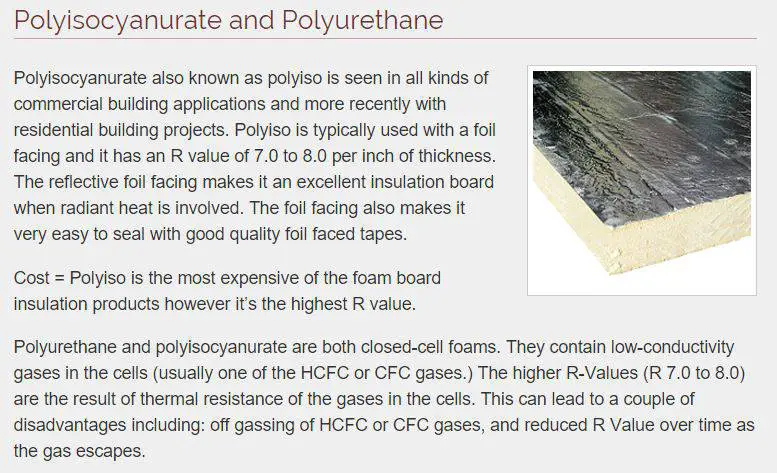
The three most common types of foam board are made of polystyrene, polyisocyanurate, and polyurethane. All are petroleum-based products.
Rigid foam can be used in walls, roofs, and foundations, for retrofits or new construction. Most varieties of foam have a higher R-value per inch than fiberglass, cotton, or cellulose. (Green Building Advisor)
Here are the three main types of rigid foam insulation:
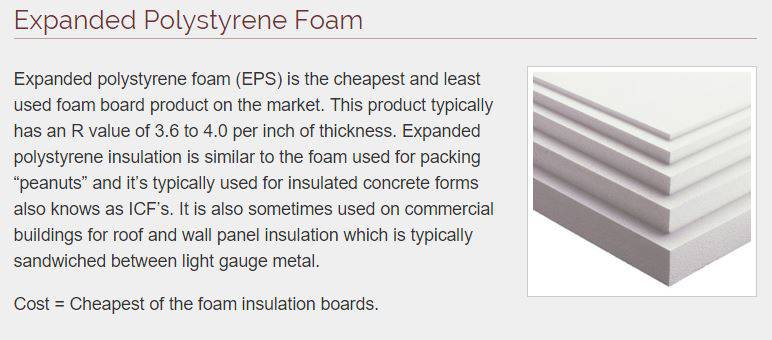
Expanded polystyrene is the most common type of foam insulation and the most affordable.
It is made from the same closed cell foam beads that your coffee cups and shipping peanuts are made from. It is molded, or extruded, into large sheets that can be used in roofing, flooring, siding, and other construction needs.
The R-value of EPS sheets depends on the density, with a single sheet of foam ranging from 3.6 to 4.2 per inch.
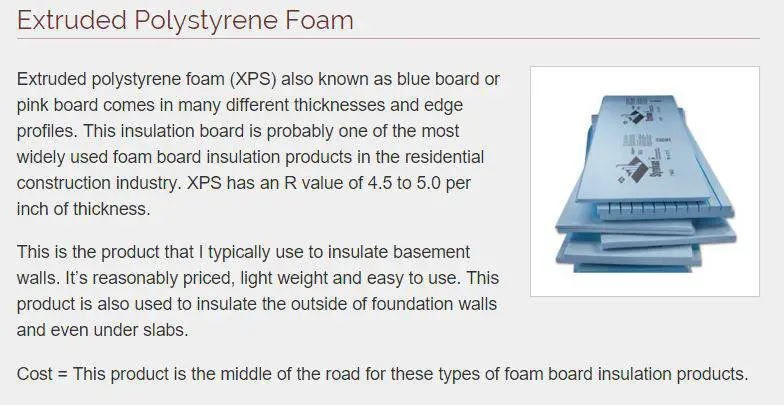
Extruded polystyrene is very similar to expanded polystyrene but it uses pellets instead of beads, making it smoother and denser. It also has better water resistance. You’ll recognize this product by its colors – it comes in blue, pink, and green depending on the manufacturer.
You’ll pay more for extruded polystyrene but you’ll get better energy efficiency. The R-value of extruded polystyrene is around 5 per inch.
Extruded polystyrene is ideal for basements and slabs and makes an ideal choice for insulating under a mobile home if the added cost isn’t an issue.
Polyurethane and Polyisocyanurate have advantages and disadvantages.
They have higher R-Value per square inch but they are also the most expensive of the three types of rigid foam.
Foil-faced polyisocyanurate is more resistant to ignition than unprotected XPS or EPS. For this reason, some (but not all) building inspectors allow foil-faced polyisocyanurate to be left exposed on crawlspace walls or in attics without requiring a layer of drywall as a thermal barrier.(Source)
An advantage of polyurethane is the foil that covers the sides. The foil can act as a vapor barrier and is used most often in roofing and foundations.
Laurel and Bryan’s ‘Death Zone’ of Cold Air
The first year in a new home, especially an older mobile home, is always a learning experience. That was certainly true for Laurel and Bryan Adams when they moved into a 1974 Olympic single wide mobile home.
The couple’s new vintage mobile home had served Laurel’s aunt very well until she passed last year at the age of 93. While the mobile home’s decor may not have made it to the cover of Home and Garden, auntie had lovingly updated it over the years. She had heroically painted the walls herself with a three-inch paintbrush in bright yellow and aqua.
During their first winter in the home, they learned how much their utilities cost and where all the cold spots were located in the home. Needless to say, their 1972 mobile home had a few cold spots and their heating costs were too high for such a small home. The following Spring they began researching how to best insulate their home.
Laurel and Bryan decided to solve their problem energy loss using foam board. They were kind enough to share the details of their project with us, complete with hand-drawn images. How cool is that?
It was a sound, affordable home that had loads of potential!
The Adam’s vintage mobile home sits in Edmonton, Alberta, and since older mobile homes are notoriously under insulated, they experienced wild temperature fluctuations during their first winter.
How to Insulate Under a Mobile Home with Foam
Once Spring arrived, the couple set out to find a way to increase the home’s energy efficiency, especially in the ‘death zone’, as Laurel playfully called it. The death zone was an area 2 to 3 feet above the floor that remained much colder than the rest of the home.
Materials Used:
4′ x 8′ Foam Insulation Board
Table saw and hand saw
3″ screws with 1″ washers
Screwdriver (electric)
The Adam’s were able to buy their 4′ x 8′ insulation foam board from the manufacturers directly. That saved them almost half off the retail price. It pays to cut out the middleman whenever possible!
The mobile home’s floor joists are on 16″ centers, which means the wood floor joists are placed 16″ apart from each joist’s center point. Since the joists themselves are roughly 1.5″ wide the section between each joist was approximately 14.5″ wide.
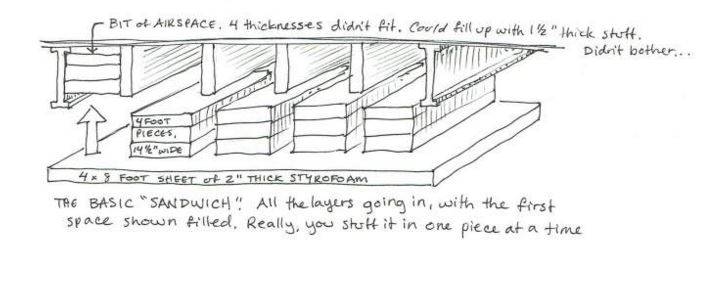
Bryan bought 2″ thick Styrofoam insulation board and used a table saw to cut the boards 14.5″ so that the foam was easy to push between the joists and stay put (there are 4″ foam boards available but the 2″ is easier to handle).
Bryan concluded that layering 4 boards together to create an 8″ total thickness of insulating foam would work best for their area’s average winter temperatures.
Each stack was made of three 14.5″ wide by 2″ thick foam boards. The fourth foam board was left full-size (4′ x 8′) and attached to the bottom of the wood joists. This holds the 3 boards above it in place and creates a total of 8″ of insulation under the entire mobile home.
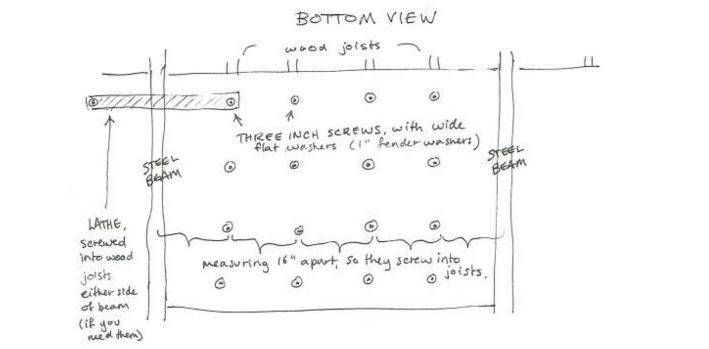
To secure the full-size sheet to the bottom of the home Bryan used 3″ screws with a 1″ wide fender washer. Since the home was built on 2 steel beams at an 8′ interval he used the lip of the steel beams to act as a shelf for the ends of the foam board. The wood joists are a bit shorter than the steel beams so this method worked well.
The drawing below shows it better than I can explain:
Laurel also drew a schematic of the screw placement. She explained that had Bryan not been able to screw into the bottom of the wood joists that he could have used a couple of different options to secure the foam. A thin wooden lathe could have been used as a bridge to hold the foam into place.
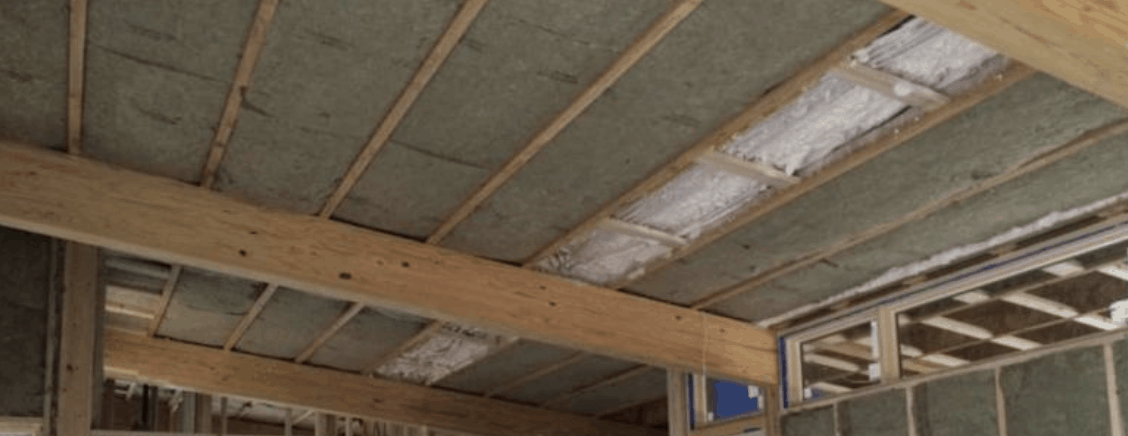
The results of the couple’s DIY insulation project has been a great success! Laurel states that the ‘dead zone’ is long gone and since the foam has insulated the duct-work under the home the forced air heat is reaching the end rooms better.
Using Fiberglass to Insulate Under a Mobile Home
Fiberglass is the most common insulating material. It is made of very fine strands of glass formed in rolls and loose fill batts that are installed between beams, joists, and studs.
Since it is made of glass it is an excellent insulator that is affordable, non-flammable, and water resistant. The downside is that it is fairly dangerous to handle. You’ll definitely want to use protection when working with fiberglass.
Depending on density you’ll get R-value ratings ranging from R-2.9 to R-3.8 per inch.
This is a great video that follow the whole project of removing and installing insulation under your mobile home:
Using Roxul Rock Wool to Insulate Under a Mobile Home
One expert recommended Roxul Rockwool for a few reasons. The following benefits are from the Rockwool website:
Non-combustible stone wool insulation with a melting point of approximately 1177°C (2150°F)
Fire-resistant due to its high melting temperature
Water and moisture resistant; does not absorb moisture to maintain insulating value
Chemically inert
Does not rot or promote the growth of mildew, fungi or bacteria
CFC- and HCFC- free product and process
Made from natural and recycled materials
ROCKWOOL® can contribute to earning LEED® points
Rockwool is a rigid mineral wool insulation sheathing board that is non-combustible, water-repellent, fire-resistant and sound absorbent
Some experts may frown on the 4.5″ left over from each 48″ wide board after getting 3 cuts. That seems kind of silly of a reason to not like a project as the foam can be used on a multitude of other things. You may even be able to get 2 or 3 different areas of your home insulated using the ‘waste.’
In the construction world you have the wrong way and the really wrong way. Everyone has an their opinion and everyone else is wrong. Ask 3 different construction exerts the same question and I guarantee you will get 3 different answers.
It is recommended that all mobile and manufactured homes have a ground moisture barrier. A barrier is usually just a polyethylene plastic sheeting placed directly on the ground and secured under the home to act as another shield between earth and home. it should extend 6″ past your mobile home skirting.
The ground barrier combined with a vapor barrier (whether via a separate belly wrap or foam installation) will protect your mobile home from moisture. It can also deter animals from going under your home and help you locate leaks and water issues as the water will sit on top of the plastic instead of soaking into the ground.
Check your Local Codes Before All DIY Projects
Inspections are a necessary evil in the construction world, regardless of what kind of DIY project you do. Every location, whether in Canada or America, has building codes that must be met for all update and remodeling projects. The location of your home will impact the codes that you will need to meet. Homes in Canada face different issues than homes in Florida so be sure to research your local codes.
Summary for Insulating Under a Mobile Home
Repairing and insulating under a mobile home (or the mobile home belly) isn’t the most exciting remodeling project but it can make a huge difference in your energy bills and your comfort.
Unfortunately, most mobile homeowners have no idea how important the belly of their mobile home is to the overall condition of their home.
If your home is losing heat or seems harder to keep heated or cooled you may want to consider insulating under your flooring as the first step in updating your home.
Insulating your mobile home with foam is proven to be effective. The foam is easy to use and fairly affordable for its high R-value and energy conservation properties.
Laurel states that she doesn’t think insulating the walls would have made nearly as much of a difference as the underfloor insulation has and she would know best, it hit -4 Fahrenheit last week and their home stayed warm and the death zone is long gone.
A HUGE thank you to Laurel and Bryan Adams for sharing their project and teaching us how to insulate and repair a mobile home underbelly. and to Laurel for the awesome drawings!
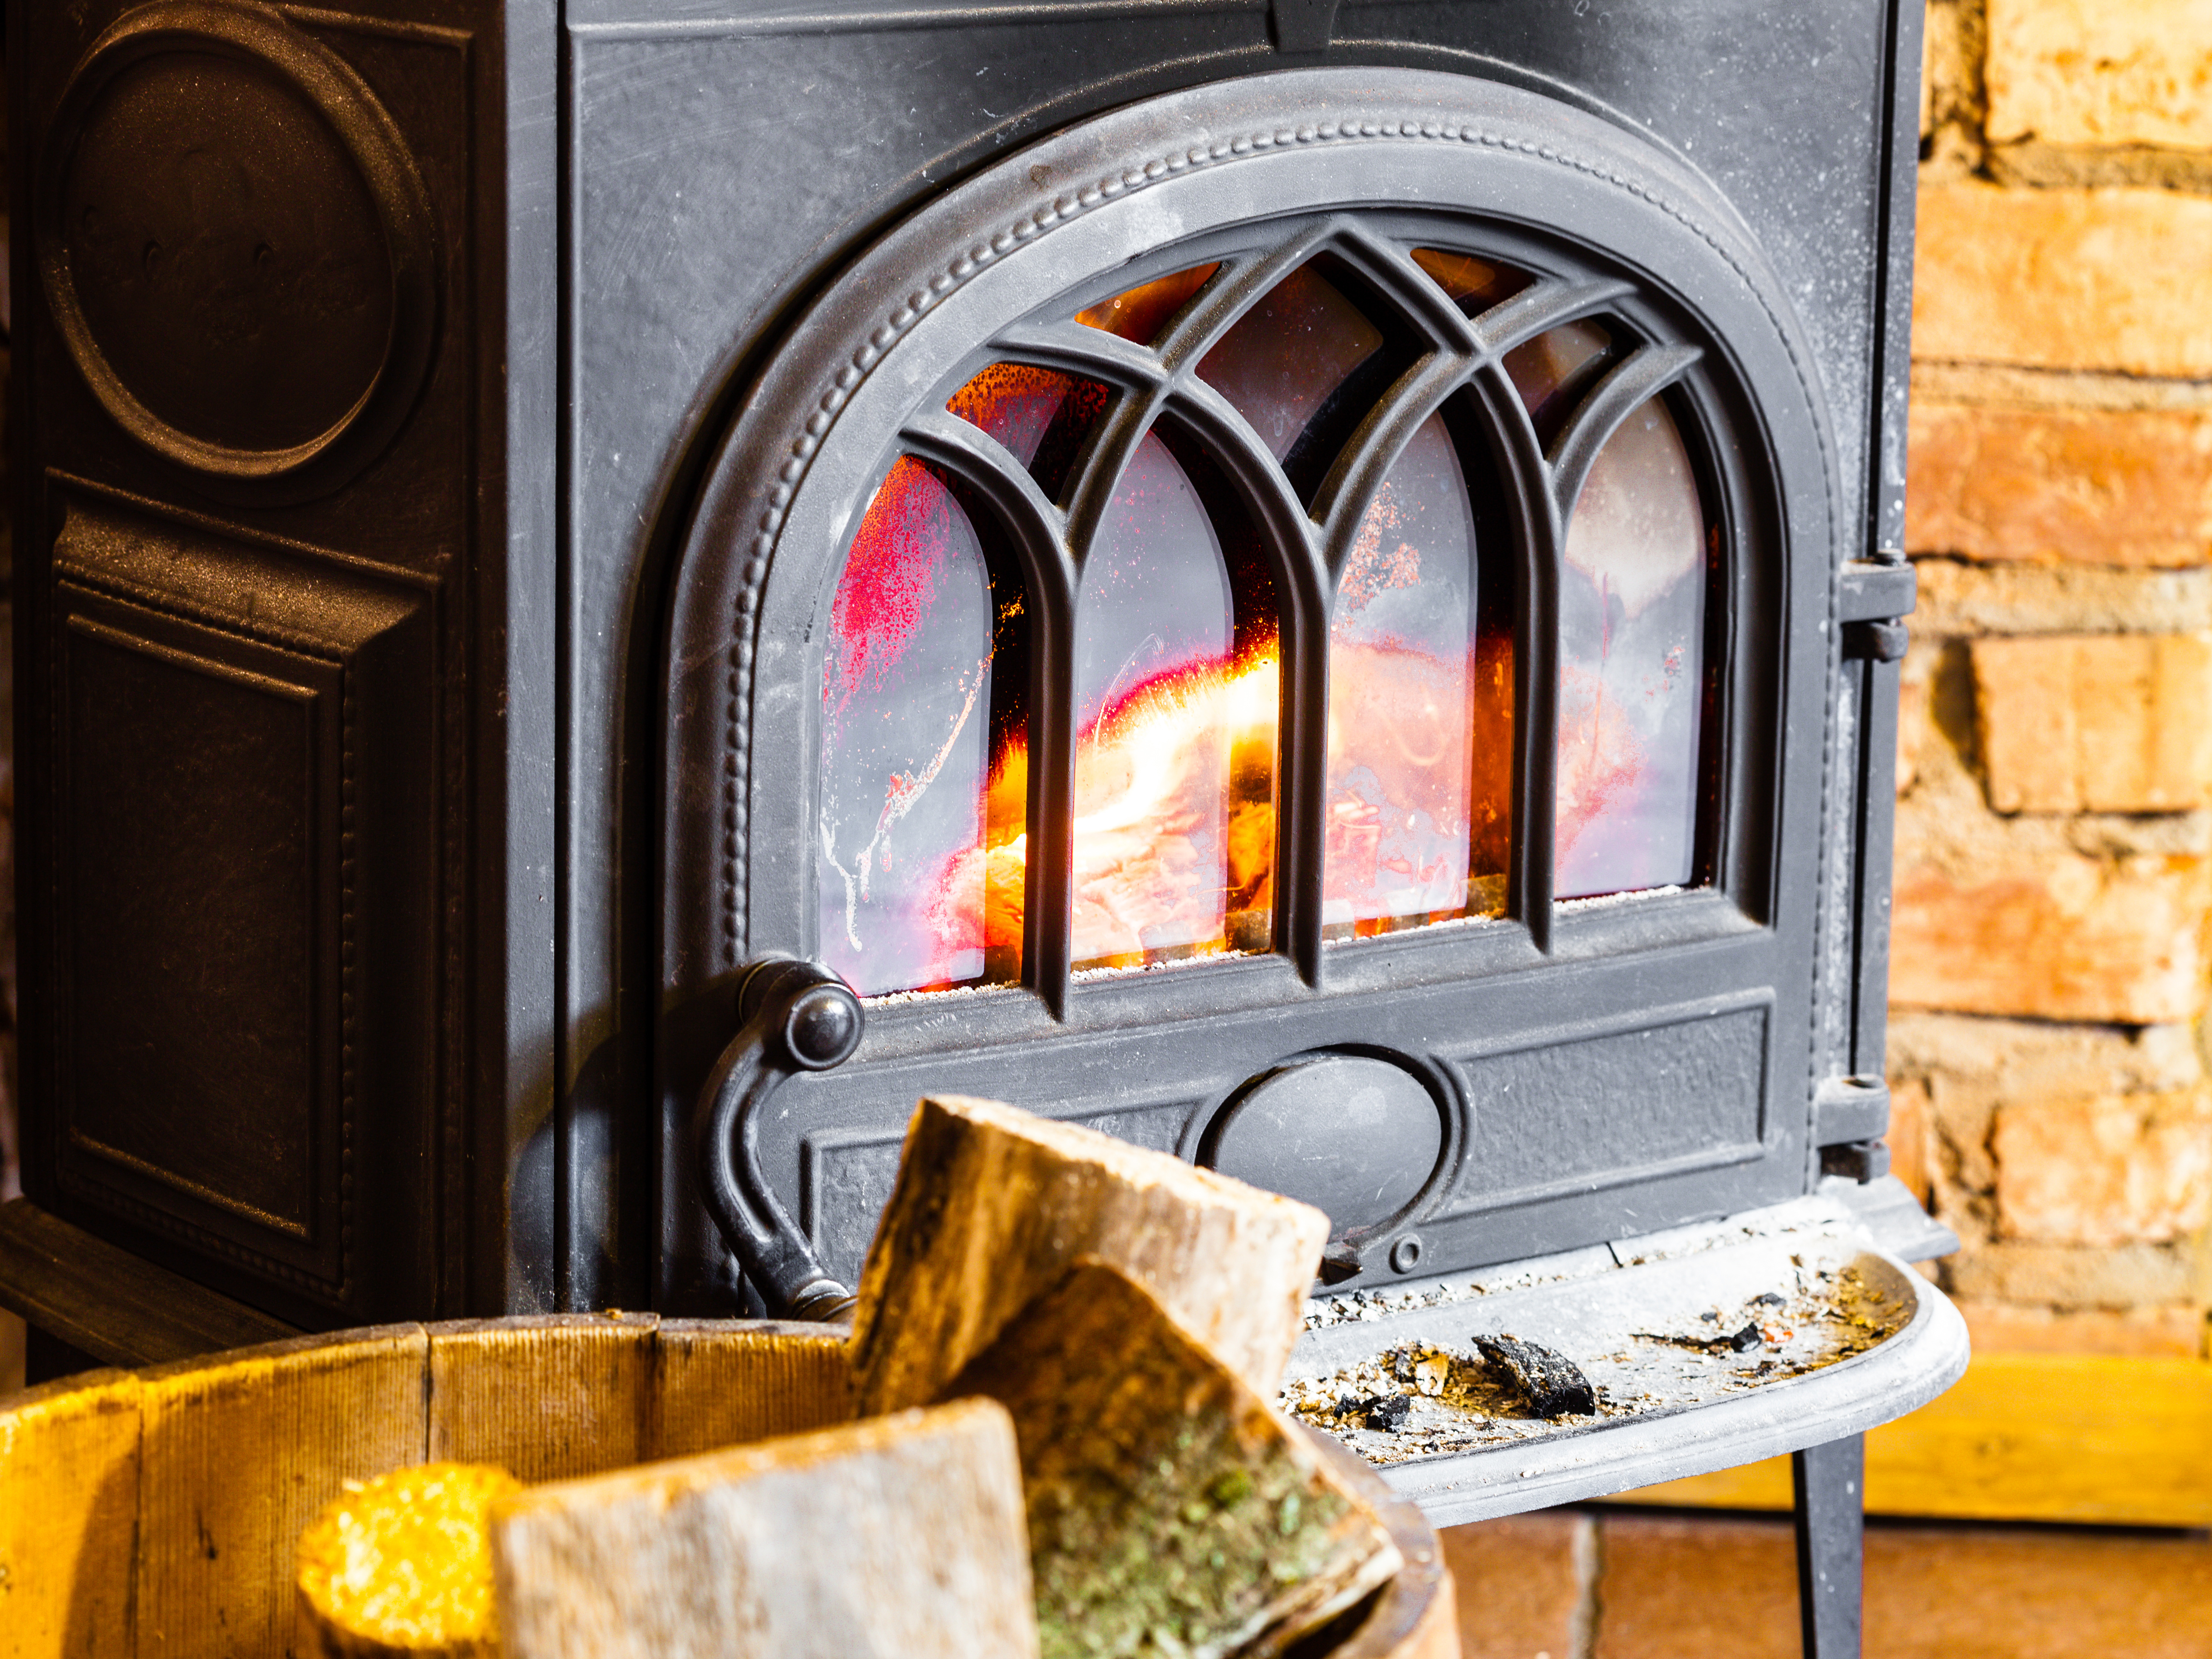
There’s nothing quite like the dry hot heat of a coal or wood stove. I grew up in the coalfields of southern West Virginia and most mines would give their employees ‘free’ coal each year. Every man in my family was a coal miner so I’ve been around coal stoves my entire life. I’m sitting in my WV mobile home writing this and there’s a coal stove about 10 feet away. Like I said, there’s nothing quite like that dry hot heat!
The money you can save on your heating costs is just icing on the cake. And home heating costs are increasing each year so installing a coal or wood stove is smart, for most.
Fair warning, though, insurance companies HATE wood stoves in mobile or manufactured homes. Chances are your home insurance policy will be cancelled if you install one, even if it’s approved for mobile homes.
We’ll cover all the insurance issues related to installing a wood stove in a mobile home along with other important information like how to install a wood stove in a mobile home.
Advantages of Installing a Wood Stove in Your Manufactured Home
Installing a wood stove in your home has many great advantages. One of the best benefits of a wood stove is the ability to have heat when your power goes out. Lower heating costs is another great benefit of a wood stove. If living an affordable or debt-free lifestyle is important to you a wood stove is one of the smartest long-term investments you can make for your home. In addition to the convenience and savings, little can compare to the beauty of a fire along with its comforting snaps and crackles.
A warm fire is the epitome of a cozy home and you can have it in a manufactured home. Of course, there are guidelines that need to be followed and safety concerns that should be addressed. We’ll go over general guidelines for choosing a wood stove for your manufactured home as well as the basic installation steps in this article. Get ready to be warm!
There’s just something about that dry hot heat from a wood stove.
You just can’t beat it!
Dealing with Your Insurance Agency
First and foremost, you must buy a stove that is approved for mobile and manufactured homes. Insurance companies will drop your policy if they find that you have installed an unapproved stove and we all know it’s hard enough to find insurance. Whether the stove will be your single source of heat or just a supplement seems to be a big factor to the insurers – if a stove will be your single source of heat you may have more difficulties so call your insurance agency and discuss the following issues:
Will your insurance raise or be dropped by installing a wood stove? What if the stove is the sole source of heat?
Will you need to have an inspection after the installation?
Does the stove have to be installed by a certified contractor?
Is there a list of accepted stove manufacturers or models that they recommend?
Do they offer guideline sheets or brochures on installing a wood stove?
There are differences between a regular wood stove and a manufactured home approved wood stove and luckily most major stove manufacturers have a manufactured home approved model. The major difference between a regular wood stove and a HUD approved stove for manufactured homes is the air intake, clearance, and chimney system. Because manufactured homes are so airtight it is important to have a good fresh air intake that will enable air from outside the home to enter.
Mother Earth News provides a good summary for choosing a wood stove for a manufactured home:
First, the stove model must have been tested by a HUD-approved laboratory and listed for use in mobile homes. A metal tag permanently fastened to the rear of the appliance indicates the name of the testing facility and the stove’s compliance with HUD Standard UM-84.
Second, a tested and listed prefabricated chimney system—connected directly to the stove and installed properly—must be used. Third, a hard ducting system for bringing outside combustion air directly to the stove’s air inlet is required.
And finally, some means of securing the stove to the floor of the home is called for.
What makes a heater mobile-home approved?
Mobile-home approved stoves have gone through specific testing to show that they can source their combustion air entirely from outside the house. This is required because mobile homes (or manufactured homes) are often very airtight. Should there be a lack of combustion air, harmful levels of CO (carbon monoxide) could accumulate in the house. This is why mobile-home approved stoves have an adapter that hooks-up to the unit and connects to a fresh air intake on the outside wall of the house through an insulated pipe.
As stated by Drolet, a leading stove manufacturer.
Where to Install Your Wood Stove in a Mobile Home
The first thing to consider is where to put your new wood stove. You should find an area that allows an 18″ clearance from the front of the stove and 12″ on the sides and back. You will also have to calculate for a space where the stove can be fastened to the floor.
Installing Your Wood Stove in a Manufactured Home
Now that you have chosen the right stove and decided on its location it’s time to begin the installation. We’ll go over each step and share an image of the process. Please note: The images shown are not of a manufactured home installation or an approved stove setup for a manufactured home. They are for reference use only. All images were posted on Imgur, an image sharing website, by user wijagoro.
Step 1 – Measuring and Taping-Off the Wood Stove’s Location
Measuring your distance from the stove to all combustibles is vitally important. You’ll need to do some math to get it right.
Step 2 – Building the Hearth Pad
You will need to protect the floor from any falling embers and possibly overheating. This is done with a floor shield or hearth pad. You can buy the hearth or build your own using only approved materials. The shield or hearth pad must extend 18 inches past the access door for wood loading and ash removal and extend 12 inches around all other sides. Before you place the stove and heat shield in its final location a few guidelines must be met: the stove must be grounded to the mobile home chassis and the stove must be anchored to the floor to prevent tipping or shifting in case you ever decide to relocate your home.
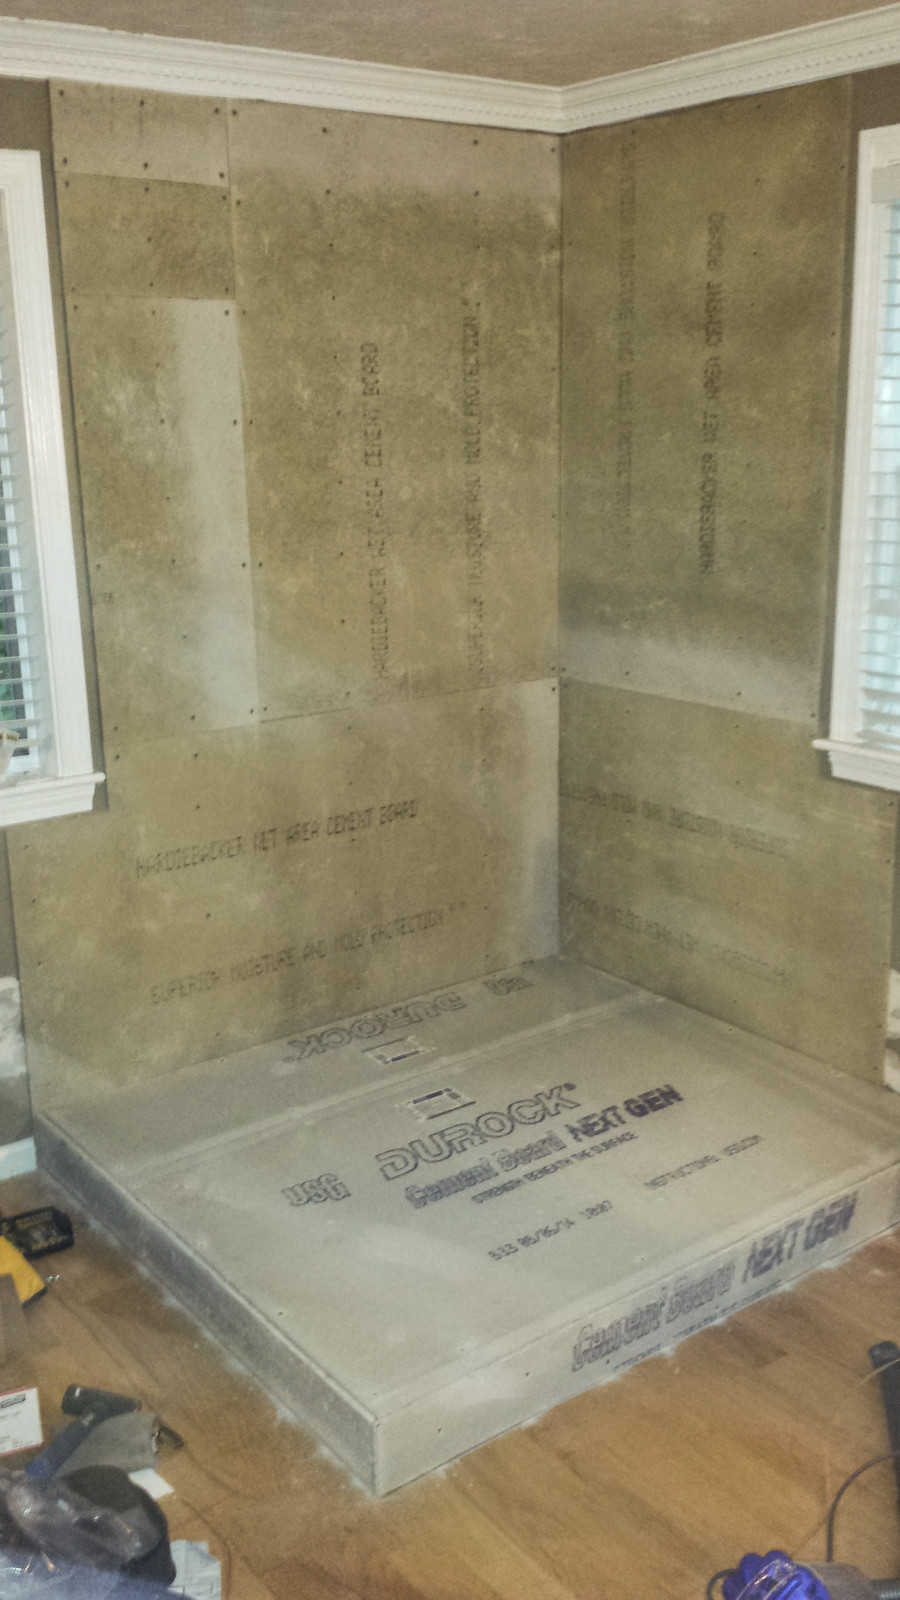
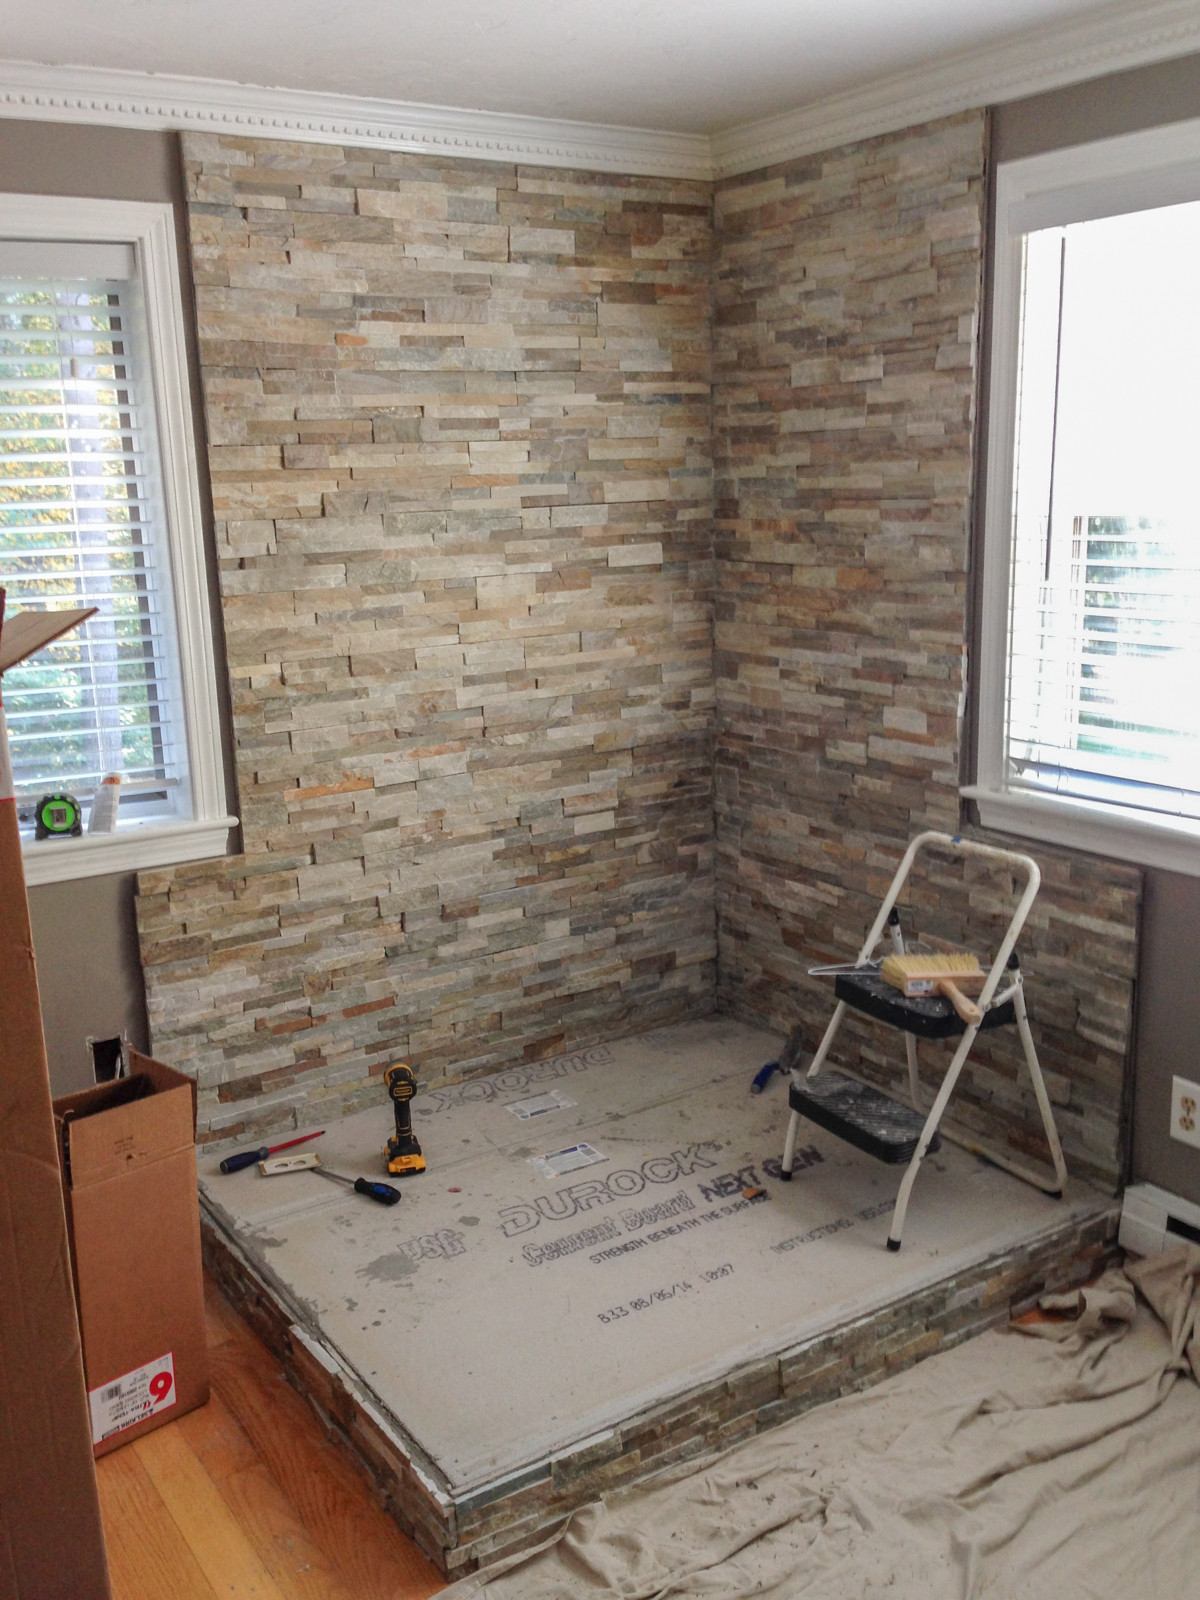
Step 3 – Preparing the Wall and Hearth for Covering
In the image above, the homeowner is covering the wall with non-combustible rock and the hearth with tile. In order to apply the stone and tile, the proper base must be built. As you can see, in this step, the area was covered in plywood first and then cement board is installed. Here you can see the layers of the hearth, notice the DurRock is the first layer, then the foundation, plywood and another layer of DurRock:
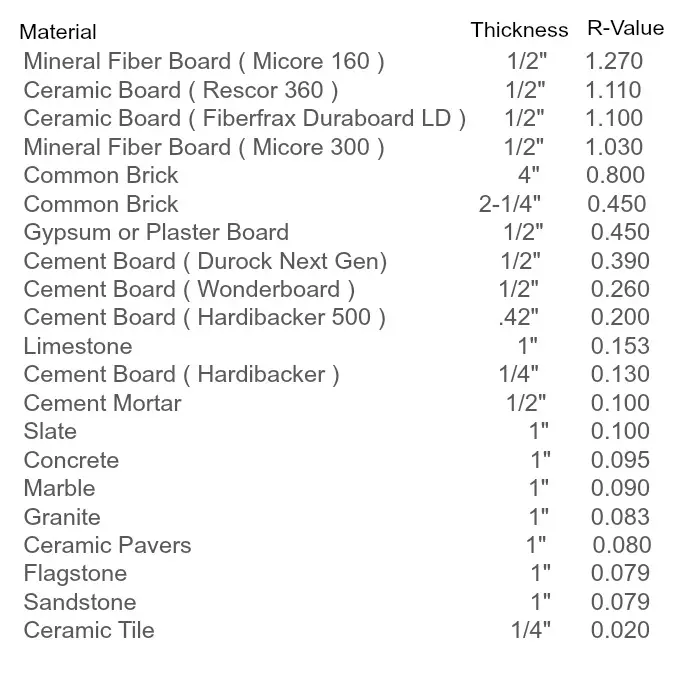
Hearth Material
There are various non-combustible materials that you can use to build your hearth based on R-values and other certified ratings. Here’s a list found on ChimneySweepOnline.com showing the various materials, their thickness, and their R-value rating:
Step 4 – Installing the Stone Surround
Installing a non-combustible material to the surrounding wall is vitally important. In the photos, the homeowner is installing real stone. If you are installing real stone or tile, you should lay the pieces out on the floor to ensure a good look and fit.
You can have a beautiful wood stove surround that is effective and safe:
Step 5 – Installing the Tile Hearth
Step 6 – Installing the Chimney
You’ll need to cut a hole through your roof or the side of your home, depending on code and preference. Either way, you will need to build a frame for your chimney pipe so that it can be supported properly.
A chimney installed through the wall instead of the roof requires the use of tees, elbows, and wall thimbles. You should only use these additional components if absolutely necessary. Offsets and obstructions within the chimney system will restrict the natural draft and take away cosmetically from the overall appearance of your home.
A wood stove that is installed to vent through the ceiling will be most efficient and produce the least amount of creosote deposits because it vents straight up and out without any bends in the structure to obstruct the draft. The best and most widely used method for a wood stove installation is through the ceiling with a high-tech pipe or through an existing chimney.
In the image above the homeowner has built a frame for the chimney. Below, the homeowner is adding the pipe:
Below you can see the pipe secured through the roof:
Black stove pipe should be used in the interior of the home from the top of the wood stove to the bottom of the ceiling or wall where it will connect to the chimney pipe. Make sure you match the correct stovepipe diameter with the diameter of the flue size on your wood-burning stove. You should never use just the stove pipe to pass through a wall or ceiling. The stovepipe is only for use inside of the home.
It is highly recommended to use a double-wall stove pipe regardless of your clearance requirements. Being safe is always a top priority! However, if you decide on a single-wall black stove pipe it requires at least an 18″ clearance to combustible materials. Single-wall black stove pipe will also radiate more heat than double-wall stove pipe, it costs less and can be cut to specific lengths if needed during your installation
Step 7 – Installing the Stove
In the last image, you can see the wood stove has been attached to the chimney. For a manufactured home you would need to permanently attach the stove through the floor as well. You can also see a heat shield sitting behind the stove as an added safety precaution.
Here are some more helpful resources on wood stoves for manufactured homes:
In thisexhaustive mobile home heating guide, we cover the basics of both electric and gas furnaces as well as mobile home heat pumps.
If you’re having an issue with your mobile home heating system this is a must-read.
It’s a good idea to read this guide if you’re having an issue with your cooling system too. That’s because the heating and cooling systems are considered to as a single system referred to as HVAC.
HVAC stand for Heating, Ventilation, and Air Conditioning.
Mobile Home Heating: 3 Main Parts of Every Heating and Cooling System
A mobile home HVAC system is composed of 3 major components:
1. The heating or cooling source (the furnace that heats and the AC that cools)
2. A single control system usually known as the thermostat
3. The distribution system or duct system that carries the modified air throughout the home
Mobile Home Heating and Cooling Control Systems
In most cases, your mobile home heating and cooling system will share a single control device most commonly known as a thermostat.
The thermostat is a small box that tells the rest of the system what to do. You can usually find it located on a wall in the middle of the your mobile home.
Control System
Simply put, a control system thermostat or control panel on your wall that tells the furnace, AC, or heat pump to kick on.
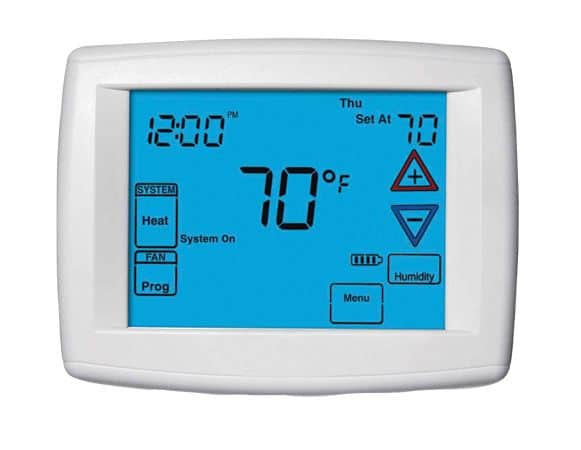
There are digital and mechanical thermostats.
What is a Mechanical Thermostat?
Mechanical mobile home thermostats are also called snap discs or snap action mechanical thermostats. They use a small bimetal strip that expands and contracts with temperature changes. When the metal strip expands it disconnects from the contact to switch the system off. If the metal strip constricts it makes contact with the wiring to kick the system on.
Mercury-bulb thermostats were also popular. Mercury, an element that conducts electricity but acts like water, is inside a small glass tube. Whenever it tilts, it will make or break contact with 2 wires on each side to tell the system to kick on or off.
Mechanical thermostats are very cheap ($10) but they are not very precise. That’s why digital thermostats are recommended by HVAC experts.
What is a Digital Thermostat?
Digital thermostats can be programmed to automatically cut mobile home heating systems on or off anytime you need them. If everyone works or goes to school from 8-5 you can keep the system from turning on and off as much. There are some thermostats with wifi capabilities that work with your smartphone.
Air Care Heating and Coolingstates that digital thermostats should be used in all homes now. Installing a digital thermostat can save between 5-20% of your heating and cooling costs right off the top. You can get smart thermostats that can save even more based on your family’s schedule.
Mobile Home Heating (or Cooling) Source
The most popular mobile home heating sources are furnaces and heat pumps. Wood stoves, fireplaces, and space heaters are also popular.
There are different furnace designs such as up-flow and downflow or sealed combustion. And there are different fuels that power mobile home heating systems but electricity and gas are the most common. We’ll cover them below.
All heating and cooling sources must be designed and rated specifically for mobile homes.
Sometimes they are labeled ‘HUD-Approved’ or even ‘high static approved.’
Distribution System – Ductwork and Vents
Your mobile home heating system uses insulated duct work to move the warmed air throughout the home.
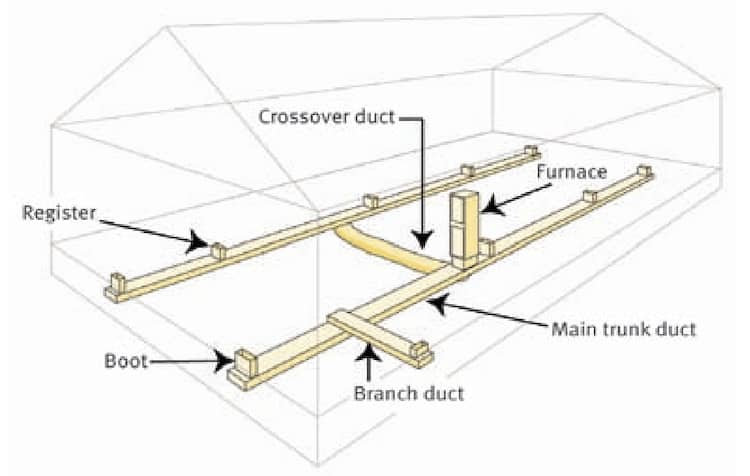
The ductwork is comprised of the main trunk ducts and crossover ducts, or flexible tubing, is used to connect the two main trunks of a double wide.
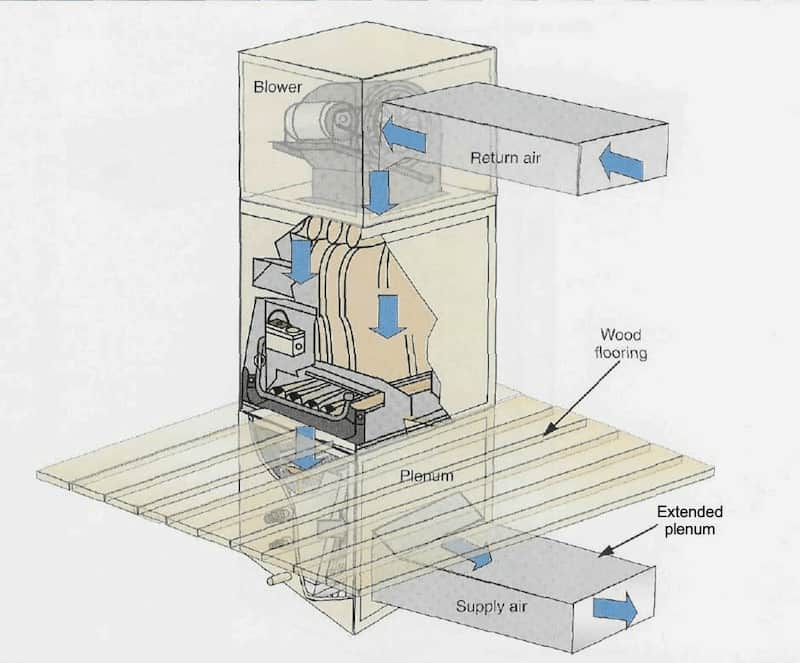
The main trunk duct carries the heated air to each register to warm a room. The plenum is usually the part of the ductwork that is directly around the heat exchanger or furnace.
Source: Energy.gov
The distribution system of a mobile home heating system is mostly made with sheet metal ductwork. These ducts run right down the middle of a mobile home. For double wides, the main truck ducts run down the middle of both sides. These ducts need to be maintained and updated whenever possible. Learn how one reader insulated under their mobile home with foam board and saved a ton on heating costs.
What is Improper Static Pressure?
Mobile home-approved heating and cooling systems are also called HUD-approved systems or high static approved. High static is an issue that occurs in heating systems when the ductwork is too small for the amount and force of the warm air traveling through them. These small ducts are an issue when trying to calculate the proper sizing for a furnace or air conditioning unit.
In mobile homes, the supply ductwork is considered to be too small for effective operation but so is the return supply. It’s recommended that you always upgrade your ductwork when you install a new heating or cooling unit.
If the resistance to the air circulating through the ducts of any heating and cooling system is too great the unit will have to work harder to push the air through the ductwork. This will compromise the efficiency of the unit and leave parts of the home too hot or too cold depending on the season. If the resistance gets too strong no air may flow through the system at all. DSCR.com
What is a Forced-Air Heating System?
Most mobile homes use a forced-air heating system. This just means that the air is driven through the ducts with a motorized blower. The warm air is pushed out of the furnace and into the ductwork to escape through the registers, or vents, and into the rooms.
The warmed air in the home is then sucked back into the furnace via a return duct and the cycle repeats. It’s a closed system and without the blower pushing the air through the ducts and acting as a suction for the return air the home wouldn’t get or stay heated.
While the blowers are always powered by electricity, the heat itself can be produced by different methods. Natural gas and electric furnaces are the most common but oil-burning furnaces are still around.
What Is a Downflow Furnace?
Furnaces are designed to blow the heated air it creates in one of 3 directions or orientations: up-flow, downflow, and horizontal flow. Up-flow means the blower pushes the heated air up because the furnace is lower than the ductwork. Horizontal flow is used for furnaces that are located on the same level as the ductwork.
Mobile homes will always use the downflow orientation because the furnace is sitting in a small closet in the middle of the home and the ductwork is below it. The blower needs to push the heated air down into those ducts.
Downflow furnaces are designed to pull the air in from the top of the furnace, heat the air, and then blow it down through the ducts under the furnace floor to heat the home. The blower pulls the warm return air back into the unit through vents via a suction created by the blower fans. Mobile homes may have a large vent in the floor or wall close to the furnace that will allow the return air to reach the furnace again.
How to Find the Right Size Electric Furnaces for your Mobile Home
AFUE stands for Annual Fuel Utilization Efficiency. It’s the grading scale of efficiency used by the Dept. of Energy and measures how well the furnace converts fuel to heat. For example, the minimum efficiency allowed is 80% now which means the furnace converts 80% of the fuel to heat and the other 20% is lost.
BTU stands for British Thermal Unit and is a measurement of the amount of heat that is required to raise the temperature of one pound of water by one degree. All HVAC systems use BTU as a standard measurement.
The Cool Calc has a free plan that can help you determine the right heating and cooling equipment for your home using the Manual J method. Trane shares the following list of variables that must be considered to calculate the right heating and cooling systems:
Factors in Mobile Home Furnace Sizing
Square Footage
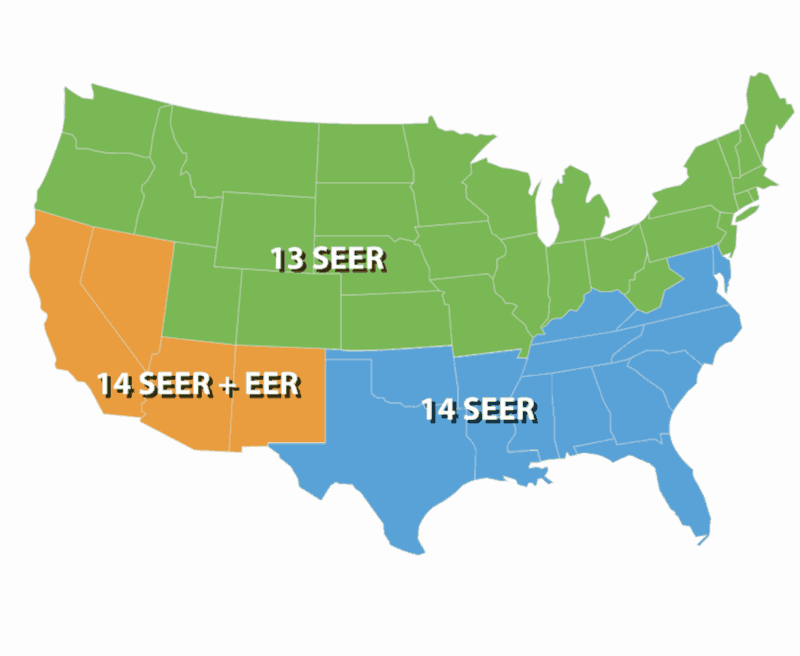
Climate Zone (see image below)
Ductwork Size
Number and style of windows
Natural shade or sunlight
Quality and amount of insulation
Number of people using the space
Heat-generating appliances
Square Footage and BTUs
Trane also shares the following chart to find the right BTUs needed for the square footage of your home. The left column is the square footage of your home and on the right are the BTUs needed to heat it:
Rule of Thumb — The maximum size unit you should buy would be 15% over the BTUs you need for cooling and 40% of the BTUs for heating. The max for heat pumps is 25% since it handles both cooling and heating. (Source)
Trane
You can use HVACDirect’s Sizing Guide here to find the right-sized furnace and AC for your mobile home.
Furnace Stages, Motor Speeds, and Dual Fuel
Mobile home furnaces are available with many options. The most important is furnace stages, motor speeds, and fuel type.
A one-stage furnace is either on or off. It has a fixed gas valve that releases gas at one speed and a single-speed blower. On a two-stage mobile home furnace, both the gas valve and the blower motor have a fast and slow setting. This can save energy costs because milder days won’t require a wide-open running speed. On most furnaces, the slower setting is the one that is used most often.
The third option is the type of fuel the furnace uses. Electric furnaces will run only on electricity but gas-powered furnaces can be modified to accept oil or propane. This is called dual fuel.
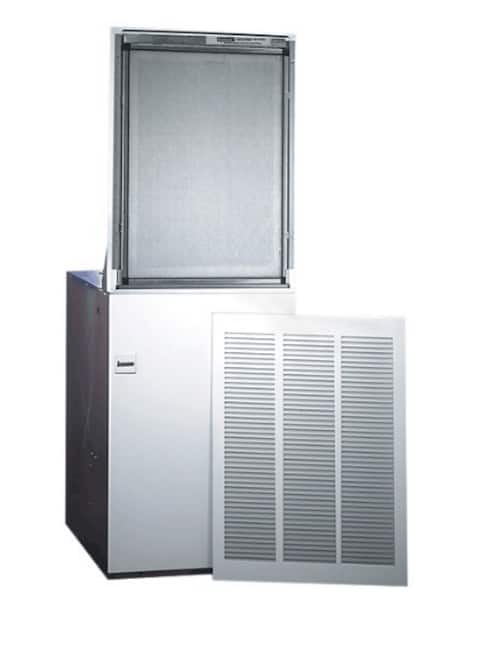
Electric or electric resistance furnaces are basically big toasters. The red coils that toast your bread are used on a much bigger scale to heat your home.
An electric furnace has a cluster of elements, or resistance coils, that get very hot one by one. This staggered heat keeps the system from overloading the mobile home’s electrical system. A fan, or blower, pushes the hot air through the ductwork to heat the home. In a site-built home, the furnace would use supply ducts to send the heated air back into the unit to get heated again but mobile homes don’t have these supply ducts.
Electric furnaces use multiple safety features to keep the unit from getting too hot. Since there isn’t a lot to electric furnaces, and there’s no combustion gas to vent, they usually last longer than their gas or oil counterparts.
Source: Energy.gov
Natural Gas and Propane Furnaces for Mobile Homes
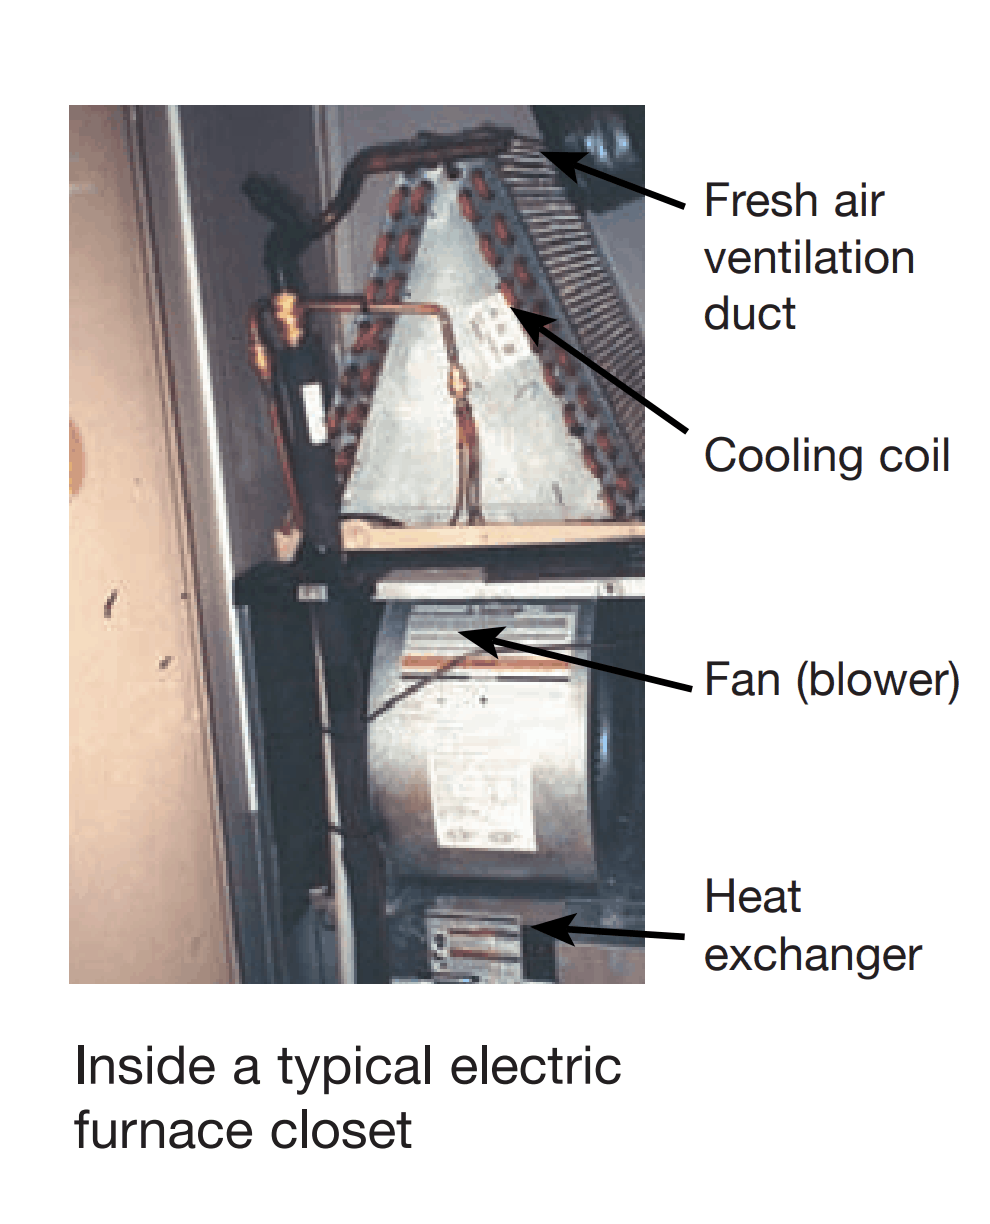
What are Sealed-Combustion Furnaces?
Gas furnaces create heat using combustion. A sealed-combustion furnace uses combustion air or fresh air that comes down through the roof jack. Once the combustion has occurred the spent air goes out the bottom. The firebox and flue are closed off to the inside of the home.
New manufactured home gas furnaces must be approved for manufactured homes by HUD and they must be sealed combustion.
Sealed combustion furnaces bring outside air directly into the burner and exhaust flue gases (combustion products) directly to the outside, without the need for a draft hood or damper. Furnaces that are not sealed-combustion units draw heated air into the unit for combustion and then send that air up the chimney, wasting the energy that was used to heat the air. Sealed-combustion units avoid that problem and also pose no risk of introducing dangerous combustion gases into your house.Energy.gov
Natural gas furnaces are more efficient than electric furnaces and are rated by the AFUE or Annual Fuel Utilization Efficiency.
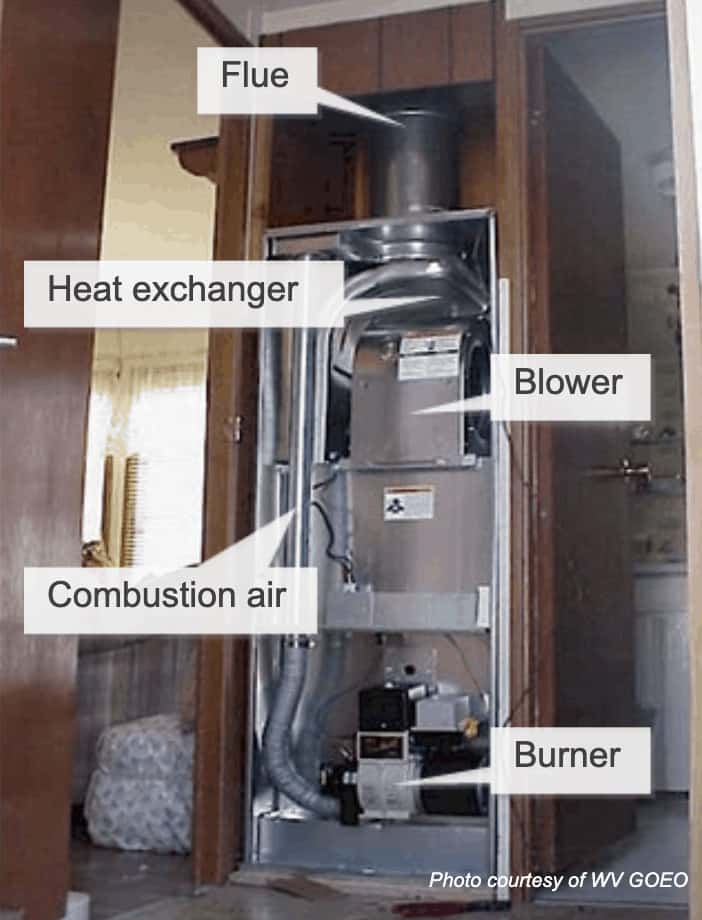
In older gas furnaces with less than an 80% efficiency rating, combustion is created by constant pilot light. When the gas valve is opened, the gas flows over the pilot light to ignite it and create heat in a combustion chamber. Then the heat moves into a container called a heat exchanger where a blower blows it through the ductwork under the mobile home.
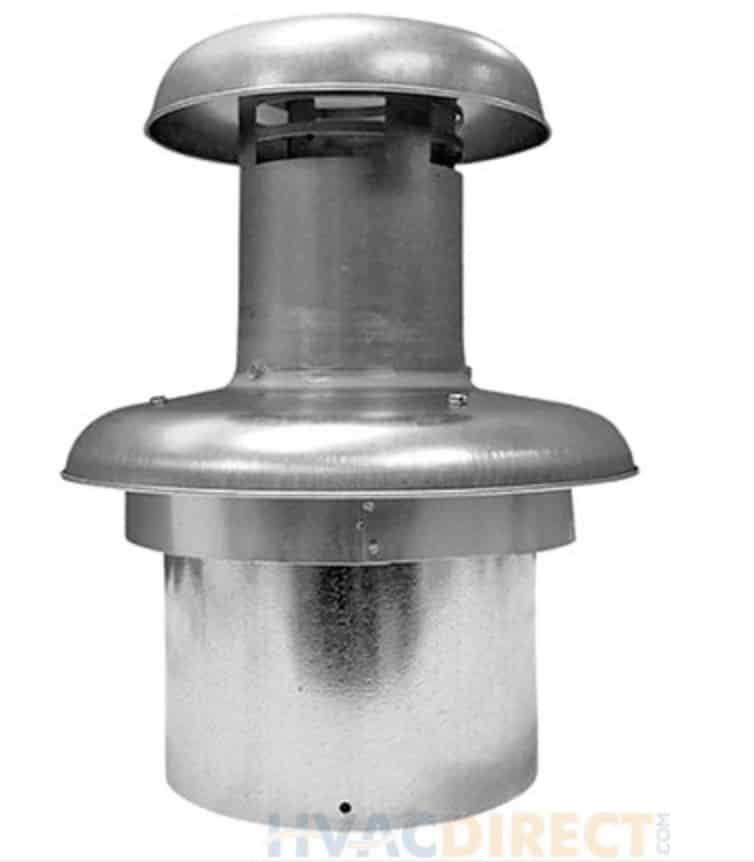
The older gas-powered furnaces need a special venting system to pull in the combustion air or air used to create the combustion and to release the spent gases that were created by the combustion. To do this with just one hole in the roof a special chimney or pipe called a roof jack is used.
A roof jack is simply a metal pipe inside another metal pipe. The outer pipe pulls in the fresh air and the inner pipe releases the spent air/gas.
Newer gas furnaces with an 80% or higher efficiency rating will not have a constant pilot light. Instead, an electrical control board or ignitor creates a spark on demand. The gas then flows through the burner to create combustion in the heat exchanger. The blower still pushes the heated air through the home.
Gas furnaces still need electricity to power control boards, valves, thermocouples, and blower that forces the warm air through the ductwork and into each room in the home.
Gas furnaces still need electricity to power control boards, valves, thermocouples, and blower that forces the warm air through the ductwork and into each room in the home.
Atmospheric Sealed-Combustion Downflow Gas Furnace
Atmospheric gas furnaces use the weight difference between hot and cold air to create a warm home. It’s a cyclical system where the combustion air enters and exits in the same double-pipe flue. Cold combustion air goes down the outer ring of the flue and into the furnace to the heat exchanger. That air is mixed with the gas at the flame, the warmed air is forced through the ducts and the flue gases go out the roof. The cycle produces a vacuum that pulls more fresh air from the flue into the firebox.
Natural gas, or atmospheric sealed-combustion downflow gas furnace, has a specially designed flue that pulls fresh air into the furnace from the crawl space of a mobile home and into a heat exchanger to get warmed, and then the blower pushes that warm air through the ducts to heat the home.
Forced Draft Gas Furnaces
Forced draft gas furnaces have a small fan called a draft booster that pulls combustion air from the outside via a chimney or pipe. It pulls the air into the firebox and pushes the exhaust gases out.
HSPF is the Heating Seasonal Performance Factor. It’s the most used measure of a heat pump’s heating efficiency. SEER is the cooling efficiency of a heat pump.
SEER stands for Seasonal Energy Efficiency Ratio and it measures the cooling efficiency of an air conditioner or heat pump. Trane states the formula to calculate the SEER taking “the cooling output for a typical cooling season divided by the total electric energy input during the same time frame.” Think of SEER like gas mileage – the higher the number the better. An air conditioner rated at 13 SEER uses 30% less electricity than a unit that has a 10 SEER.
Ton or Tonnage describes the cooling capacity of an air conditioning system in relation to melting one ton of ice in a 24-hour time frame. One ton of air conditioning cooling is equal to 12,000 Btu per hour. For example, it takes 288,000 Btu to melt one ton of ice in 24 hours.
Choosing the right size of heating system is tricky with mobile homes that have the original ductwork. As mentioned above, mobile home ductwork is thin and small compared to site-built home ducts. Many ducts in mobile homes are only 4″x 10″ and when they are that small they will interfere with the heat pump’s efficiency and SEER ratio. See above for the mobile home furnace sizing guide.
Heat pump seems to be a terrible name for a unit that cools but once you understand how a heat pump works you’ll see how it got its name. Refrigerators and air conditioners work by removing hot air, or extracting it, and putting it somewhere else, usually coils. So, it pumps heat away. Get it?
A heat pump has a refrigeration system with two two copper coils, one inside and one outside, and a compressor. When heating, the liquid refrigerant pulls the heat from the air. Energy.gov explains the process well:
A heat pump’s refrigeration system consists of a compressor and two coils made of copper tubing (one indoors and one outside), which are surrounded by aluminum fins to aid heat transfer. In heating mode, liquid refrigerant in the outside coils extracts heat from the air and evaporates into a gas. The indoor coils release heat from the refrigerant as it condenses back into a liquid. A reversing valve, near the compressor, can change the direction of the refrigerant flow for cooling as well as for defrosting the outdoor coils in winter.
A heat pump can heat a home but they aren’t so efficient when the temperatures get below freezing. A common complaint is that the air is warm but it isn’t warm enough. They are better paired with a furnace that has a 4-speed blower. They do fine cooling homes in the summer, especially in mild climates.
The air handler in the existing furnace would be used by the new heat pump and the furnace’s coils can be used as a backup heating source. Supply ducts on heat pumps should be insulated to prevent sweating and critter damage.
Heat pumps can be added to an existing mobile home furnace. However, the components must be properly sized for efficiency. It’s always better to buy and install everything for your mobile home heating and cooling system at one time. That includes ductwork.
How Much are Mobile Home Heat Pumps?
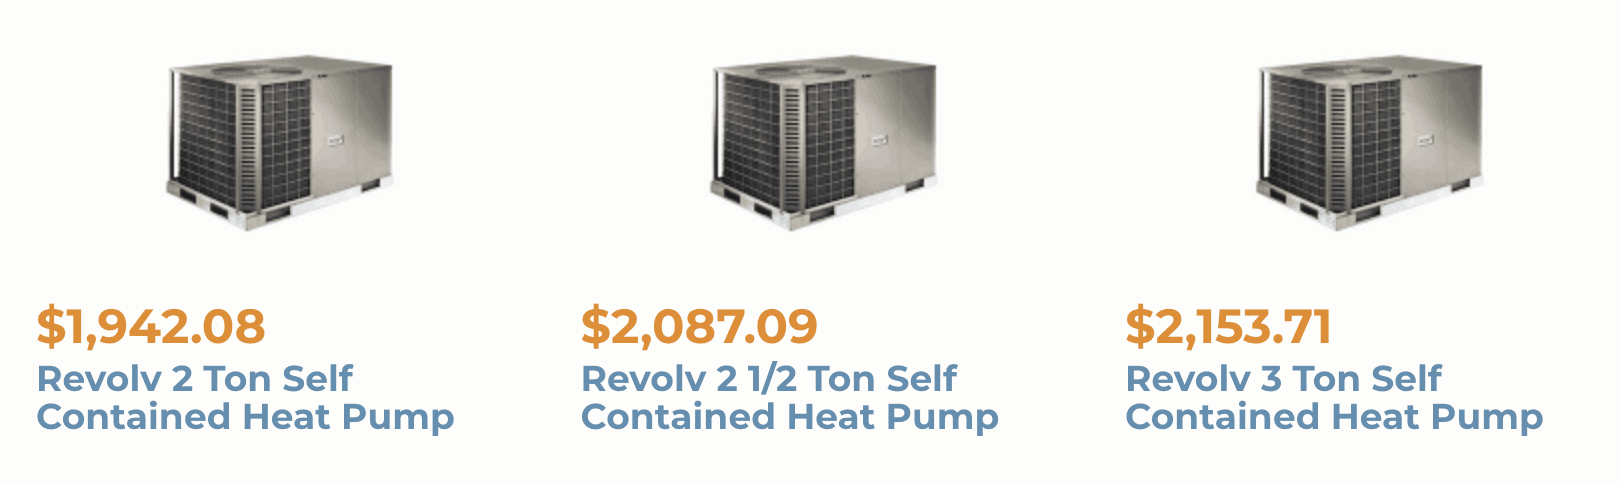
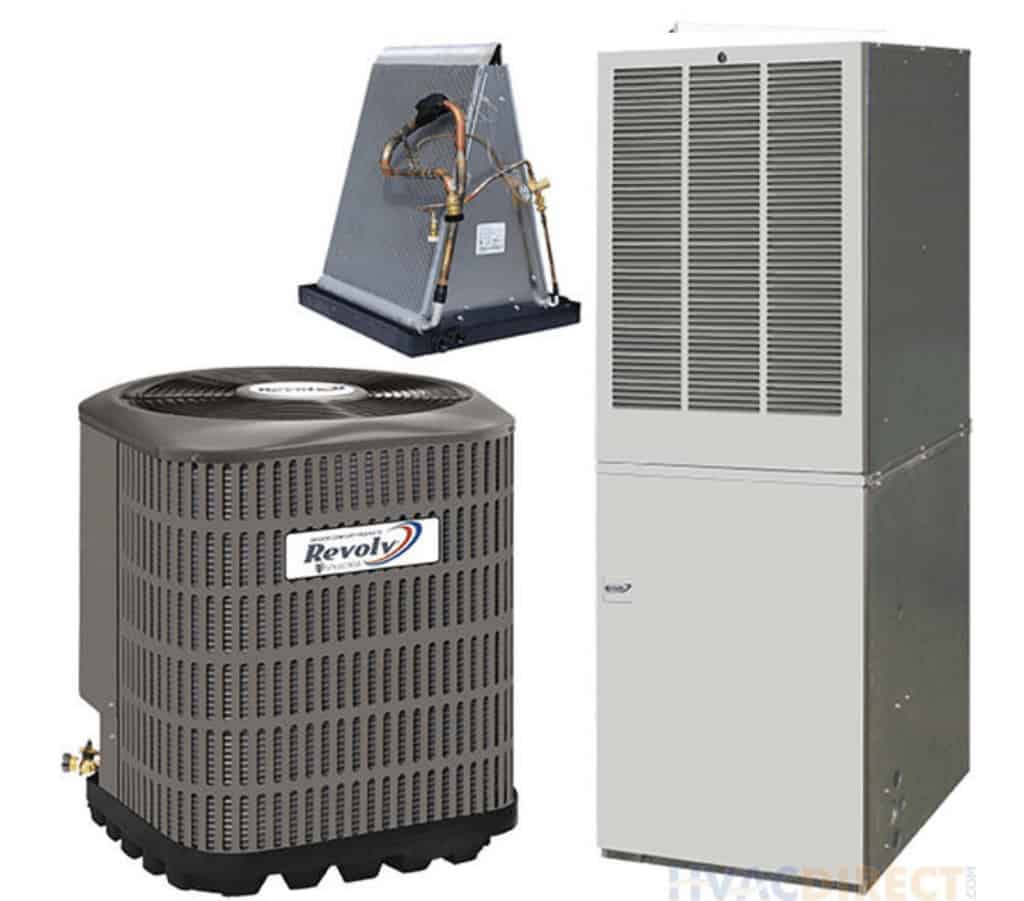
Mobile home heat pumps are more expensive because they produce both cool and warm air. A popular brand of mobile home heat pumps is StyleCrest’s ReVolve. They come in several different sizes, from 2 tons to 4.
The 2 Ton 14 SEER Revolv AccuCharge Mobile Home Heat Pump with 24,000 Btu is $1,545.95 at HVACDirect.
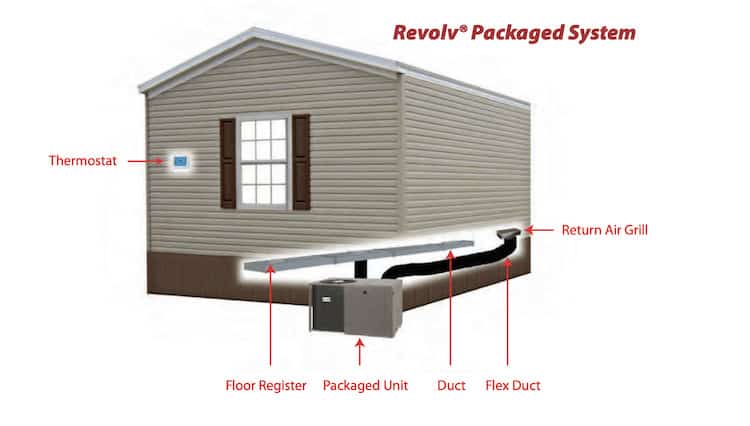
Packaged Heat Pump Units
A packaged unit contains all the heating and cooling elements in one large outside unit. Packaged units are easier to install than split systems, but if you have the room, we recommend a split system since it is more energy-efficient. Heat pumps aren’t the greatest at heating homes below 35-40 degrees.
When choosing a new unit be considerate of the company you buy from. Make sure there is a sound warranty and 24 hour furnace repair.
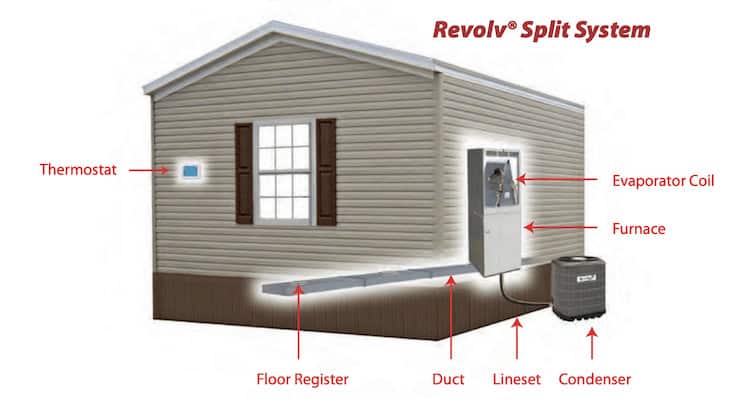
Split Unit Heat Pump Systems
A split system has the heat pump or AC condenser sitting outside of the home while the furnace, evaporator coils, and air handler are inside. Split systems are great if your home’s furnace is working fine and you just want to add air conditioning to your home. However, many homeowners tend to overestimate how big of a system they need and buy a unit that’s too big. This causes dehumidification within the system and higher energy costs.
Matching Your Split Unit Components
You will need to make sure your new mobile home system is compatible with your old one. StyleCrest, the nation’s biggest supplier to manufactured housing builders has a properly cross-reference matching guide that will help you choose the right parts. Technically, this is for their distributors but it’s not difficult to use. You can find the mobile home heat pump matching chart here.
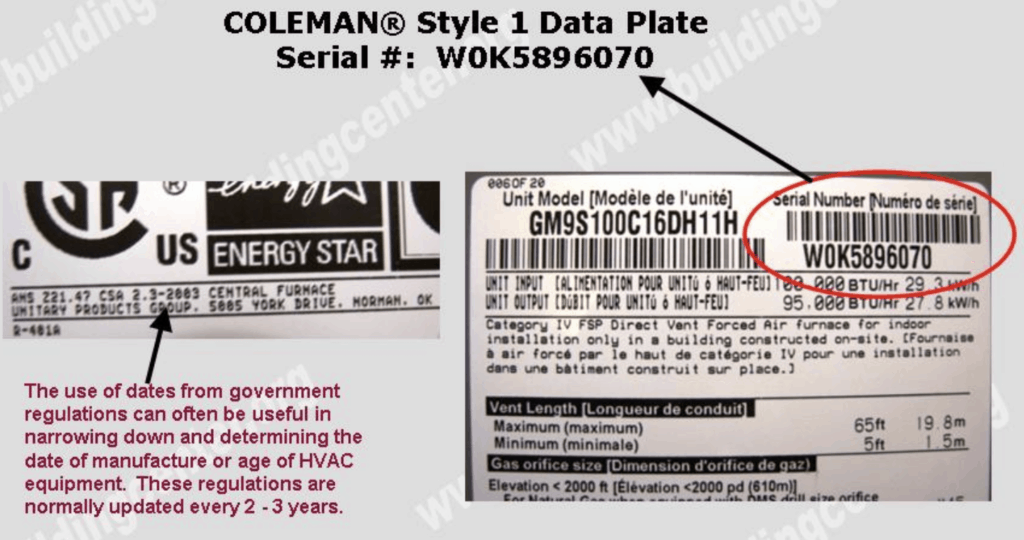
Coleman is another top furnace company and apparently, they have a confusing serial number system. I found the following images online:
How Much are Split Systems?
Currently, at HVAC the 2.5 ton 14 SEER 20KW Revolve Accucharge mobile home heat pump and electric furnace system run $2,838.85.
Hopefully, you understand a bit more about mobile home furnaces, heat pumps, and heating systems in general.
Any new mobile home heating system must be approved for your manufactured home. You cannot use a unit designed for a site-built home. With the new technologies and EnergyStar guidelines, we have some really amazing mobile home heating systems on the market. Unfortunately, they aren’t cheap but with the high-efficiency rating, you can recoup your investment in a few short years.
Thank you for reading Mobile Home Living®
Please note, that if I don’t fully understand a subject I will reach out to experts to make sure I’m sharing accurate information (I’m just a plumber’s helper so HVAC is a bit out of my league). In this case, the experts at HVAC Direct helped me with this article and also allowed me to become an affiliate. That means I will get a small percentage of the sale at no cost to you if you buy anything using the affiliate links in the article. It was a win-win for me and I appreciate their kindness very much.
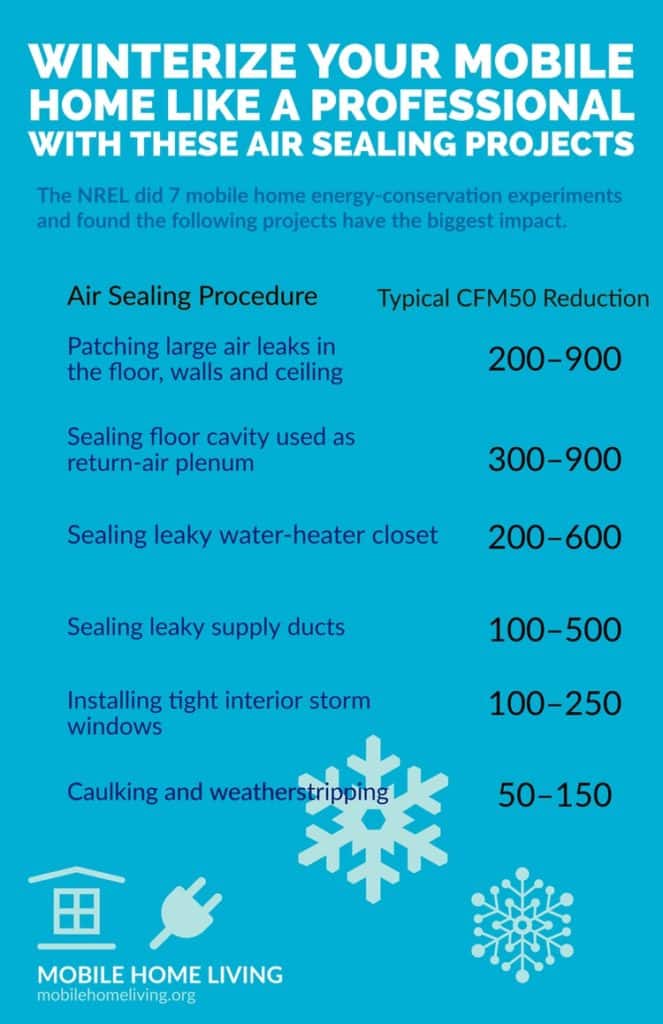
Winterizing a mobile home means more than just caulking around doors and windows and adding insulation. Most of us already know to do that. The following tips will help you winterize your mobile home like a professional.
These lesser-known energy-conservation tips have been tested by the National Renewable Energy Laboratory or NREL, in a partnership with the Department of Energy. They tested 7 different mobile homes and determined which winterization, energy conservation, and air sealing projects worked best.
It’s a constant battle to keep cold air out of your home during the winter. Usually, when a mobile homeowner thinks about air leaks in their home they immediately think about doors and windows but that’s not where most air leaks are found. Per the NREL, the following are the top places that should be sealed and winterized to best conserve your energy and save you money:
Furnace and Duct Systems
Return air plenums, especially in the 1970s and 1980s model homes that have large return air-ducts on the floor or ceiling. You’ll need to hire an HVAC professional for this but if your home has this kind of setup it will be a good investment. It’s recommended that these openings be sealed off and return registers furthest from the furnace be rerouted using flex duct.
If your furnace closet has a main return-air opening in the floor or ceiling that should be closed off as well and new openings created in the door or sidewalls of the closet so the furnace blower pulls its return air from within the home. HUD requires at least 2 square inches of return air area for every 1000 Btuh of furnace capacity. Be sure to hire a professional to do this.
Forced-Air Supply Ducts
Sealing the furnace base and duct connector, or boot, can reduce air leak and save money on utility bills. Forced-air supply ducts have high air leak potential. The ducts are usually in the floor but Southern homes may have them in the ceiling. These ducts or tunnels and the boots that connect the ducts to the home can allow a lot of cold air into your home if they aren’t regularly sealed.
Using Butyl Tape and Mastic to Seal Ducts
To seal the ducts and boots, you can use silicone caulking for smaller holes but you’ll need aluminum-foil butyl tape or mesh tape to seal the corners, joints, and cover larger holes. You’ll then apply a thick layer of mastic. For especially large holes you’ll need to fasten a sheet metal patch over it and then seal the edges with tape and mastic. Be sure to apply mastic over butyl tape to make it last.
You don’t have to crawl under the home to do this. While sealing your ducts from below the home is always the better choice you can do a little duct sealing and winterization from inside your home. You can read our guide to sealing mobile home ducts here.
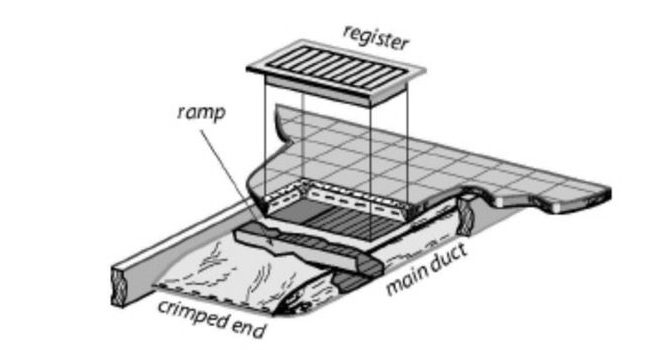
The registers are usually just crimped to the main duct. Sealing this area with mastic or tape can help reduce air leaks.
Plumbing Areas and Water Heaters
Plumbing in a mobile home is different from a site-built home in one major way – the pipes rise up through the floor instead of through walls. This creates a lot of cracks and crevices that allow cold air to enter the home. To truly winterize your mobile home you will need to seal around all supply and drain pipes.
Pay special attention to seal around your washing machine supply and drain lines, under all your sinks, and even under your bathtub if possible. Your water heater chimney will be another location to inspect and sealed if needed.
Exhaust Fans
HUD began requiring exhaust fans in manufactured home kitchens and baths years ago. Because they are out of sight a lot of homeowners don’t think about them when they winterize their homes. This is a mistake. You’ll need to caulk around the exhaust fan and its register around your ceiling so that the cold air doesn’t reach the interior of your home.
Marriage Line
The marriage line on a double wide has a rubber seal that helps seal the two sides together to form an airtight membrane. However, these seals can’t work properly if the home has become unlevel. Sealing and adding insulation around the marriage line is never a bad idea.
A Double Wide For Sale On The Dealer’S Lot. The Marriage Line Has A Seal But It Can Become Brittle And Settling Can Damage It Over Time. Image Source: Flickr – Ginosalerno.com
Light Fixtures (and Receptacles)
A lot of articles about winterizing your mobile home forget to mention that your light receptacles and light fixtures are well-known to leak air. Mobile homes are built and insulated in a way that creates air gaps between your interior walls and siding and ceiling and roof. Any hole in your walls or ceilings will allow that air to flow so it needs to be sealed. You can use caulk for smaller cracks but if it’s a large crack you may need to create a frame to rest between the receptacle and the wall or ceiling.
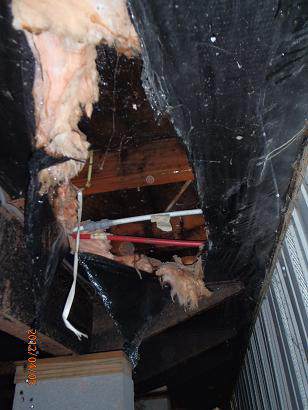
New insulation should be added between the joists and then the belly wrap needs to be patched or replaced quickly.
Damaged or Missing Underbelly and Insulating Blanket
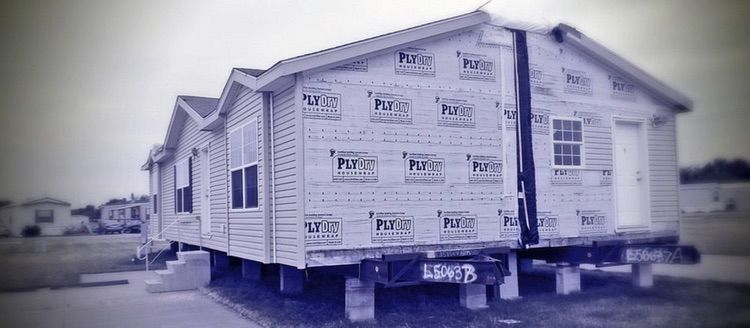
The underbelly is the sheeting attached to the underside of your mobile home. Older mobile homes have underbellies made from heavy tar paper or asphalt-impregnated fiberglass cloth but new homes use fiber-reinforced polyethylene. If the underbelly is missing or damaged you absolutely need to get it repaired. This isn’t just about winterizing your mobile home, underbellies also help deter rodents and critters and aids in keeping ground moisture from rising into your home.
If your underbelly is missing, chances are your insulation or insulating blanket will be as well. Take a day to create an airtight underbelly. To do this you need to do 3 things while under home: seal and caulk your ductwork, add insulation between the floor joists of your home and attach a new underbelly.
Add a Ground Vapor Barrier
If you can, go ahead and add a new ground vapor barrier while you’re under there. You’ll surely lower your heating and cooling costs and create a more comfortable and longer lasting home.
A Few Extra Notes about Winterizing a Mobile Home
The following tips are more common in articles about winterizing mobile homes. They are so important we wanted to go ahead and add them along with the lesser known winterization tips.
Remember to Loosen Your Mobile Home’s Tie Downs
Most experts recommend that you loosen your mobile home’s tie-downs a couple of inches before winter to allow the home to shift if the ground should freeze. Frozen ground can shift 2-3 inches and that can cause strain on your tie-downs and, in turn, on your chassis and joists.
Furnace Maintenance
There are some easy ways to weatherproof your mobile home heating system. If you have a maintenance agreement with your heating installer, give them a call and schedule a maintenance appointment before the weather turns cold.
There are also some simple things you can do yourself to get your system ready for winter:
Make sure you keep your filter changed once a month
Clean the outdoor coils
Remove any debris or leaves from around the unit
Make sure the drain from the system is clear
Clean and Repair the Gutters
Although messy, cleaning your gutters are a necessity to winterize your mobile home. If not clear of leaves and twigs it won’t drain. Once it gets below freezing you will have ice in the gutters which will hold snow and ice up against your roof’s seam, a sensitive area to begin with. Ice is heavy and can cause your gutters to pull away and fall, damaging siding, and windows in the process.
Simply remove the leaves and debris from the gutter and spray it out with a water hose until the water flows freely out of the downspout. You’ll want to keep a check on the gutters throughout the winter months.
Add Insulation
We’ve covered all the basics of blowing insulation into your home’s walls, floors, and ceiling cavities here. If your home has a lot of cold spots and you just can’t seem to stay warm it’s probably time to for new insulation. You can do it yourself but it’s probably less stressful if you can hire it out. Click here to read our complete mobile home insulation guide.
More Energy Savings Ideas For Your Mobile Home.
Sealing and Winterizing Your Mobile Home Can Save a Ton of Money
Winterizing your mobile home to minimize air leakage will absolutely save you money in the long run. Every home needs a little attention as it ages but older and more affordable mobile home models need some additional attention. These tips will help you understand where your attention is needed most and how to get the best return on your investment.
Hopefully, these five tips to help weatherproof your mobile home will help you save on your heating bills this winter and keep you and your family warm and toasty this season.
The secret to staying warm in the winter is layering your clothes and the same goes for your home’s plumbing lines, you want as many layers as possible between the elements and your water pipe. In this article, we’re covering heat tape. We’ll help you understand why and how it works, how much it costs to run, how much you need to buy, and how to install it safely.
What is Heat Tape
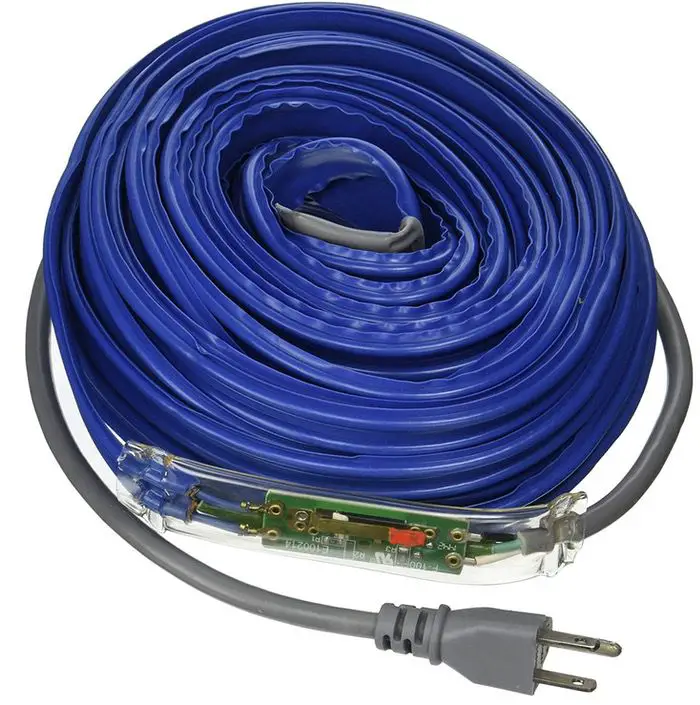
Heat tape is used to prevent metal and rigid plastic water filled lines from freezing. In sub-freezing areas, heat tape is one of the most popular ways to protect pipes from freezing because it’s affordable and works remarkably well. Heat tape isn’t sticky. It’s really just a simple resistive heat-conducting flexible wire that uses electricity to produce heat. This heat source is held close against your vulnerable water lines and keeps the water from freezing.
Heat Tape for Mobile Homes
Older mobile and manufactured homeowners need to be extra careful when they choose a heat tape. There are two things to consider for older mobile homes: the water line material and the electrical system used in the home. Some of the old school water feed lines used in mobile homes (before PEX) is too thin to withstand even the lowest heat tape temperatures. If your home has the older rigid plastic piping you will need a low-temperature heat tape that is approved for that specific material. In addition, mobile home owners should only use shielded heat tape that is rated specifically for their homes electrical specs.
Mobile Home Parts Store Sells Electric Water Pipe Heat Tape.
Most heat tapes that are lightweight and thermostatically controlled are not designed for older manufactured homes. Only brands that are UL listed for use in manufactured homes should be used. Most modern manufactured homes today have some sort of plastic-like water lines like PEX or PVC. When selecting your heat tape and insulation you need to be sure that you are getting a product approved for your particular application.
Aluminum Wiring and Heat Tape isn’t a Good Combination
Another issue for older mobile homeowners is aluminum wiring. While aluminum hasn’t been installed in mobile homes for decades there are still many homes that still have it. Aluminum wiring connectors (and the wiring itself) are prone to corrosion and that loosens the connections needed for safe electricity travel. Pair that with the high power consumption of space heaters and some heat tapes and you have a recipe for disaster. It’s a good idea that all older mobile homes have their aluminum wiring replaced as soon as possible.
2 Types of Heat Tape, 2 Types of Installations
There are two types of heat tape wiring installation methods. The first is the hardwired heat tape. These tapes are professionally connected to your home’s electric system and controlled with its own breaker. Most of us do not have the luxury of this type of installation because it requires a licensed electrician to install. The second installation method for heat tape is to run an outdoor certified extension chord and a GFCI outlet.
Heat Tape Plugged Into A Gfci Outlet.
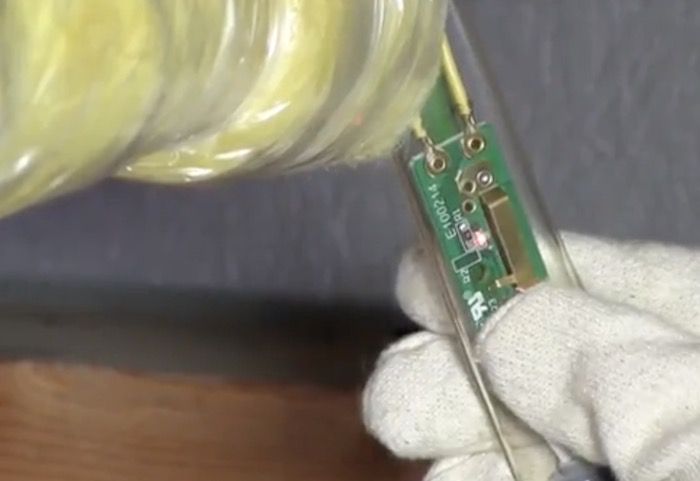
Self-Regulated Heat Tape
The newer automatic temperature controlled models (aka self-regulated) is the best choice because they save money on energy costs. These smart heat tapes only increase its temperature as colder weather sets in. You can pretty much plug, set and forget until you unplug them in the spring.
Silicone Heat Tape
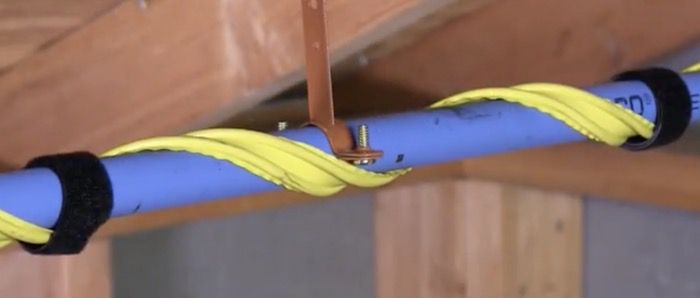
There are two types of heat tape available for manufactured homes. The first type is a one-piece flat heat tape with a rubber or silicone coating. When silicone heat tape is installed, it must never overlap itself and the heat tape must not have kinks or steep bends. Locate the thermostat at the end of the pipe that will be the coldest. This particular heat tape is coated with rubber and resists moisture which helps it to last longer.
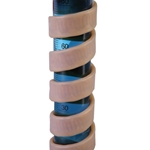
Braided Heat Tape
The second type of heat tape is braided. It is most recommended for mobile homes. Braided heat tape is a bit more complicated to buy and install. The braided tape is still This heat tape is sold by the foot, which can make it hard to judge exactly how much you will need. In addition, you must also purchase two ends to install on either end of the tape. When installed, it is wrapped around the pipe and can safely be overlapped without worry, which makes it safer to use. A downside to using this type of heat tape is that it has no rubber coating, the heat tape tends to rust and stop working due to the lack of a moisture barrier. Most contractors like to use this type of tape as they can buy it in large quantities and use only what’s needed for any particular job.
Best Heat Tape for PVC Pipe
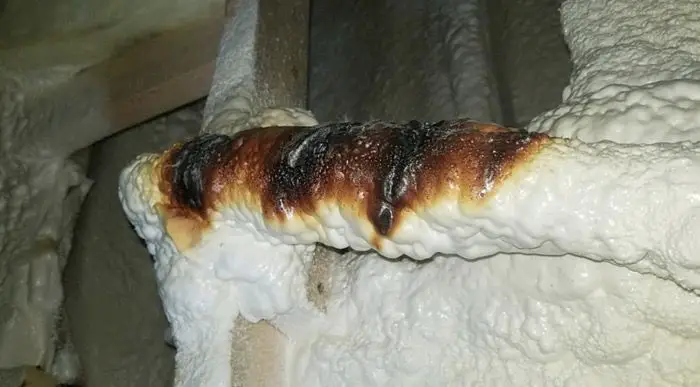
Most PVC plumbing pipe can safely withstand temperatures between 140-160 degrees without fear of melting.
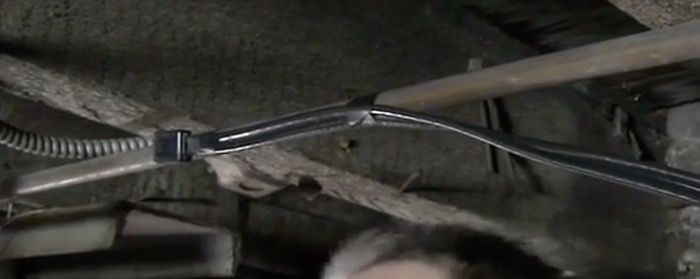
Where to Install Heat Tape
Heat tape should be installed on an exposed pipe located outside of your home only. As stated above, water supply and drain lines in the area between the ground and the bottom of the mobile home is the most common place to install heat tape for mobile and manufactured homes. Though the skirting or foundation helps hide the water lines and shield the pipes a bit from the elements, they are still exposed pipes in an unheated space. In the majority of frozen water line calls we’ve had over the last 2 decades a whopping 95% occurred under the mobile home. Usually within 3 feet of the ground connection point or where the mobile home’s belly wrap and insulation have been damaged or removed for some reason.
A Look Under A Mobile Home.
Materials Needed to Install Heat Tape
The proper amount of heat tape, or braiding, needed to wrap around your water lines at a 6″ to 8″ interval.
Power supply (GFCI outlet, extension cord)
PVC/electrical tape
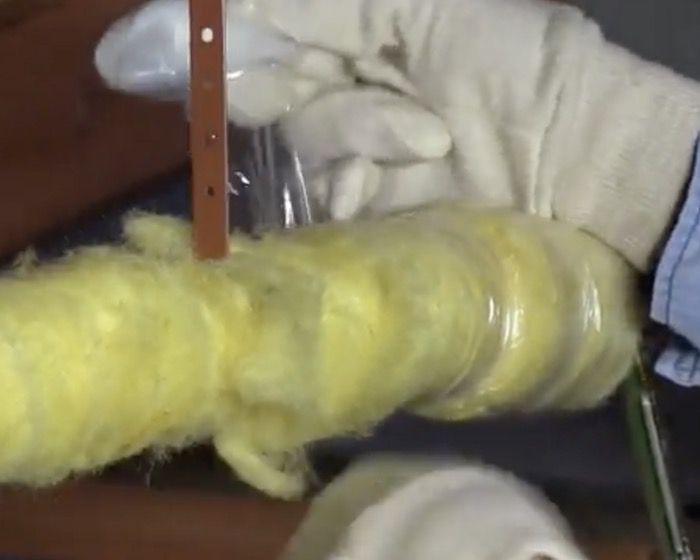
Fiberglass pipe insulation
Vapor seal wrap
Tape measure
Scissors and Knife
Mask, gloves, and eye protection
Supplies to clean your pipe (rag with cleaner)
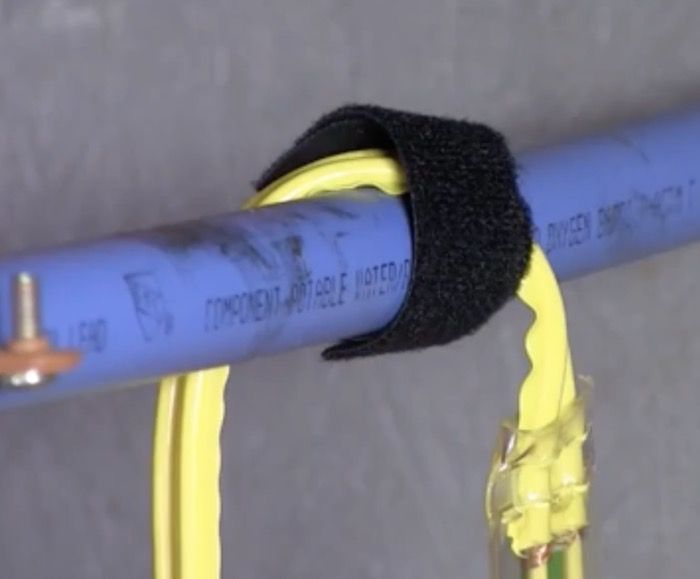
You can make heat installation easier by preplanning and making sure you have everything you’re going to need before you crawl under the home. Pre-cut the tape, ties or straps you’re using to attach the heat tape to the pipe. You want to tape or tie it at least every 10-12″ but closer is always better. You want the heat tape to make constant contact with the water pipe. Learn about mobile home repair loans here.
How Much Heat Tape Do You Need to Buy?
The diameter and material of your pipe are used to calculate how much heat tape you should need. For instance, a 1/2″ copper pipe that is 18 inches long would need around 24″ of heat tape. Here are tables for various widths and lengths of pipe as well as material.
Also, be aware that if the manufacturer recommends it, you’ll need to buy the right amount of fiberglass insulation wrap as well.
How to Install Heat Tape
Oftentimes, the pipe you need to install the heat tape will be a few feet under a mobile home. If your home has a low crawl space you could be in for a tough installation. Other than that, installing heat tape isn’t that difficult. We rate it 6 out of 10 for those comfortable with common DIY home projects.
Attach Heat Tape With Manufacturer’S Recommended Tape Or Ties.
Parallel Installation
There are two ways to install heat tape to a pipe. The first is parallel where the heat tape is applied in a straight flat line against the pipe. If you use this method under your mobile home be sure to position the heat tape on the side most exposed to the weather.
The second method is to spirally wrap the heat tape around the water line in short intervals. This is a better installation method if your water lines are verticle and exposed to the elements on more than one side. In the image below you can see the light green line running parallel to the pipe. On the second pipe, the squiggly lines represent the heat tape and the black lines represent the tape that holds the heat tape to the pipe.
Spiral wrapped heat tape.
Wrap Heat Tape with Insulation
After you’ve installed your heat tape and made sure it will remain as dry as possible you can wrap insulation over it IF the heat tape manufacturer recommends it (many do). Insulating heat tape helps it maintain a constant temperature easier and protects it from damage. We only recommend fiberglass insulation in 99% of all situations. Fiberglass has a higher fire retardancy than other insulating materials such as foam sleeves so it’s safer.
Wrap fiberglass insulation around heat tape if the manufacturer recommends it.
To install fiberglass insulation around a pipe with heat tape you simply start at one end and wrap the water line being careful not to make your wraps to tight. Fiberglass Pipe Wrap at Amazon
Installing Vapor Seal/Barrier
The final step to installing heat tape is the vapor or moisture seal. A moisture barrier is installed the same way as the insulation but the plastic is wrapped in the opposite direction as the insulation. A snug uniform fit without being too tight is what you are trying to achieve. You want the insulation to be protected against the elements. Fiberglass insulation loses its effectiveness when it gets wet.
Vapor Barrier Wrapped Over Fiberglass Insulation.
Other Important Information about Heat Tape
How Much Power Does Heat Tape Use?
The most common heat tapes use either 2 watts per foot or 7 watts per foot and keep your water line from freezing down to an impressive -50F degrees. Newsminer.com explains that if an average heat tape draws 5 watts of electricity per foot then a 6-foot long heat tape will use 30 watts to heat the pipe. With their current electric rates in Fairbanks, AK that 30 watts spread over 4 months would cost close to $20.
Heat tape was too insulated with foam spray and burnt. (Amazon.com).
Is Heat Tape Safe?
Self-regulated heat tapes don’t get very hot at all which is why they aren’t helpful to unfreeze pipes. In fact, they should be installed on your pipes long before the first freeze. The new self-regulated heat tapes will turn on when the temperature gets below 40 to 38 degrees. Still, the Washington Post reports that modern certified heat tapes that have met the UL standards cause close to 2,000 home fires, 10 deaths, and 100 injuries each year. A majority of these accidents could be prevented if homeowners followed these suggestions:
If your using an extension cord to power your heat tape be sure its rated for outdoor use.
Only purchase UL certified heat tapes.
Heat tape should have a grounding or three-prong plug. Especially in older mobile homes due to the metal chassis and grounding. Only use a quick-tripping ground-fault circuit-interrupter (GFCI) outlet.
Do not install heat tapes inside walls, floors, or ceilings. Heat tape should only be used outside.
Install heat tapes directly on the pipe you need to protect from freezing. Do not install heat tape around pipe insulation – only the pipe itself.
Don’t cover heat tapes with insulation even if the tape manufacturer permits it.
If you do add insulation, only use fiberglass or another non-flammable material. Do not use foam or vinyl insulation as they could catch fire easier.
Do not wrap heat tape over itself even if some manufacturers allow it.
Never use metal to secure heat tape to the pipe.
Check the manufacturer’s instructions for the thermostat’s location. Should it rest against the pipe and be covered with insulation to sense pipe temperature or hang uncovered to sense air temperature?
Inspect all heat tapes and electrical connections before winter and at least monthly during winter. Replace heat tape if it has cuts, cracks, charring, animal chew marks, bare wires or a loose or missing end. If it looks suspicious it should be replaced or removed.
Testing a heat tape thermostat.
Replace Heat Tape Regularly
Speaking of replacing, heat tape only has a 3-year lifespan. Most heat tape manufacturers warn that you should replace your heat tapes every 3 years minimum. Heat tape has a near-constant connection with both water and electricity and usually isn’t protected well from the elements.
Other Noteworthy Information about Heat Tape
You can’t add heat tape after your pipes have frozen and expect it to unfreeze your pipe. It will help, of course, but heat tape is a prevention product – it works by keeping the line from freezing in the first place. Read more winterizing tips for your mobile home. A water line that freezes and busts can be a troublesome and expensive mishap not only to the line itself but to the surrounding structures. Fortunately, there are some good options to choose from to help prevent any future problems. Learn more about plumbing in mobile homes.
Heat Tape Plugged Into A Gfci Outlet.
Freeze Alarms are Smart
There are freeze alarms that can be installed to warn you when your lines reach a critically low temperature. The alarm itself is installed inside your home with a cord attached and running to your water line. The installation is fairly simple and straightforward, but as always follow the manufacture’s recommendations and instructions.
Good Ideas to Keep in Mind
You can find heat tape at your local hardware store or order online from an online retailer such as The Mobile Home Parts Store. or Lowe’s. The main priority is to make sure the heat tape is recommended for your home’s plumbing lines. Heat tape is a commonly used defense against the weather but it must be used properly and inspected regularly to be safe and effective. Thank you for reading Mobile Home Living!