This old world, farmhouse style kitchen remodel is a treat! The Slayton’s have turned their double wide manufactured home into a style all their own and I’m sure you’ll love it as much as I do.
The end result of the couple’s hard work is gorgeous!
My Hearts Song recently featured this great double wide manufactured home kitchen remodel. If you aren’t familiar with My Heart’s Song, and are particularly interested in single wide mobile home remodels, click one of the links now! Geneva, the talented decorator, and blogger updated her single wide manufactured home beautifully and she provides detailed instructions and how-to directions for everything. It’s a great resource for all mobile and manufactured homeowners!
This double wide started out just like any other standard manufactured home straight out of the factory. For example, the kitchen had an open floor plan with oak cabinetry, but Rhonda wanted to add her own personal style to the home, which is something we should all do. Making the home ‘yours’ by adding your own personality and letting the surrounding tell your story is a great way to make your home more comfortable. That’s especially true for a kitchen remodel.

Together, Rhonda and her husband created a beautiful space with this kitchen remodel. The farmhouse style with an old-world feel is great for any home.
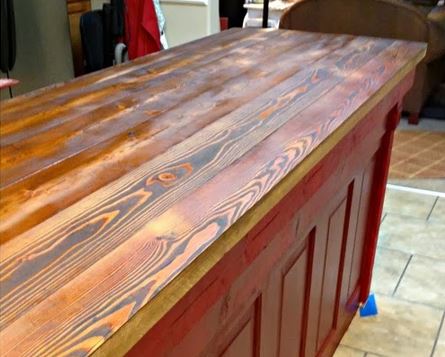
Unusual materials, such as doors, helped the couple create a high-end kitchen without the high-end cost. They aged the cabinet doors instead of buying new, they added architectural details to create a custom counter look and opted for wood countertops to achieve the warmth that is indicative of the old world, farmhouse style.
By adding 2 table legs to the front of the counter, centering the kitchen sink, they added a custom look to the entire kitchen without the custom price.
Here’s Rhonda’s breakdown of all the things they did during their kitchen remodel:
Kitchen:
- I changed the upper cabinet profiles to a staggered configuration rather than straight lines which gives it much more interest. This change helped to disguise the vent for the microwave – I don’t care for the “boxed in” look in most mobile homes.
- Changed the width of the opening to accommodate an old chimney cupboard. I love using furniture pieces in the kitchen. You will see more of that by the sink – incorporated a small chest of drawers to gain more storage. We also added wainscoting in kitchen and chair rail moldings. We replaced the vinyl tile with laminate wood floors.
- In our latest renovation, we removed a block of cabinets from the center of the room which held the sink and dishwasher and pushed them to the window wall. Al had to cut down the plantation shutters but we were able to keep the look of the shutters at the top. From outside it just looks like the shutters are closed. He built the island using a base cabinet we got at Habitat store and faced with old doors. Painted it red for a nice pop of color. Also, we added a small bar sink in this island which is great when canning or cooking.
- I know – I should have taken more “before” pictures but I was so excited to get started. We painted and glazed the cabinets and added new hardware. I used an old songbook rack from a church pew for a recipe book holder – this one actually came out of my Mom’s home church and has her brother’s initials carved in it – it is at least 85 years old. I love to use items in an unexpected way.
- Wire rack used as a canister holder was another “junk” find. I think I paid $2.00 for it and added the jars. A can of red spray paint and some distressing makes it look like it came that way.
- Before the renovation, there was walk thru to the dining room and a lot of wasted space. I am thrilled with the extra storage and the look of the new kitchen.

By painting and aging the kitchen cabinets they were able to create a truly old world style without the old world price!


Related: Another example of Vintage Farmhouse Decor in a Mobile Home.
Homeowners Interview
Rhonda was kind enough to answer a few questions for us and I greatly appreciate it – there’s so much to learn about kitchen remodeling! The more information, tips, and advice we can get before tackling our own, the better prepared we will be.
Make and model of your home?
We purchased our home in 2006 from Deer Valley Homes. We actually visited their manufacturing facility in Guin, Alabama to see how the homes were built. When we placed the home on our property we had the building inspector check it out and his comment was “This home is built better than a lot of the stick built homes we check”.
Favorite thing about your home?
Large windows with plantation shutters – after 7 years I still love them.
The most difficult project?
The hardwood floors were physically challenging (my husband’s knees will never be the same). Each project is time-consuming since we both still have full-time jobs so be prepared to live with the mess. These projects don’t complete overnight.
Advice or tips for anyone about to remodel their own home?
Take it slow. Take on small projects first and then when you have built up your confidence move on to larger ones. I have clipped pictures from magazines for years and keep them in a binder so when I get in a “creative mood” I pull out my dream book and get started. It helps to have a wonderful husband who understands the dream.
The most used tool?
Kreg jig – this thing is awesome.
Any favorite tools you can recommend?
Always use good paint brushes – it will save you so much time. Don’t skimp on sanding.
Doors are used throughout your home in wonderfully creative ways. Is there a special process needed to re-use a door?
For the projects we have built it is necessary to use a solid wood door. Amazingly enough, I have never paid more than $10 for a solid wood door and most of them have been picked up off somebody’s trash pile. I am amazed at the things people throw away. Just keep your eyes open and don’t be bashful about rescuing things from the trash.
How did you seal the countertops, what products did you use?
We stained both sides of the wood with Minwax Provincial Stain – staining both sides helps prevent warping. We used MinWax clear satin polyurethane – sanded between coats and used about 4 layers. The wood on the island is old warehouse flooring but they didn’t have enough to use on the sink counters so we just bought pine 2 x 8’s from Lowes and matched the stain. Again we put it all together using the Kreg jig.
You had never lived in a manufactured home before you bought this one. Was it a hard transition?
It was a hard transition simply because we have always lived in a stick built home but we found ourselves in a financial situation with both of us out of a job and we decided that we would never put ourselves in a place where we could not make a payment on one income.
Were you influenced by the negative stigma of manufactured homes?
We did have a tough time at first but once people walk in the home they are amazed at how well built it is. This home has standard ceiling heights, sheetrock walls, nice cabinets, and floor treatments were pretty good so it doesn’t feel like a trailer. My only regret is that we did not buy the “hinged” roof which actually gives you a higher roofline. It was a new feature and we just weren’t sure how it would hold up. The low roofline is my least favorite thing about our home.
What advice would you give someone that was about to buy a manufactured home?
Go to the manufacturing facility and see how they are put together. This was a huge benefit to us and really sold us on the investment.
We took one of the Deer Valley standard plans and changed it to be more suitable for our needs. They were great to work with and incorporated my changes which made it feel more like a custom built home. Also, here are a few of the things we did:
- We took a 4 bedroom plan and reduced to 3 bedrooms and added an additional bath with a walk- in shower so that we would have a suitable place to create a suite for my parents if that need ever arises.
- Replaced standard exterior doors with antique doors. The front door was one we found in North Georgia at an antique store when we were building our first home 30 years ago. Al stripped about 8 layers of paint off of it and as of today it has hung on 6 homes – we think this is our final placement. It took several moves to “square” it and the joke with my daddy was that he would hang it for me when I move to a retirement home!! He will be 86 this year – it would be nice to think he would still be around when I get to retirement age…can you tell I am a “daddy’s girl”? He was the one who taught me how to see the value in everything.
- The back door is a door that came from my husband’s mom and dad’s home – they are both in heaven now but it is a sweet reminder of them.
- All exterior lights have been replaced.
- All windows are the same size (including the one in my master closet) which makes for a much more cohesive look from the outside – don’t care for the octagon shaped windows which again scream manufactured home to me. We invested in plantation shutters which I absolutely love – we have been in this home for 7 years and I still love them.
- Added a front porch, back deck and small porch at the end of the house.
- Landscaping – never ends but we are on 14 acres and love the natural look.
- Future plans to replace shutters with wooden shutters which I bought for $5.00 each at Habitat store.
Bathrooms:
- Bathroom floors were replaced with antique v-board from a salvage yard – Al just turned it over and used flat side – refinished it and nailed it to the floor with square nails – looks awesome and has held up really well.
- Replaced standard mirrors with framed mirrors.
- Mounted light fixtures on 10” wide board to give more “ump” to standard lights.
- Painted vanity in one bathroom and changed all hardware and lights. We have plans to paint the other two – on my wish list.
- Added beadboard.
Living Room:
- We removed the built-in bookcase around the fireplace.
- Added shelves over the window and hung another large shelf to display baskets, quilts, and other goodies.
- Plan to replace carpet with same laminate wood flooring that was used in the kitchen.
- Replaced door trim with 1” x 6” lumber which looks so much better. Slowly replacing trim all through the house.
Dining Room:
- Most interior lights have been replaced – my best find was the tin punch chandelier I found at a thrift store for $15.00 – it sells for about $300.
- The table was Al’s grandparents – had to have new legs and one board replaced but we enjoy using it every day.
- The hutch was a thrift store find which we refinished with the turquoise color.
- The Hoosier cabinet sat in my grandma’s kitchen – she would let me cut the biscuit dough on the enamel top. Again refinishing was necessary – there is a scorch mark on one side where her gas stove burned it – doesn’t bother me – adds character. A Prince Albert tobacco can is nailed over a hole in the back…hmm… this must be where I got the “re-use it” gene.
Utility Room:
- We added storage cabinets to the utility room – again took junk cabinets that someone was giving away and re-finished them…can’t beat free!!
Bedrooms:
- Master bedroom: Al built our headboard from an old door that came from his grandparent’s home. We love using family treasures.
- The guest room contains the wardrobe that Al used as a child and the iron and brass bed that his mom and dad started their married life with 75 years ago.
- 3rd bedroom/craft room has a table set up that came from my grandparents home – it was in their dirt basement and needed new legs but thanks to my “handyman” that was no problem.

Thank you so much, Rhonda, for the great information and kitchen remodeling ideas! Again, we appreciate you sharing your home and providing such great, in-depth information about your remodels. Advice and tips from homeowners that have remodeled their homes are priceless for those of us about to tackle our own kitchen remodels. I’m definitely using a few of your tricks in my home!
As always, thank you so much for reading Mobile Home Living!
Photo Source: MyHeartsSong.com
Hi Cheryl,
Messing with gas lines is tricky since it is to important to get the fittings tight and meet your local codes. You will definitely want to contact your local gas company and ask some questions (but if you don’t have to give any info don’t – they may notate the inquiry and that can give you some issues. For example, I’m in a position right now that if I move my power pole 20 feet I have to purchase a whole new meter that will cost $1500). Best of luck!
I would like to relocate our gas line for our range. It currently is located in the middle of our kitchen, possibly used to be an island but not sure. (The kitchen was half torn out when we bought it.) I would like to move it about 5 feet or so to an exterior wall. It will be closer to the gas meter in the new location. Can you tell me the best way to accomplish this, and the cheapest. Thanks.
Love your site.
I love the way you updated the kitchen. I love the dresser in the kitchen, is that small drawers at the top? What color red did you paint it? also what kind of wood did you use on the counter top? I’m not very brave to attempt the cabinet doors, but I’m going to try, did you sand them first then paint then distress? Beautiful job!!
You did an awesome job in that kitchen. From an old-looking space, it turned out to look modern and stylish after the renovation. You’re very creative and detailed, most especially with that cabinet. Some furniture pieces more and it will look extra beautiful.
Thanks
Thanks for your sweet comment. It took me 7 years to get brave enough to paint but I was tired of the “builder’s oak” and wanted something more my style. First we removed the doors and hardware and sanded both frames and doors. I will look up the paint color – it was a satin finish that we bought at Sherwin Williams – it was pricey but has held up well. We sprayed the doors and then rolled on 1 more coat. We did not spray the frames since they were still installed and chose to use a roller on them. I waited 24 hours before I worked with the glaze. Trust me …if you get too antsy you will end up pulling the paint off. Be patient and wait. I used Ralph Lauren Glaze -Tobacco was the color. I put it on fairly heavily and then wiped it off. Leave the glaze heavier where there are details. You can always put more on in layers until you get the look you want. I bought a similar door at the Habitat Store for a dollar and practiced on that. If your doors have raised panels you can take a small brush and add more glazing if you want a heavier look. The good news is that it is water soluble so if you put it on and don’t like you can just wet a cloth and wash it off and do it again!! I let everything dry for 3 or 4 days and then finished up with a good coat of Johnson’s clear paste wax. I can truly say that I have no regrets (other than the junk on the counter in my “before” picture). Let me know how it turns out. Good luck.
I love the “antiqued” kitchen cabinet doors…!!! May I ask how did you achieved that aged (dare I say distressed) look…??? I am redoing my manufactured home in the modern cottage and I was planning on painting my cabinets white to save time and money (plus my cabinets were built for my house)… I really like white cabinets but the get so dirty… But this would be perfect…!!!
Thank you so much Geneva!
Thank you for the shout out Crystal! Didn’t they do a good job on their home…it’s so creative!
Keep up the good work…Your blog is our “Go To” place for all things Mobile & Manufactured Home. XO