It’s late at night, you’re snuggled up in your bed trying to fall asleep and you just heard your furnace startup for the fourth time in 45 minutes. It seems like that furnace is constantly running!
Home heating costs are increasing each year. There are a few things that can be done to help lower costs such as turning your thermostat down or using a programmable thermostat such as Nest, adding additional insulation to your home, sealing cracks, adding extra layers to your clothing, using a portable electric heating source, and one age-old remedy that has been used successfully time and again – installing a wood burning stove.
How to Install a Wood Stove in Your Manufactured Home
Installing a wood stove in your home has many great advantages. One of the best benefits of a wood stove is the ability to have heat when your power goes out. Lower heating costs is another great benefit of a wood stove. If living an affordable or debt-free lifestyle is important to you a wood stove is one of the smartest long-term investments you can make for your home. In addition to the convenience and savings, little can compare to the beauty of a fire along with its comforting snaps and crackles.
A warm fire is the epitome of a cozy home and you can have it in a manufactured home. Of course, there are guidelines that need to be followed and safety concerns that should be addressed. We’ll go over general guidelines for choosing a wood stove for your manufactured home as well as the basic installation steps in this article. Get ready to be warm!
Dealing with Your Insurance Agency
First and foremost, you must buy a stove that is approved for mobile and manufactured homes. Insurance companies will drop your policy if they find that you have installed an unapproved stove and we all know it’s hard enough to find insurance. Whether the stove will be your single source of heat or just a supplement seems to be a big factor to the insurers – if a stove will be your single source of heat you may have more difficulties so call your insurance agency and discuss the following issues:
- Will your insurance raise or be dropped by installing a wood stove? What if the stove is the sole source of heat?
- Will you need to have an inspection after the installation?
- Does the stove have to be installed by a certified contractor?
- Is there a list of accepted stove manufacturers or models that they recommend?
- Do they offer guideline sheets or brochures on installing a wood stove?
Foremost Insurance Company’s Advice on Installing a Wood Stove in a Manufactured Home
Manufactured Home Approved Wood Stoves
There are differences between a regular wood stove and a manufactured home approved wood stove and luckily most major stove manufacturers have a manufactured home approved model. The major difference between a regular wood stove and a HUD approved stove for manufactured homes is the air intake, clearance, and chimney system. Because manufactured homes are so airtight it is important to have a good fresh air intake that will enable air from outside the home to enter.
Mother Earth News provides a good summary for choosing a wood stove for a manufactured home:
First, the stove model must have been tested by a HUD-approved laboratory and listed for use in mobile homes. A metal tag permanently fastened to the rear of the appliance indicates the name of the testing facility and the stove’s compliance with HUD Standard UM-84.
Second, a tested and listed prefabricated chimney system—connected directly to the stove and installed properly—must be used. Third, a hard ducting system for bringing outside combustion air directly to the stove’s air inlet is required.
And finally, some means of securing the stove to the floor of the home is called for.
In addition to the HUD requirements, some basic clearance and installation guidelines, provided by the stove manufacturer and based on testing to Underwriters’ Laboratory Standard 1482, should be adhered to. Mother Earth News also shared the following image that depicts a HUD approved wood stove for a mobile home:
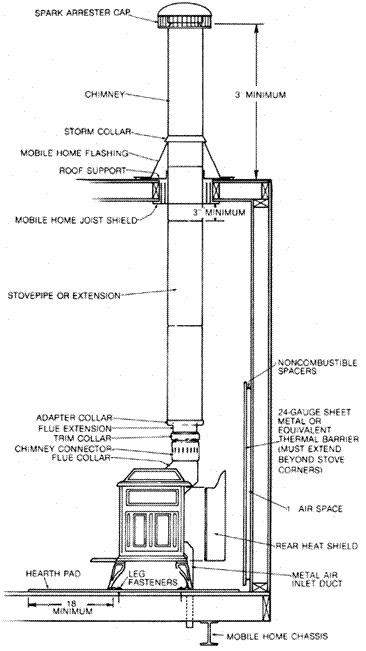
Drolet, a leading stove manufacturer, shares the following regarding manufactured home approved stoves:
What makes a heater mobile-home approved?
Mobile-home approved stoves have gone through specific testing to show that they can source their combustion air entirely from outside the house. This is required because mobile homes (or manufactured homes) are often very airtight. Should there be a lack of combustion air, harmful levels of CO (carbon monoxide) could accumulate in the house. This is why mobile-home approved stoves have an adapter that hooks-up to the unit and connects to a fresh air intake on the outside wall of the house through an insulated pipe.
Where to Install Your Wood Stove
The first thing to consider is where to put your new wood stove. You should find an area that allows an 18″ clearance from the front of the stove and 12″ on the sides and back. You will also have to calculate for a space where the stove can be fastened to the floor.
Installing Your Wood Stove in a Manufactured Home
Now that you have chosen the right stove and decided on its location it’s time to begin the installation. We’ll go over each step and share an image of the process. Please note: The images shown are not of a manufactured home installation or an approved stove setup for a manufactured home. They are for reference use only. All images were posted on Imgur, an image sharing website, by user wijagoro.
Step 1 – Measuring and Taping-Off the Wood Stove’s Location
Measuring your distance from the stove to all combustibles is vitally important. You’ll need to do some math to get it right.
Step 2 – Building the Hearth Pad

You will need to protect the floor from any falling embers and possibly overheating. This is done with a floor shield or hearth pad. You can buy the hearth or build your own using only approved materials. The shield or hearth pad must extend 18 inches past the access door for wood loading and ash removal and extend 12 inches around all other sides. Before you place the stove and heat shield in its final location a few guidelines must be met: the stove must be grounded to the mobile home chassis and the stove must be anchored to the floor to prevent tipping or shifting in case you ever decide to relocate your home.
Step 3 – Preparing the Wall and Hearth for Covering

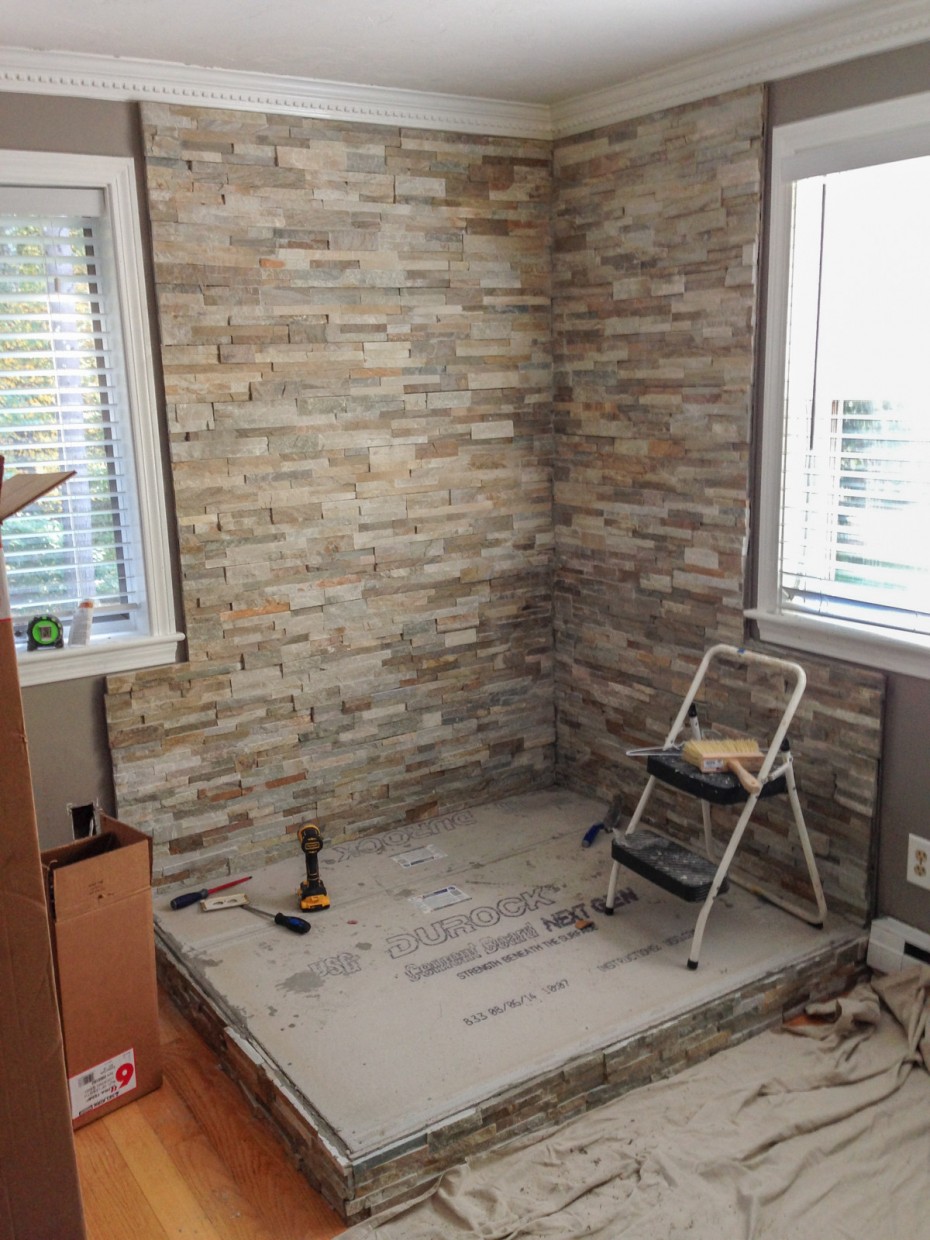
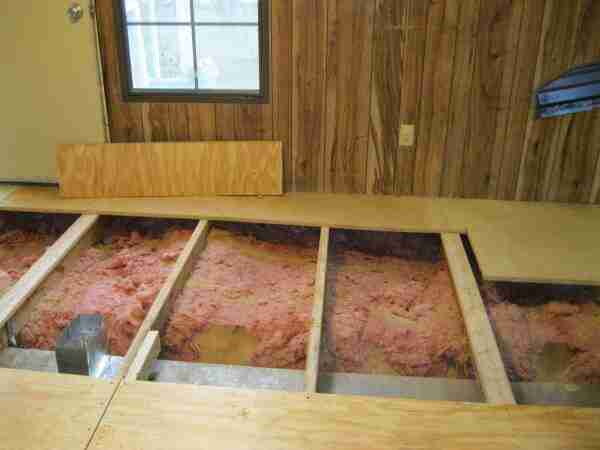
In the image above, the homeowner is covering the wall with non-combustible rock and the hearth with tile. In order to apply the stone and tile, the proper base must be built. As you can see, in this step, the area was covered in plywood first and then cement board is installed. Here you can see the layers of the hearth, notice the DurRock is the first layer, then the foundation, plywood and another layer of DurRock :

Hearth Material
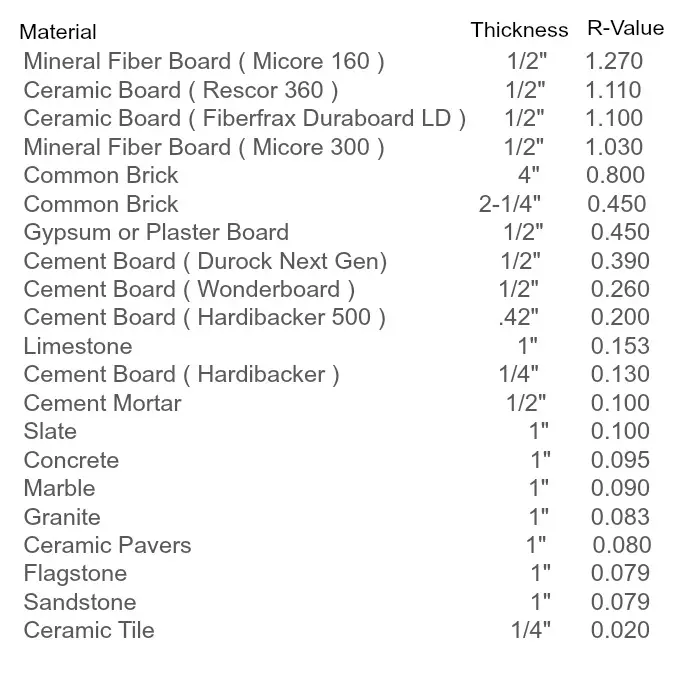
There are various non-combustible materials that you can use to build your hearth based on R-values and other certified ratings. Here’s a list found on ChimneySweepOnline.com showing the various materials, their thickness, and their R-value rating:
Step 4 – Installing the Stone Surround
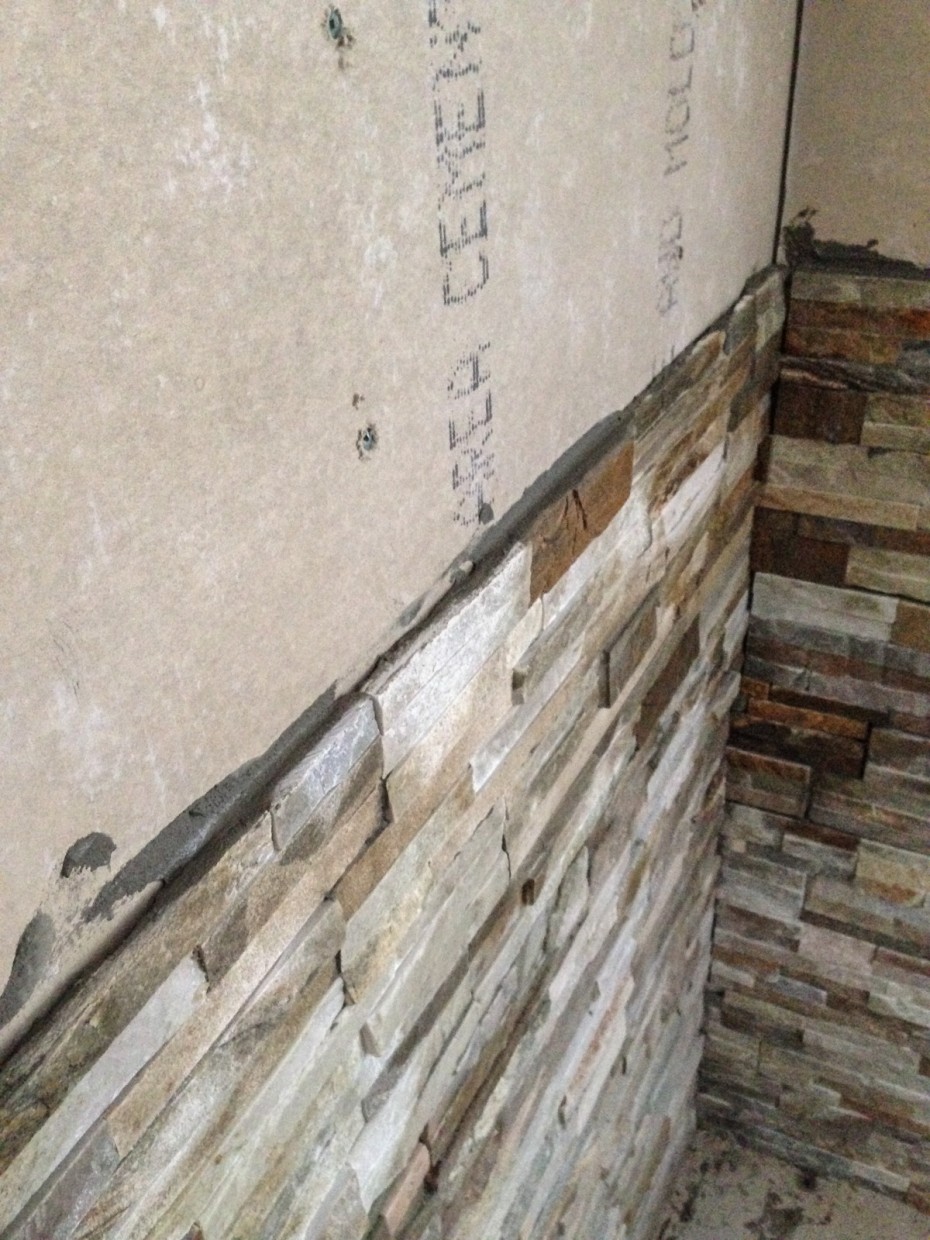
Installing a non-combustible material to the surrounding wall is vitally important. In the photos, the homeowner is installing real stone. If you are installing real stone or tile, you should lay the pieces out on the floor to ensure a good look and fit.
You can have a beautiful wood stove surround that is effective and safe:
Step 5 – Installing the Tile Hearth
Step 6 – Installing the Chimney
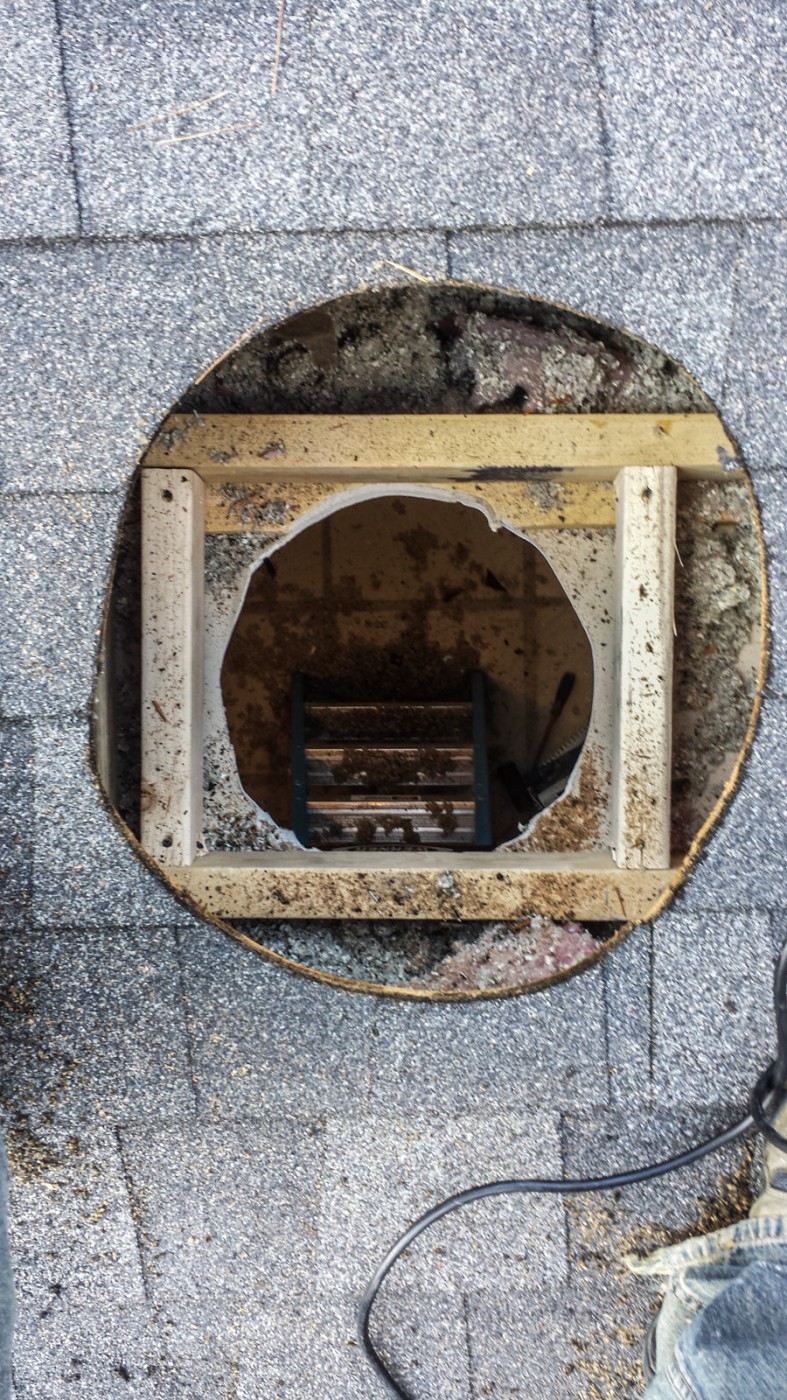
You’ll need to cut a hole through your roof or the side of your home, depending on code and preference. Either way, you will need to build a frame for your chimney pipe so that it can be supported properly.
A chimney installed through the wall instead of the roof requires the use of tees, elbows, and wall thimbles. You should only use these additional components if absolutely necessary. Offsets and obstructions within the chimney system will restrict the natural draft and take away cosmetically from the overall appearance of your home.
A wood stove that is installed to vent through the ceiling will be most efficient and produce the least amount of creosote deposits because it vents straight up and out without any bends in the structure to obstruct the draft. The best and most widely used method for a wood stove installation is through the ceiling with a high-tech pipe or through an existing chimney.
In the image above the homeowner has built a frame for the chimney. Below, the homeowner is adding the pipe:
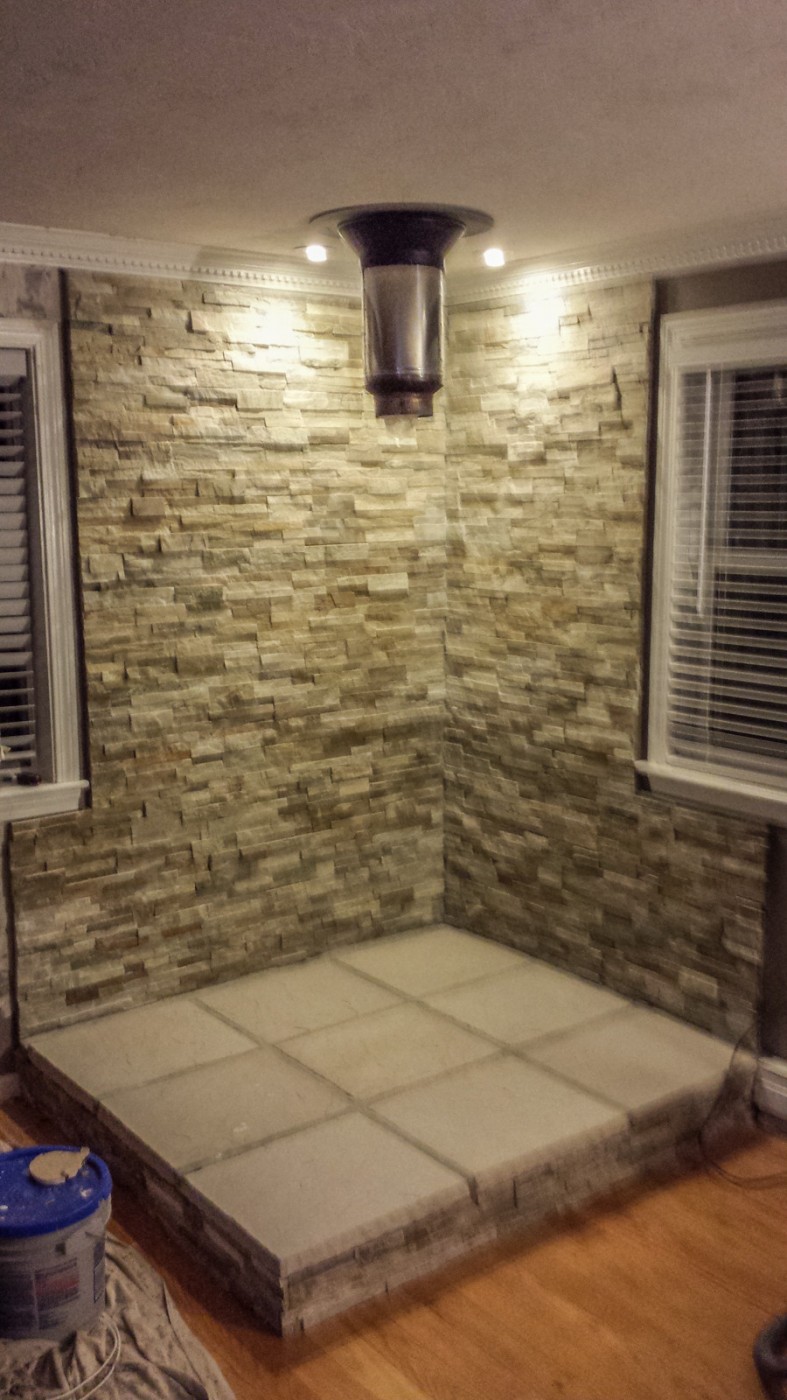
Below you can see the pipe secured through the roof:
Black stove pipe should be used in the interior of the home from the top of the wood stove to the bottom of the ceiling or wall where it will connect to the chimney pipe. Make sure you match the correct stovepipe diameter with the diameter of the flue size on your wood-burning stove. You should never use just the stove pipe to pass through a wall or ceiling. The stovepipe is only for use inside of the home.
It is highly recommended to use a double-wall stove pipe regardless of your clearance requirements. Being safe is always a top priority! However, if you decide on a single-wall black stove pipe it requires at least an 18″ clearance to combustible materials. Single-wall black stove pipe will also radiate more heat than double-wall stove pipe, it costs less and can be cut to specific lengths if needed during your installation
Step 7 – Installing the Stove
In the last image, you can see the wood stove has been attached to the chimney. For a manufactured home you would need to permanently attach the stove through the floor as well. You can also see a heat shield sitting behind the stove as an added safety precaution.
Here are some more helpful resources on wood stoves for manufactured homes:
Walden Effect – Wood Stove in a Mobile Home
Walden Effect – Choosing an Efficient Wood Stove
Hearth – What is the Importance of a Mobile Home Approved Stove
Rural Energy – Wood Stove Information
Wallace’s Stoves – Information on Wood Stoves for Mobile Homes
Green Building Advisor – All About Wood Stoves
Survivalist Blog – Heating a Double Wide
Good luck and happy heating! Thank you for reading Mobile Home Living!






An insert should definitely be an option, but you would want to consult a professional to help you decide what needed to be done. You may have to do some upgrades to the chimney liner and lines would need to be run for the gas.
My manufactured home has a fireplace but not one that can burn much wood and it’s mainly meant
for a gas fire. It therefore has the chimney and I’m wondering if an insert would be an option? I’m sure I
would need to extend the hearth area but I’m guessing that the required heat shields are already there?
Thanks much for your help!
I saw a mobile approved wood stovejustz few days ago at Lowes in winnipeg Manitoba, Canada
Hello,
Thank you for an interesting article.
In the last picture, The stove is pictured with a self standing heat shield. It’s black and it fits in a corner. I’m trying to locate something similar to this. Do you happen to have the brand name and place of purchase of that particular heat shield please?
Thank you,
Hi Sabii,
There are only a few that will allow the stoves and those that allow them only accept mobile home approved stoves that have been either been professionally installed or inspected by the agent personally. In states with a lot of mobile homes, it’s a bit easier to find. In WV, there was only one company that would accept stoves but I can’t think of the name (I want to say Safeco but I don’t think that’s right). We never installed our little pot belly because it was going to raise our premiums too much.
The insurance industry needs to stop this open discrimination. Mobile homes do not catch fire any more than site-built homes (in fact, there are significantly less mobile home fires than site-built homes on record). Sorry I can’t be any help.
Hi,
I just talked to my insurance agent, he said none of the companies he work with allow any kind of wood stove in a mobile home. Where are you guys insure your homes?
Thanks,
Sabi
Hi Cynthia,
I’d call your local mobile home supply store or the stove store. You will need a mobile home approved stove so wherever you find it will likely have a couple of installers they can recommend.
Best of luck!
Where can you find an installer for a wood-burning stove going into a mobile home? I’ve looked online but I’m having very little luck locating someone that can install my wood-burning stove.
Hi Lupe,
I remember reading that manufactured homes were typically more airtight than site-built homes but that’s all I know. Of course, the different levels of quality may impact the airtightness of a manufactured home? I’m not really sure. Sorry!
Is true the mobile homes are airtight?
Hi Samantha,
You can get the faux rock panels at Lowe’s or Home Depot. There’s also a couple of websites you can order it from. Real stone will usually be available at your local quarry or gravel supplier but you’ll need to be sure the wall can take that weight.
Best of luck!
Beautiful! Do you happen to know where they got the rock from? Thanks!
Hi Jessica,
You can buy the stove pipe at Lowe’s or a local fireplace/stove store (our small town furniture store/hardware store had them in stock).
I wasn’t able to get the total cost. To be honest, this is not a cheap project. The stove alone is over $800 easy (the mobile home approved stoves run $600+) and then the stone was probably a few hundred and then there’s labor. I’m gonna guess replicating this project would cost an easy $2000 in WV and I understand things are more expensive in other parts of the country. Fortunately, recouping the cost would only take a few cold winters and the peace of mind alone would be worth it. My mommaw has a huge coal/wood stove in her basement and she uses it all the time. We always lose power for a couple of weeks every year in WV and her stove is the only thing we have to stay warm with. It’s been a gift many times!
Thanks so much for reading MHL!
Very helpful post indeed. But can you mention from where you bought those stove pipe and chimney? And if you don’t mind I would like to know the total expenditure?
Absolutely!
Hi Regina!
Please email the photos to me and I’ll add them to this article or use them on a whole new article. I’m always looking for images to use! My email is [email protected]
Thanks!
You need to isolate wooden parts of your roof from high temperature of the chimney! Its important to provide isolation asap, otherwise you have big risk of fire!
Hi Keith! Spacers are typically determined by local code but I’ll look into it and see if I can’t find a good resource for you. Thanks!
Need more detailed information about the material the spacers are made of, the placement of the spacers, and best way to leave a method for air to move freely in the spacer area.
Great article and the photos really help understanding the points made about the project. This is very helpful.