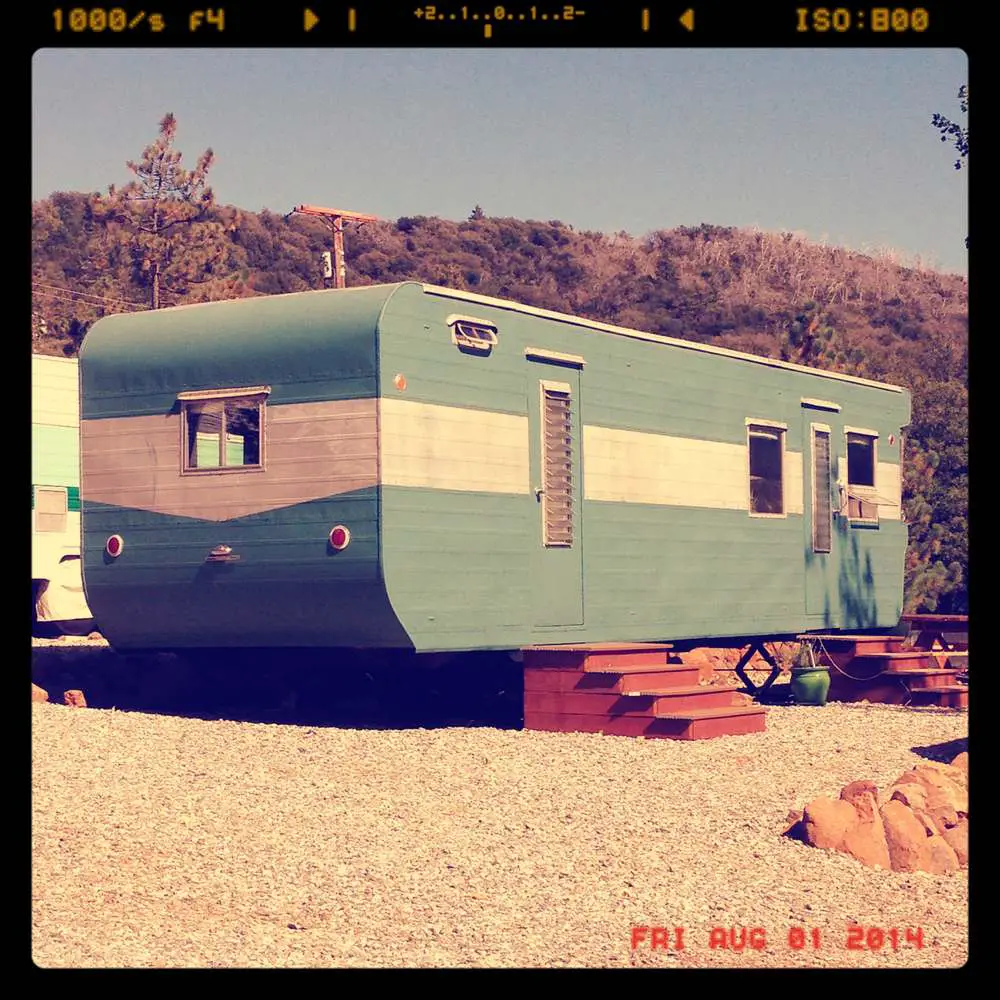
There are so many myths and misconceptions about mobile and manufactured homes. One of the worst is that mobile homes somehow attract tornadoes. It’s mind-boggling that anyone can think that!
Anyway, here are 7 facts about mobile homes that you probably didn’t know.
Since starting Mobile Home Living, I have researched manufactured homes and mobile homesquite a bit. In the process, I have stumbled upon information that surprised me.
1. Most Mobile Homes Are NOT Properly Tied Down
The majority of manufactured home loses in high winds are due to improper tie-downs, not the home’s construction.
If manufactured homes were properly tied down and secured to a true foundation the chances of a mobile home surviving a major storm would be significantly higher.
Of course, many older manufactured homes are made differently from a site-build home, using cheaper materials and staples. That’s the beauty of the homes – they are made in a way that makes them affordable to the average working American that wasn’t handed a silver spoon.
Neither mobile nor a site-built home would make it through the most powerful storms but new manufactured homes have been tested to withstand 110 mph winds.
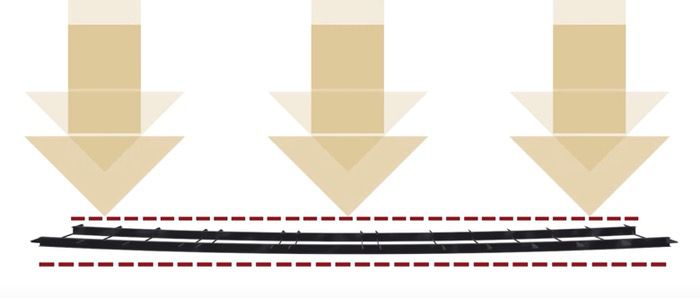
2. Chassis Have Specially Designed Curvatures that Distribute the Home’s Weight
The steel chassis that mobile homes are built on have a curvature to them. The curved beams are called cambers. Camber are created using heat and pressure at specified engineered points.
Reverse camber creates a curved top.
Positive camber is on the top and draws the tail up.
Camber allows the I-beam to distribute the weight of the home more evenly and are specifically designed for each model.
Notice the Curve?
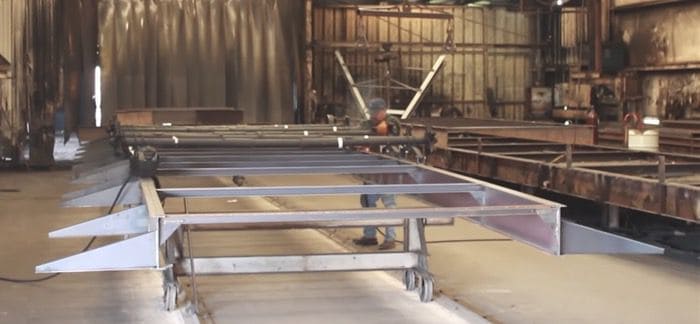
In addition to the curve, manufactured home buyers should pay special attention to the outriggers on the chassis. The best manufactured homes will have outriggers that go to the edge and supports the side walls.
This image shows a welder creating a chassis (it’s upside down).
4. Mobile Home Frames are Sprayed with Tar Based Substances to Prevent Rust
Rust was a huge problem for older mobile homes. If sitting to close to the ground the rust comes even quicker. Frames are now sprayed with a tar based substance to prevent rusting. This prolongs the life of the frame by protecting it from the elements.
5. Double Wides Have 2 Titles in Most States
Double wides have 2 titles, one for each section on the road, behind a truck. Essentially they treat it as a trailer. I find that fascinating!
6. South Carolina Has the Most Mobile Homes
South Carolina has the most mobile homes.
The following states have the highest ratio of mobile homes:
South Carolina
North Carolina
West Virginia (Woo-Hoo!)
NM
Each of these states have the highest percentage of mobile homes at around 16%. Notice they are all 2 worded states. I don’t know why I even noticed that but I did.
The states with the lowest percentage of mobile and manufactured home with ranges from .02% to just 1%:
Hawaii
New Jersey
Rhode Island
Massachusetts
Except for Hawaii, these are all northern states and also the oldest states in the nation. Housing is much denser in these states and property values are typically much higher.
7. Statistics about Mobile Homes You Probably Didn’t Know
Mobile homes are a worthwhile way of owning your own home and achieving the American dream.
If all the people that live in a mobile home lived in one state, it’d be the third most populous behind only California and Texas.
To put that in more context, the number of people that live in mobile homes is the rough equivalent of the populations of Nevada, New Mexico, Nebraska, West Virginia, Idaho, Hawaii, Maine, New Hampshire, Rhode Island, Montana, Delaware, South Dakota, North Dakota, Alaska, Vermont, and Wyoming- combined.
There are a lot of us mobile and manufactured homeowners! So why isn’t there more resources for us? Why don’t we have a magazine? (Well, we will after September 2022 because our new Mobile Home Living Magazine is going to print and it only took me 11 years! Read more about our new magazine here.
All of this brings about the question: How, in a society such as the United States, can such a large block of people be so consistently disrespected and disregarded by the media, the government, and the society?
Don’t let those glossy home magazine photos fool you, home remodeling can be stressful! But there are ways plan a stress-free home remodel.
Long-term home remodeling projects are life-altering and can lead to an enormous amount of stress. Your home, that wonderful space that’s all your own, is turned upside down. Materials are in the way, the home gets covered in dust regardless of how much plastic you’ve taped up, and simple design choices can lead to heated arguments in the most stable relationships.
The chaos of home remodeling can seem overwhelming and pressure to get it done, and get it done right, can create an enormous amount of stress.
Dealing with My Own Home Remodeling Stress
Home remodeling stress is real and can cause a lot of frustration within the family. I should know, I’m in the throes of it myself!
Remodeling an older manufactured home isn’t all sunshine and rainbows. It’s hard work and expensive, regardless of how much you do yourself.
After buying our single wide I created a 5-year timeline. We would pay the home off first and then start remodeling without incurring any debt. First, we’d work on updating and repairing the flooring, ceilings, and walls. Next, we would build an addition and install new siding. Lastly, the bathroom and kitchen would get completely overhauled.
It seemed like a great plan. I even had a professional plumber/contractor living in the house with me so it was supposed to be easy. My husband has remodeled countless homes, just never our own. It didn’t take long for the reality to set in – remodeling is expensive, time-consuming, and stressful!
It’s been almost 4 years and we haven’t finished (or even started) on a quarter of the projects that we planned. If it’s not one thing, it’s another! Unexpected expenses, time constraints, and a lack of motivation are all creating stress in our home. I still love my home, it’s paid for after all, but I feel as if I could’ve and should’ve done better.
Luckily, you can have a stress-free remodel that actually gets started and finished!
Proper planning and research can help a lot. Knowing what to expect and having realistic expectations helps too!
Their list of home remodeling stress creators include:
Not knowing where to begin
Not understanding how much everything will cost
Not knowing how long the project will take to complete
Making too many changes during the project
Not understanding your home “quirks” or inherent issues
Miscommunication
How to Have a Stress-Free Home Remodel
The two biggest factors of home remodeling stress are emotional and financial factors.
Preparing yourself, and your family, for what’s coming and understanding what to expect can help you have a stress-free home remodel.
Research (or how to use Google to your advantage)
The top three causes of stress in the list above can be remedied by research. Knowing how to start, how much everything is going to cost, and how long a project will take can help you reduce stress during a home remodel.
How to find anything you want on Google
In this day and age, you can find anything you want on Google, the largest search engine in the world. The trick is knowing how to search Google and getting the results you want.
Google uses keywords, or queries, to categorize every article it indexes. There are millions of results for each keyword combination so the chances of finding exactly what you want are high.
Here are a few tips to help you search Google to get answers to questions you have about remodeling:
Quotes and Important Words
If you want to see only results with specific words or word combinations use quotes around the words you want.
If you only want to see how to remodel a bathroom simply add quotes around those words and you’ll get only the results that specifically include those exact words in the text or description. All of us bloggers and webmasters have to tweak our articles and images to make them easier to find for readers and by using quotes around “how to remodel a bathroom” you will be getting only results with those exact words.
If you’re not getting what you want you can add to the search by adding or rearranging words. Remodeling a bathroom can become how to remodel a small bathroom or bathroom remodeling ideas.
Entering your search as a question can help you get better information. Say you want to find out how much vinyl siding costs, simply enter “How much is vinyl siding?” into Google’s search and you’ll likely find the answer.
Keep note, usually, the first three results on Google are advertisements that may or may not tell you exactly what you want to know but after the top three, you’ll likely get your answer. Here is Google’s exact response to “how much is vinyl siding”, along with a link to the source of the information (Angie’s List):
Your total cost determination starts with your choice of siding – vinyl, for example, runs between $200 and $300 for one hundred square feet. For a 2,200-square-foot home, you’re looking at a base cost of between$6,000 and $8,500.
Keep Your Expectations and Limitations in Check
Another way to reduce stress during a home remodel is to understand exactly what the project will entail. Simply put, make sure your expectations for the remodel are realistic.
A complete kitchen or bathroom remodel is going to be more difficult than a flooring install and larger remodels will take longer, and cost more, than smaller projects.
Know How Long the Remodel Will Take
Realtor.com has an informative article titled, How Long Will Home Renovation Take?, that breaks down the average remodeling projects for you. They state that a kitchen remodel will take 3 to 6 months, bathrooms will take 2 to 3 months. You can read more here.
Your budget and DIY abilities will drastically affect the results of your remodel. You shouldn’t expect a $5,000 remodel to have the same results as a $50,000 remodel but you can still get amazing results.
Remodeling is like opening a can of soup without a label. You don’t know what you’re going to get until you open it! Ripping out the bathtub and seeing rotted studs and mold is always a possibility even in a newer home.
Setting a realistic budget, with extra padding for those unknown issues that always arise, will help you keep the remodel stress-free.
Porch.com shares 10 steps to set up a kitchen remodeling budget and breaks down an average kitchen remodels. They state, “According to Remodeling Magazine, the national average cost of a mid-range, major kitchen remodel (which includes updating a 200-square-foot kitchen with 30 linear feet of semi-custom cabinets, a 3-by-5-foot island, laminate countertops, double-tub stainless-steel sink with single faucet, energy-efficient appliances, custom lighting, new flooring and fresh paint) costs $54,909 and has an average return on value of 74.2%.”
The cost allocation for an average kitchen remodel:
Appliances: 19% (about 7% of this cost will be for labor)
To get a better understanding of the cost of a remodeling project you can also refer to the 2015 Cost Vs. Value report from Remodeling Magazine. This report will help you understand the correlation between cost and value. The report will break down a local city’s average job costs, resale value, cost recouped, and regional comparisons for typical remodeling projects.
Summary
Once things feel out of control during a home remodel project, or the thrill is gone, stress may be inevitable. Planning your strategy well, understanding how the remodel will affect you and your family, finalizing and staying within budget, and researching well will help you have a smooth, stress-free remodel.
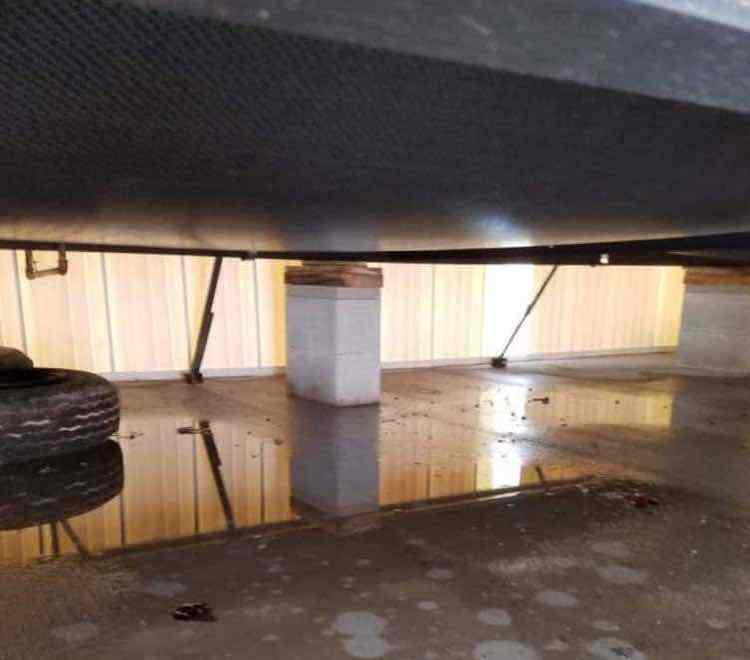
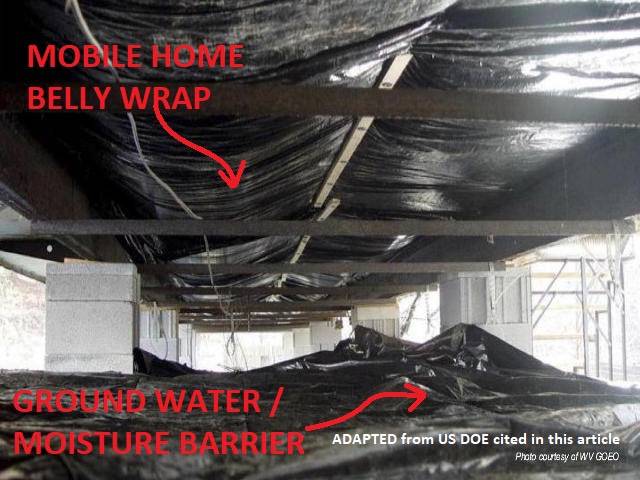
If you insulate under a mobile home you can save money. Over the last 3 decades, the National Renewable Energy Laboratory (NREL) has partnered with the US Department of Energy to test various methods of energy efficiency for old and new manufactured homes. Adding better insulation to the walls reduced heat loss by 13%. Coming in a close second was adding better insulation to the underbelly, under the sub-floor but above the belly wrap. It reduced heat loss by 11%. Installing storm windows also decreased heat-loss by 11%.
As with most everything involving mobile homes, there is confusion surrounding the mobile home underbelly or crawlspace under the home. One reason for the confusion is the numerous names used to describe the same thing. Mobile home belly board is also called a mobile home belly wrap, underbelly, bottom wrap, bottom board, belly, and belly barrier. Regardless of the word you use, it needs to be well-insulated.
In this article, we cover the best materials and method to insulate under a mobile home. We also share how one couple insulated and repaired their own mobile home underbelly using foam board.
Blowing Insulation into the Belly of your Mobile Home
As we shared in our complete mobile home insulation guide, blowing insulation into the belly and the ceiling of a mobile home is the most recommended method to insulate under a mobile home.
However, this method of insulating a mobile home underbelly requires specialized equipment and advanced knowledge of a mobile home’s construction. Therefore, blowing insulation can be expensive. Fortunately, there are many state and local government programs that may help mobile home owners to add insulation via energy grants and low-interest loans.
Depending on your location you may qualify for a program or financing help to get your mobile home insulated better, especially if it was built before 1976.
Top Materials to Insulate Under a Mobile Home
While blown insulation is the favorite method of insulating a mobile home underbelly it is also expensive because you have to hire it out. Using foam, fiberglass, or Rockwool panels gives the homeowner the opportunity to DIY which is usually always a cheaper option.
Spray Foam
Spray foam is most recommended for already enclosed areas such as the walls or ceiling/roofing of a mobile home. It’s fairly expensive because you have to have special equipment.
Spray insulation can be made of a variety of materials. Most common is cellulose (newspaper), foam, and fiberglass. Learn more about spray foam here and here.
Advantages of Foam Insulation
Foam insulation has many advantages. Here are just a few:
easy to cut with a utility knife, hand saw, or table saw
lightweight and easy to carry
flexible enough to easily maneuver into tight spaces – DIY friendly
doesn’t promote mold growth
water resistant
long-lasting – won’t decay
insecticide is used on most foam making
Since foam board can also act as both an insulator and a vapor barrier for your mobile home it’s ideal to install under your flooring.
Disadvantages of Foam
Fire is probably the biggest disadvantage of foam board insulation and meeting your local fire protection codes may be bothersome. Foam is fairly hard to ignite, but once it catches it emits a dense smoke and toxic gases. However, some manufacturers spray the foam with fire retardant. You’ll want to research your local codes.
The three most common types of foam board are made of polystyrene, polyisocyanurate, and polyurethane. All are petroleum-based products.
Rigid foam can be used in walls, roofs, and foundations, for retrofits or new construction. Most varieties of foam have a higher R-value per inch than fiberglass, cotton, or cellulose. (Green Building Advisor)
Here are the three main types of rigid foam insulation:
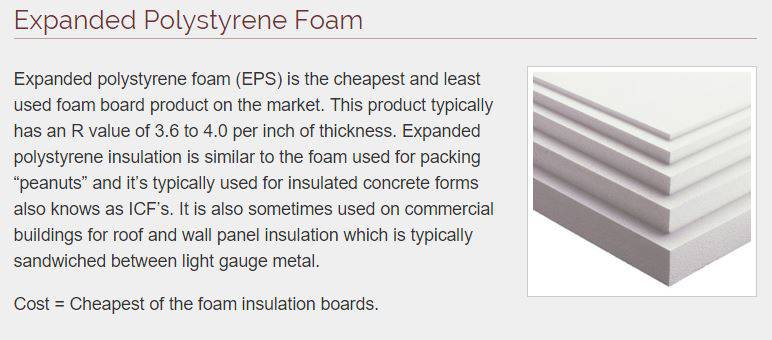
Expanded polystyrene is the most common type of foam insulation and the most affordable.
It is made from the same closed cell foam beads that your coffee cups and shipping peanuts are made from. It is molded, or extruded, into large sheets that can be used in roofing, flooring, siding, and other construction needs.
The R-value of EPS sheets depends on the density, with a single sheet of foam ranging from 3.6 to 4.2 per inch.
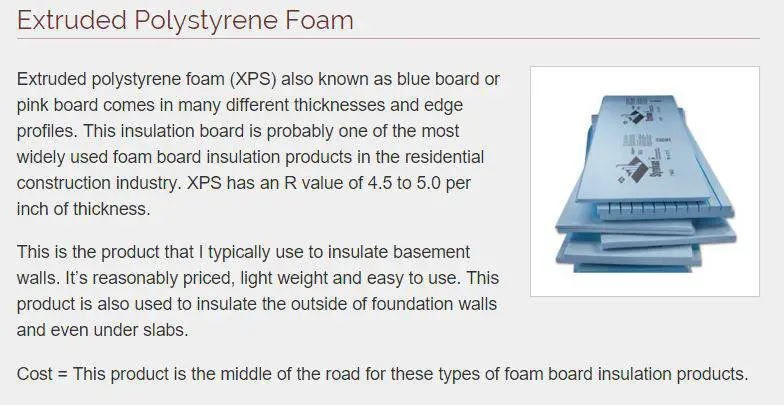
Extruded polystyrene is very similar to expanded polystyrene but it uses pellets instead of beads, making it smoother and denser. It also has better water resistance. You’ll recognize this product by its colors – it comes in blue, pink, and green depending on the manufacturer.
You’ll pay more for extruded polystyrene but you’ll get better energy efficiency. The R-value of extruded polystyrene is around 5 per inch.
Extruded polystyrene is ideal for basements and slabs and makes an ideal choice for insulating under a mobile home if the added cost isn’t an issue.
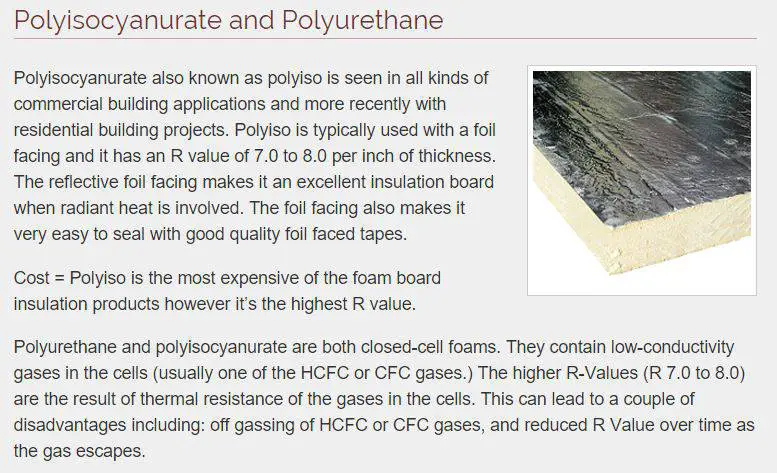
Polyurethane and Polyisocyanurate have advantages and disadvantages.
They have higher R-Value per square inch but they are also the most expensive of the three types of rigid foam.
Foil-faced polyisocyanurate is more resistant to ignition than unprotected XPS or EPS. For this reason, some (but not all) building inspectors allow foil-faced polyisocyanurate to be left exposed on crawlspace walls or in attics without requiring a layer of drywall as a thermal barrier.(Source)
An advantage of polyurethane is the foil that covers the sides. The foil can act as a vapor barrier and is used most often in roofing and foundations.
Laurel and Bryan’s ‘Death Zone’ of Cold Air
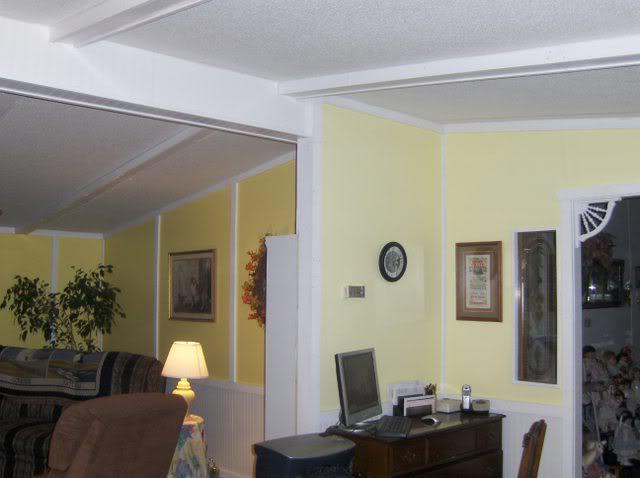
The first year in a new home, especially an older mobile home, is always a learning experience. That was certainly true for Laurel and Bryan Adams when they moved into a 1974 Olympic single wide mobile home.
The couple’s new vintage mobile home had served Laurel’s aunt very well until she passed last year at the age of 93. While the mobile home’s decor may not have made it to the cover of Home and Garden, auntie had lovingly updated it over the years. She had heroically painted the walls herself with a three-inch paintbrush in bright yellow and aqua.
During their first winter in the home, they learned how much their utilities cost and where all the cold spots were located in the home. Needless to say, their 1972 mobile home had a few cold spots and their heating costs were too high for such a small home. The following Spring they began researching how to best insulate their home.
Laurel and Bryan decided to solve their problem energy loss using foam board. They were kind enough to share the details of their project with us, complete with hand-drawn images. How cool is that?
It was a sound, affordable home that had loads of potential!
The Adam’s vintage mobile home sits in Edmonton, Alberta, and since older mobile homes are notoriously under insulated, they experienced wild temperature fluctuations during their first winter.
How to Insulate Under a Mobile Home with Foam
Once Spring arrived, the couple set out to find a way to increase the home’s energy efficiency, especially in the ‘death zone’, as Laurel playfully called it. The death zone was an area 2 to 3 feet above the floor that remained much colder than the rest of the home.
Materials Used:
4′ x 8′ Foam Insulation Board
Table saw and hand saw
3″ screws with 1″ washers
Screwdriver (electric)
The Adam’s were able to buy their 4′ x 8′ insulation foam board from the manufacturers directly. That saved them almost half off the retail price. It pays to cut out the middleman whenever possible!
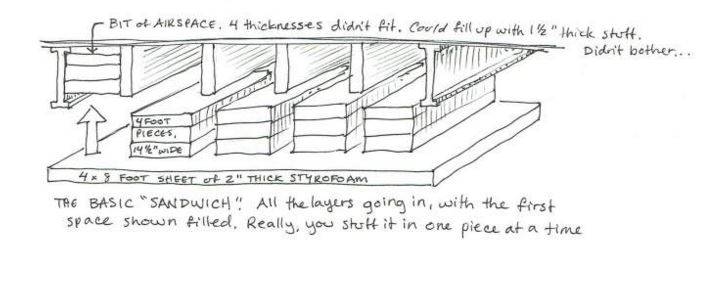
The mobile home’s floor joists are on 16″ centers, which means the wood floor joists are placed 16″ apart from each joist’s center point. Since the joists themselves are roughly 1.5″ wide the section between each joist was approximately 14.5″ wide.
Bryan bought 2″ thick Styrofoam insulation board and used a table saw to cut the boards 14.5″ so that the foam was easy to push between the joists and stay put (there are 4″ foam boards available but the 2″ is easier to handle).
Bryan concluded that layering 4 boards together to create an 8″ total thickness of insulating foam would work best for their area’s average winter temperatures.
Each stack was made of three 14.5″ wide by 2″ thick foam boards. The fourth foam board was left full-size (4′ x 8′) and attached to the bottom of the wood joists. This holds the 3 boards above it in place and creates a total of 8″ of insulation under the entire mobile home.
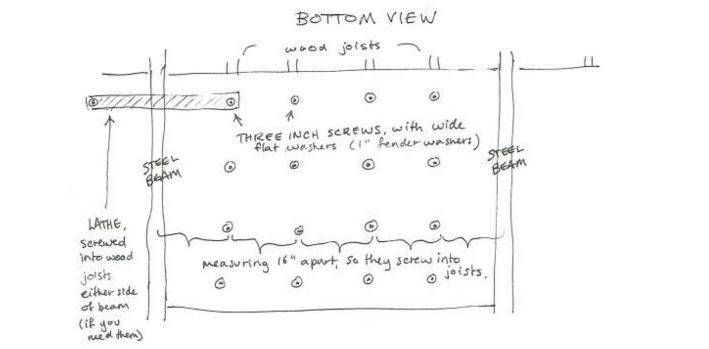
To secure the full-size sheet to the bottom of the home Bryan used 3″ screws with a 1″ wide fender washer. Since the home was built on 2 steel beams at an 8′ interval he used the lip of the steel beams to act as a shelf for the ends of the foam board. The wood joists are a bit shorter than the steel beams so this method worked well.
The drawing below shows it better than I can explain:
Laurel also drew a schematic of the screw placement. She explained that had Bryan not been able to screw into the bottom of the wood joists that he could have used a couple of different options to secure the foam. A thin wooden lathe could have been used as a bridge to hold the foam into place.
The results of the couple’s DIY insulation project has been a great success! Laurel states that the ‘dead zone’ is long gone and since the foam has insulated the duct-work under the home the forced air heat is reaching the end rooms better.
Using Fiberglass to Insulate Under a Mobile Home
Fiberglass is the most common insulating material. It is made of very fine strands of glass formed in rolls and loose fill batts that are installed between beams, joists, and studs.
Since it is made of glass it is an excellent insulator that is affordable, non-flammable, and water resistant. The downside is that it is fairly dangerous to handle. You’ll definitely want to use protection when working with fiberglass.
Depending on density you’ll get R-value ratings ranging from R-2.9 to R-3.8 per inch.
This is a great video that follow the whole project of removing and installing insulation under your mobile home:
Using Roxul Rock Wool to Insulate Under a Mobile Home
One expert recommended Roxul Rockwool for a few reasons. The following benefits are from the Rockwool website:
Non-combustible stone wool insulation with a melting point of approximately 1177°C (2150°F)
Fire-resistant due to its high melting temperature
Water and moisture resistant; does not absorb moisture to maintain insulating value
Chemically inert
Does not rot or promote the growth of mildew, fungi or bacteria
CFC- and HCFC- free product and process
Made from natural and recycled materials
ROCKWOOL® can contribute to earning LEED® points
Rockwool is a rigid mineral wool insulation sheathing board that is non-combustible, water-repellent, fire-resistant and sound absorbent
Some experts may frown on the 4.5″ left over from each 48″ wide board after getting 3 cuts. That seems kind of silly of a reason to not like a project as the foam can be used on a multitude of other things. You may even be able to get 2 or 3 different areas of your home insulated using the ‘waste.’
In the construction world you have the wrong way and the really wrong way. Everyone has an their opinion and everyone else is wrong. Ask 3 different construction exerts the same question and I guarantee you will get 3 different answers.
It is recommended that all mobile and manufactured homes have a ground moisture barrier. A barrier is usually just a polyethylene plastic sheeting placed directly on the ground and secured under the home to act as another shield between earth and home. it should extend 6″ past your mobile home skirting.
The ground barrier combined with a vapor barrier (whether via a separate belly wrap or foam installation) will protect your mobile home from moisture. It can also deter animals from going under your home and help you locate leaks and water issues as the water will sit on top of the plastic instead of soaking into the ground.
Check your Local Codes Before All DIY Projects
Inspections are a necessary evil in the construction world, regardless of what kind of DIY project you do. Every location, whether in Canada or America, has building codes that must be met for all update and remodeling projects. The location of your home will impact the codes that you will need to meet. Homes in Canada face different issues than homes in Florida so be sure to research your local codes.
Summary for Insulating Under a Mobile Home
Repairing and insulating under a mobile home (or the mobile home belly) isn’t the most exciting remodeling project but it can make a huge difference in your energy bills and your comfort.
Unfortunately, most mobile homeowners have no idea how important the belly of their mobile home is to the overall condition of their home.
If your home is losing heat or seems harder to keep heated or cooled you may want to consider insulating under your flooring as the first step in updating your home.
Insulating your mobile home with foam is proven to be effective. The foam is easy to use and fairly affordable for its high R-value and energy conservation properties.
Laurel states that she doesn’t think insulating the walls would have made nearly as much of a difference as the underfloor insulation has and she would know best, it hit -4 Fahrenheit last week and their home stayed warm and the death zone is long gone.
A HUGE thank you to Laurel and Bryan Adams for sharing their project and teaching us how to insulate and repair a mobile home underbelly. and to Laurel for the awesome drawings!
14,000 people suffer from water damage every day in the US. The insurance industry spends roughly $2.5 billion every year on water damage restoration claims with the average claim running close to $7,000. Needless to say, water damage and water damage restoration is serious business.
Water damage restoration isn’t a single project that you can tackle and then forget about. It’s a multi-step process that can take anywhere from a couple of days to a few weeks.
In this article, we cover the equipment used in a water damage restoration, restoration processes, where to find a good water damage restoration professional, and tips on how to handle specific materials in your mobile home like subfloors and ceilings after they’ve suffered water damage.
Our mobile and manufactured homes are made with cheaper and more porous material than most site-built homes. AND THAT’S OK.
Mobile Homes Have a Lot of Porous Materials
Water is one of the most destructive forces on earth and can create havoc on a mobile home.
You don’t need to suffer a major flood to have significant water damage. A 1/8″ crack in a water supply line can leak over 250 gallons of water in a single day and make a mess of the mobile home subfloor, walls, and cabinetry. (Source)
Our mobile and manufactured homes are made with cheaper and more porous material than most site-built homes. AND THAT’S OK.
Let me repeat that…..Manufactured homes are built with modern materials like OSB, MDF, and particleboard. They are constructed with a lot of glue and staples but have comparable strength and durability as traditional materials and building methods. Technology has given us the ability to build sound homes that a regular working-class family can actually afford and there’s nothing wrong with that.
Manufactured homes cost less than half the price of a site-built home per square foot. The average site-built home in the US costs around $286,000. Manufactured homes average only $70,600 (source: MHI)
You don’t get that kind of affordability by using traditional building methods and materials.
Hiring a Water Damage Restoration Company
Hiring a water damage restoration company is easier if you take advantage of the professional associations of restoration companies that train and certify technicians.
Expect to have a lot of scammers and ‘contractors’ knock on your door within hours of a natural disaster. You never know what you’re going to get so be polite and ask for their insurance, their business license, and a list of references that you can call. That should make them leave.
Water Damage Classifications Impact Costs
Service Pro of Kalamazoo states that the average price for a standard water damage restoration in WI is around $3,000. That price can change depending on your water damage and intrusion classifications.
The IIRC’s average cost for just water removal is $2700. Adding cleanup and restoration can cost upwards of $20,000. (Source)
What are Water Damage and Intrusion Classifications?
The IIRC has created a national standard of restoration classifications. They have classified water damage into 3 classes and created 4 classifications for water intrusion.
3 Classes of Water Damage
Category 1 water damage is water that came from a ‘safe’ place such as a water supply line or an ice maker.
Category 2 water damage is often called grey water. It comes from an unsanitary and unsafe source such as a sewer line rupture and septic tanks. It is unsafe and will pose a serious risk to anyone that comes in contact with it.
Category 3 water damage has toxic and damaging bacteria such as a serious sewage leak or flood water. It’s best to have professionals deal with this class of contamination.
4 Classes of Water Intrusion
If you get estimates from restoration companies expect to see these water intrusion classes on their estimate. They will use these classifications when estimating the cost of the job,
Class 1 water intrusion is minimal water and mostly nonporous materials like cement.
Class 2 water intrusion deals with medium porosity that extends drying time and cost,
Class 3 water intrusion involves highly porous material like mobile home gypsum board and MDF. These materials soak up a lot of water and will need extended water extraction and drying time.
Class 4 intrusion is the most difficult water damage restoration. Water trapped behind walls and under floors would be considered a class 4. Expect to rip out and replace a significant amount o material.
Water Damage Restoration Equipment
Having the right equipment for the job is essential, especially if you have suffered serious water damage.
Equipment used for water damage restoration. (Source Steam-Brite.com)
The more water and vapor you can remove from your home the better and modern equipment makes that removal a lot easier and a lot more effective, giving you a better chance of complete bacteria and fungal removal.
Water damage restoration equipment is expensive. Luckily, homeowners can rent almost all the equipment needed for DIY water damage restoration.
Water Extraction System
The first piece of equipment used in water damage restoration is a water extraction system. These machines suck up the water and moves it away from the house via tubing.
Source SunBelt US
There are several types of water extraction machines. The standing water extraction system on the right is the top of the line Hydro-X Xtreme Xtractor. It has a patented suction roller that does both suction and compression. This forces the water to the surface, so the suction pulls the water away, and it doesn’t have a chance of being reabsorbed by the carpet. It runs close to $4200.
A truck mounted water extraction system are run between &10,000 to $20,000 or more.
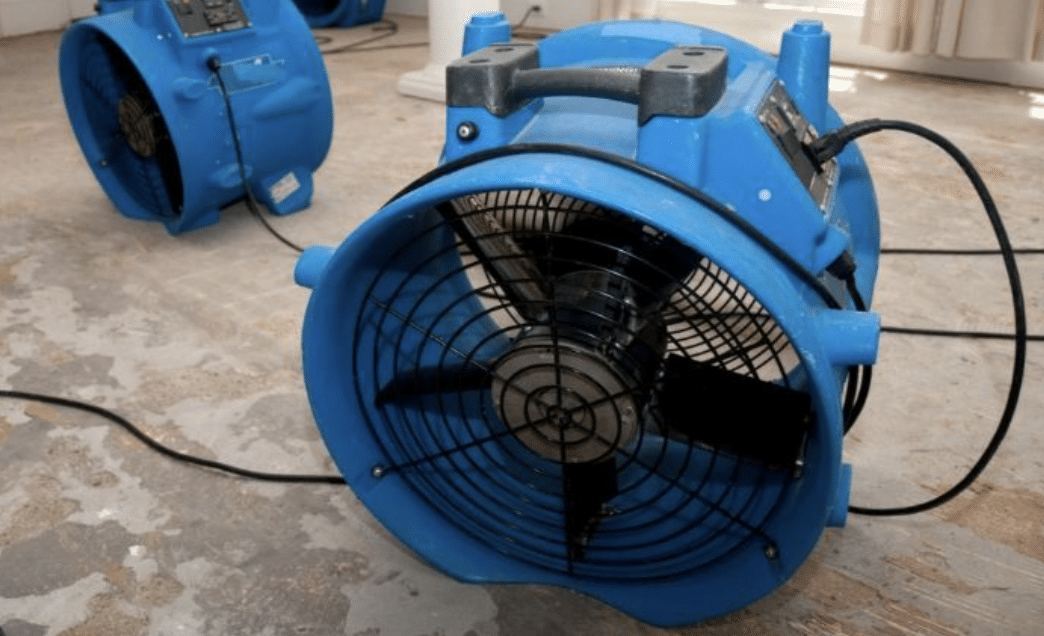
Air Movers
You’ve probably seen industrial floor fans pointed toward the floor somewhere. They call them air movers. High-powered industrial air movers push out a lot of air and usually costs between $200-1200 depending on the model.
Source RestorationSoS.com
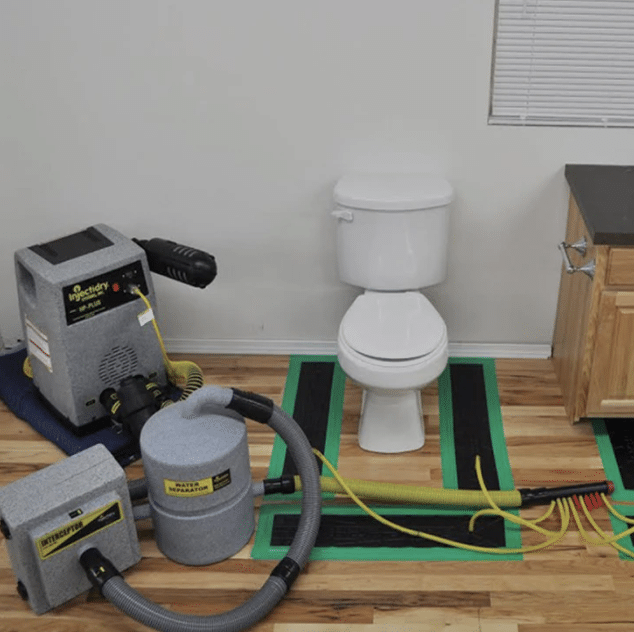
The Injectidry System
The most expensive water restoration air mover is probably the the injectidry systems that has tubing and pads that lay straight over the floor. They run a few thousand dollars but they can dry several feet of flooring or ceiling quickly.
Source: Sylvane
Dehumidifiers
Dehumidifiers pulls humidity, or water vapor, from the air. After a major water incident there will be a lot of humidity in the air and mold spores love humidity.
There are several types of dehumidifiers.
We use a desiccant dehumidification moisture control procedure, along with fans and targeted air movement, to remove moisture in the air from the disturbed spaces. These dehumidifiers direct extremely dry air into damaged areas and speedy drying decrease the probability of additional damage, helping you return to your home or business as soon as feasible.
BMScat
CleanFax.com describes a desiccant dehumidifier as a machine that utilizes “chemical attraction instead of condensation to remove water from the air.”
If you can rent or borrow the air movers and dehumidifiers described above you will have a much easier time. Of course, if you can’t get the equipment make do with what you have and get creative. Simple house fans are better than nothing.
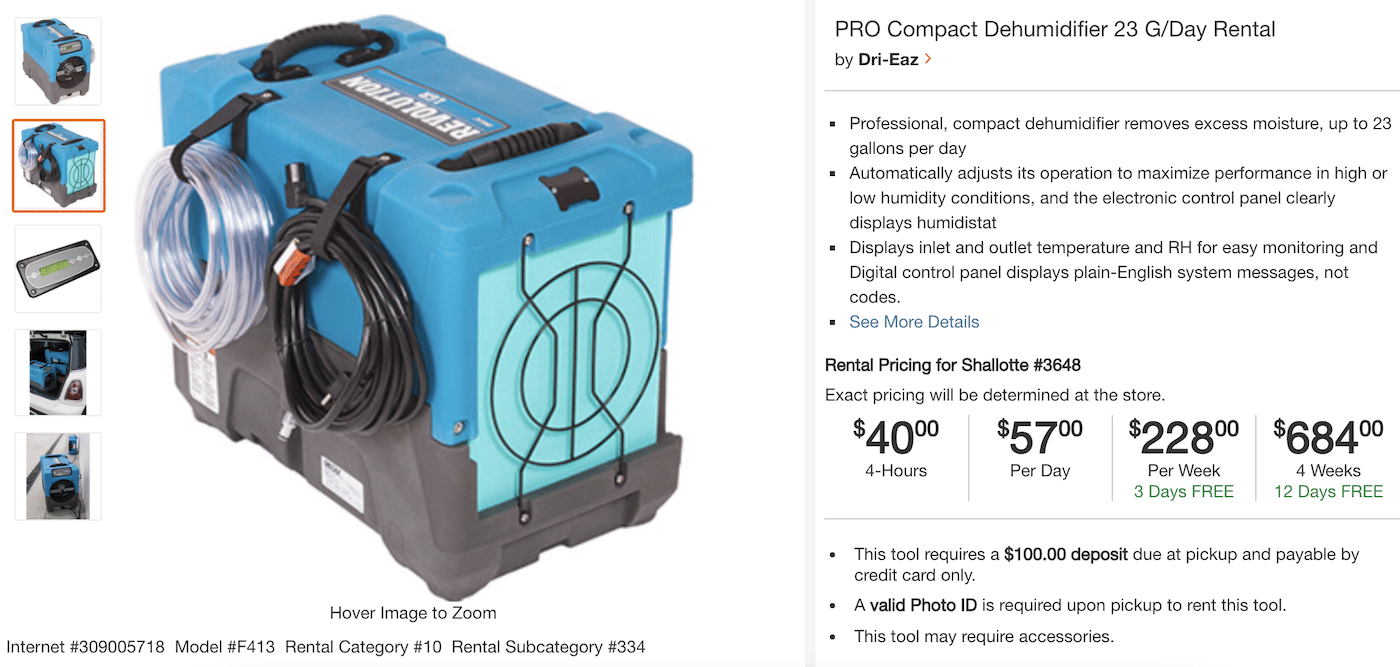
Home Depot’s rental prices for an industrial dehumidifier
Home Depot and Lowe’s have water damage restoration equipment rentals. The dehumidifier above costs $57 per day or $228 per week. This model can extract up to 23 gallons of water a day.
Air Scrubbers
The name says it all. Air scrubbers pull airborne particles that create the musty smells after water damage. There are wet air scrubbers and dry. The wet air scrubbers use a wet filter that the particles stick to. The dry air scrubber uses an ionic purifier.
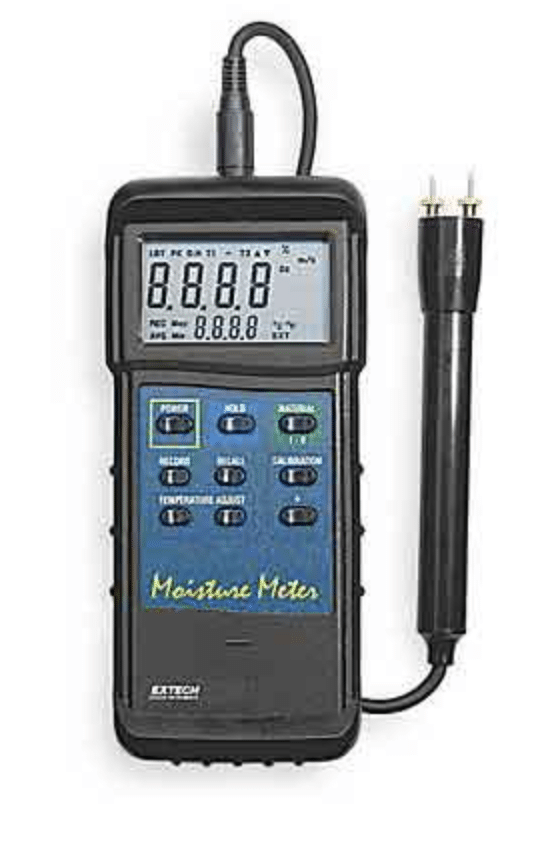
Moisture Meter from Steam-Brite.com
A moisture meter is a must-have for restoration companies. The one pictured above costs around $300. It can sense moisture in 150 different species of wood.
Air Purifiers also help indoor air quality. HEPA (High-Efficiency Particulate Air) Filtration is the most popular type of air purifier. This guide will help you understand more about air purifiers.
Self-Mitigation: DIY Water Damage Restoration
You will need to get to work as soon as possible after a natural disaster. Time is of the essence; extract or remove as much water and water vapor from your home as quickly as possible.
Consumer Reports interviewed Joan W. Bennett, a fungal geneticist, that says mold will start growing in dark damp places within 24 hours. Within two days you can actually see the visible colonies of mold with the right conditions.
You’re on your own if insurance won’t cover the water damage and you don’t have the money to hire an expensive water damage restoration company.
DIY water damage restorations are tough because there are so many steps you have to do and equipment for just about every stage.
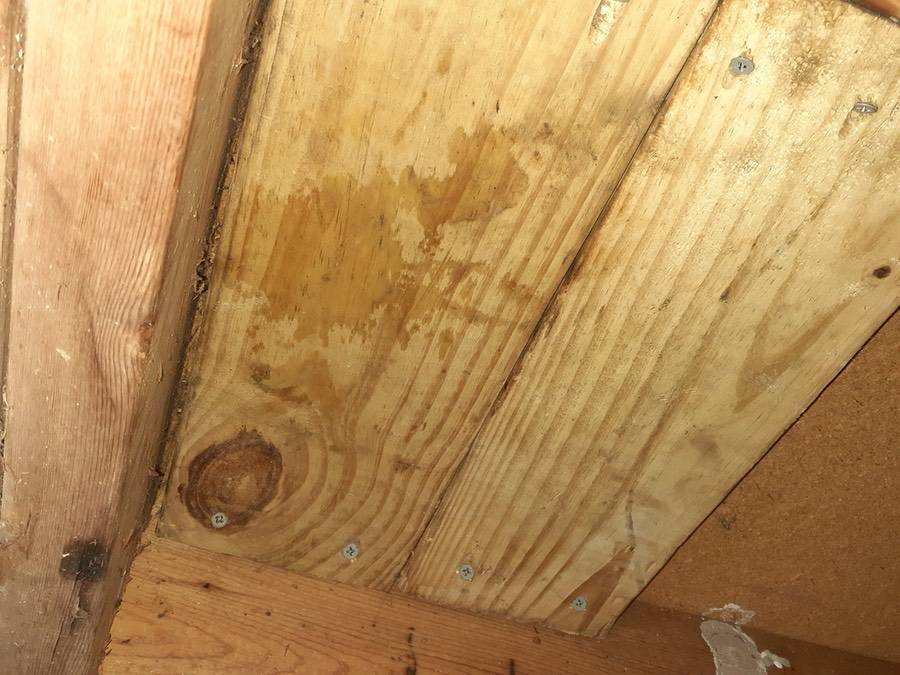
Water Damaged Subfloor and Flooring in Mobile Homes
The most notable porous material in a mobile home is the OSB, MDF, and particleboard subfloors.
An OSB, MDF, or particleboard subfloors are perfectly fine in every way except they don’t handle water very well. These modern materials are pressed, layered, and glued but the process leaves cracks and crevices that water easily flows into.
Drying insulation out typically requires you to remove whatever surface is in front of it, like the subfloors and wall paneling.
If you do manage to dry insulation out you still run the chance of mold spores spreading and causing chaos in the future. Insulation is a fairly affordable material considering what it can do for a home. A $30 roll of R 19 insulation and a staple gun today could keep mold, illness, and more structural damage from happening in the future.
Most Important Steps in Water Damage Restoration for Mobile Homes
If you plan on hiring a company you’ll need to act quickly. Restoration companies that only handle disaster and fire/ water damage restorations know what they’re doing. It makes sense that we follow their lead. Service Master of Kalamazoo lists their steps for a full-service water restoration:
Water Extraction is One of the Most Important Steps
Do whatever it takes to remove as much water as quickly as possible.
Time is of the essence here. Use a wet/dry vacuum, mops, water extraction machines, rags, or whatever else you have at your disposal to get all the standing water gone.
Drying the Materials
After the water is removed you’ll need to focus on drying the materials out completely. This is usually done with large powerful air movers. If you can, rent the air movers with the special flow attachment that points the air flow toward the carpet.
Aer Industries has an article that gives a rundown of the steps that needs to be taken after a water heater leaked in an older residential apartment complex:
Surface water is eliminated by mopping or sponging.
Ventilation is added by opening doors or windows.
Air movers are brought in to begin drying operations. For a 1,000-square-foot shop, two Soleaire ½ horsepower models like the Max Storm would be needed to surface dry the area quickly.
Once standing water is eliminated, long-term drying of isolated spaces, such as in wall cavities and under shelving units, begins.
A dehumidifier would greatly assist in the restoration time frame. Because this is a moderately damp area now, only a small dehumidifier with a 14-pint-per-day capacity would be necessary. The BlueDri BD-76P, for example, should be sufficient to handle the job.
Flood Insurance
It wouldn’t be right to have an article about water damage restoration and not mention flood insurance. A standard homeowner’s insurance policy does not cover flooding.
The only way you can get flood insurance is through FEMA’S National Flood Insurance Program.
The National Flood Insurance Program (NFIP) is managed by FEMA, the Federal Emergency Management Agency. The NFIP is a network of 60 insurance companies that are certified to sell flood insurance across the nation.
Conclusion: Water Damage Restoration is Tough and Expensive
Water damage is serious business. There are many variables at play that affect both the outcome and the cost of a water damage restoration.
The secret to the most successful restorations seems to hinge on the time it takes you to start the restoration after the damage occurs. The sooner you start the removal or extraction of the water and the water vapors from your home the better.
As always, thank you for reading Mobile Home Living®!
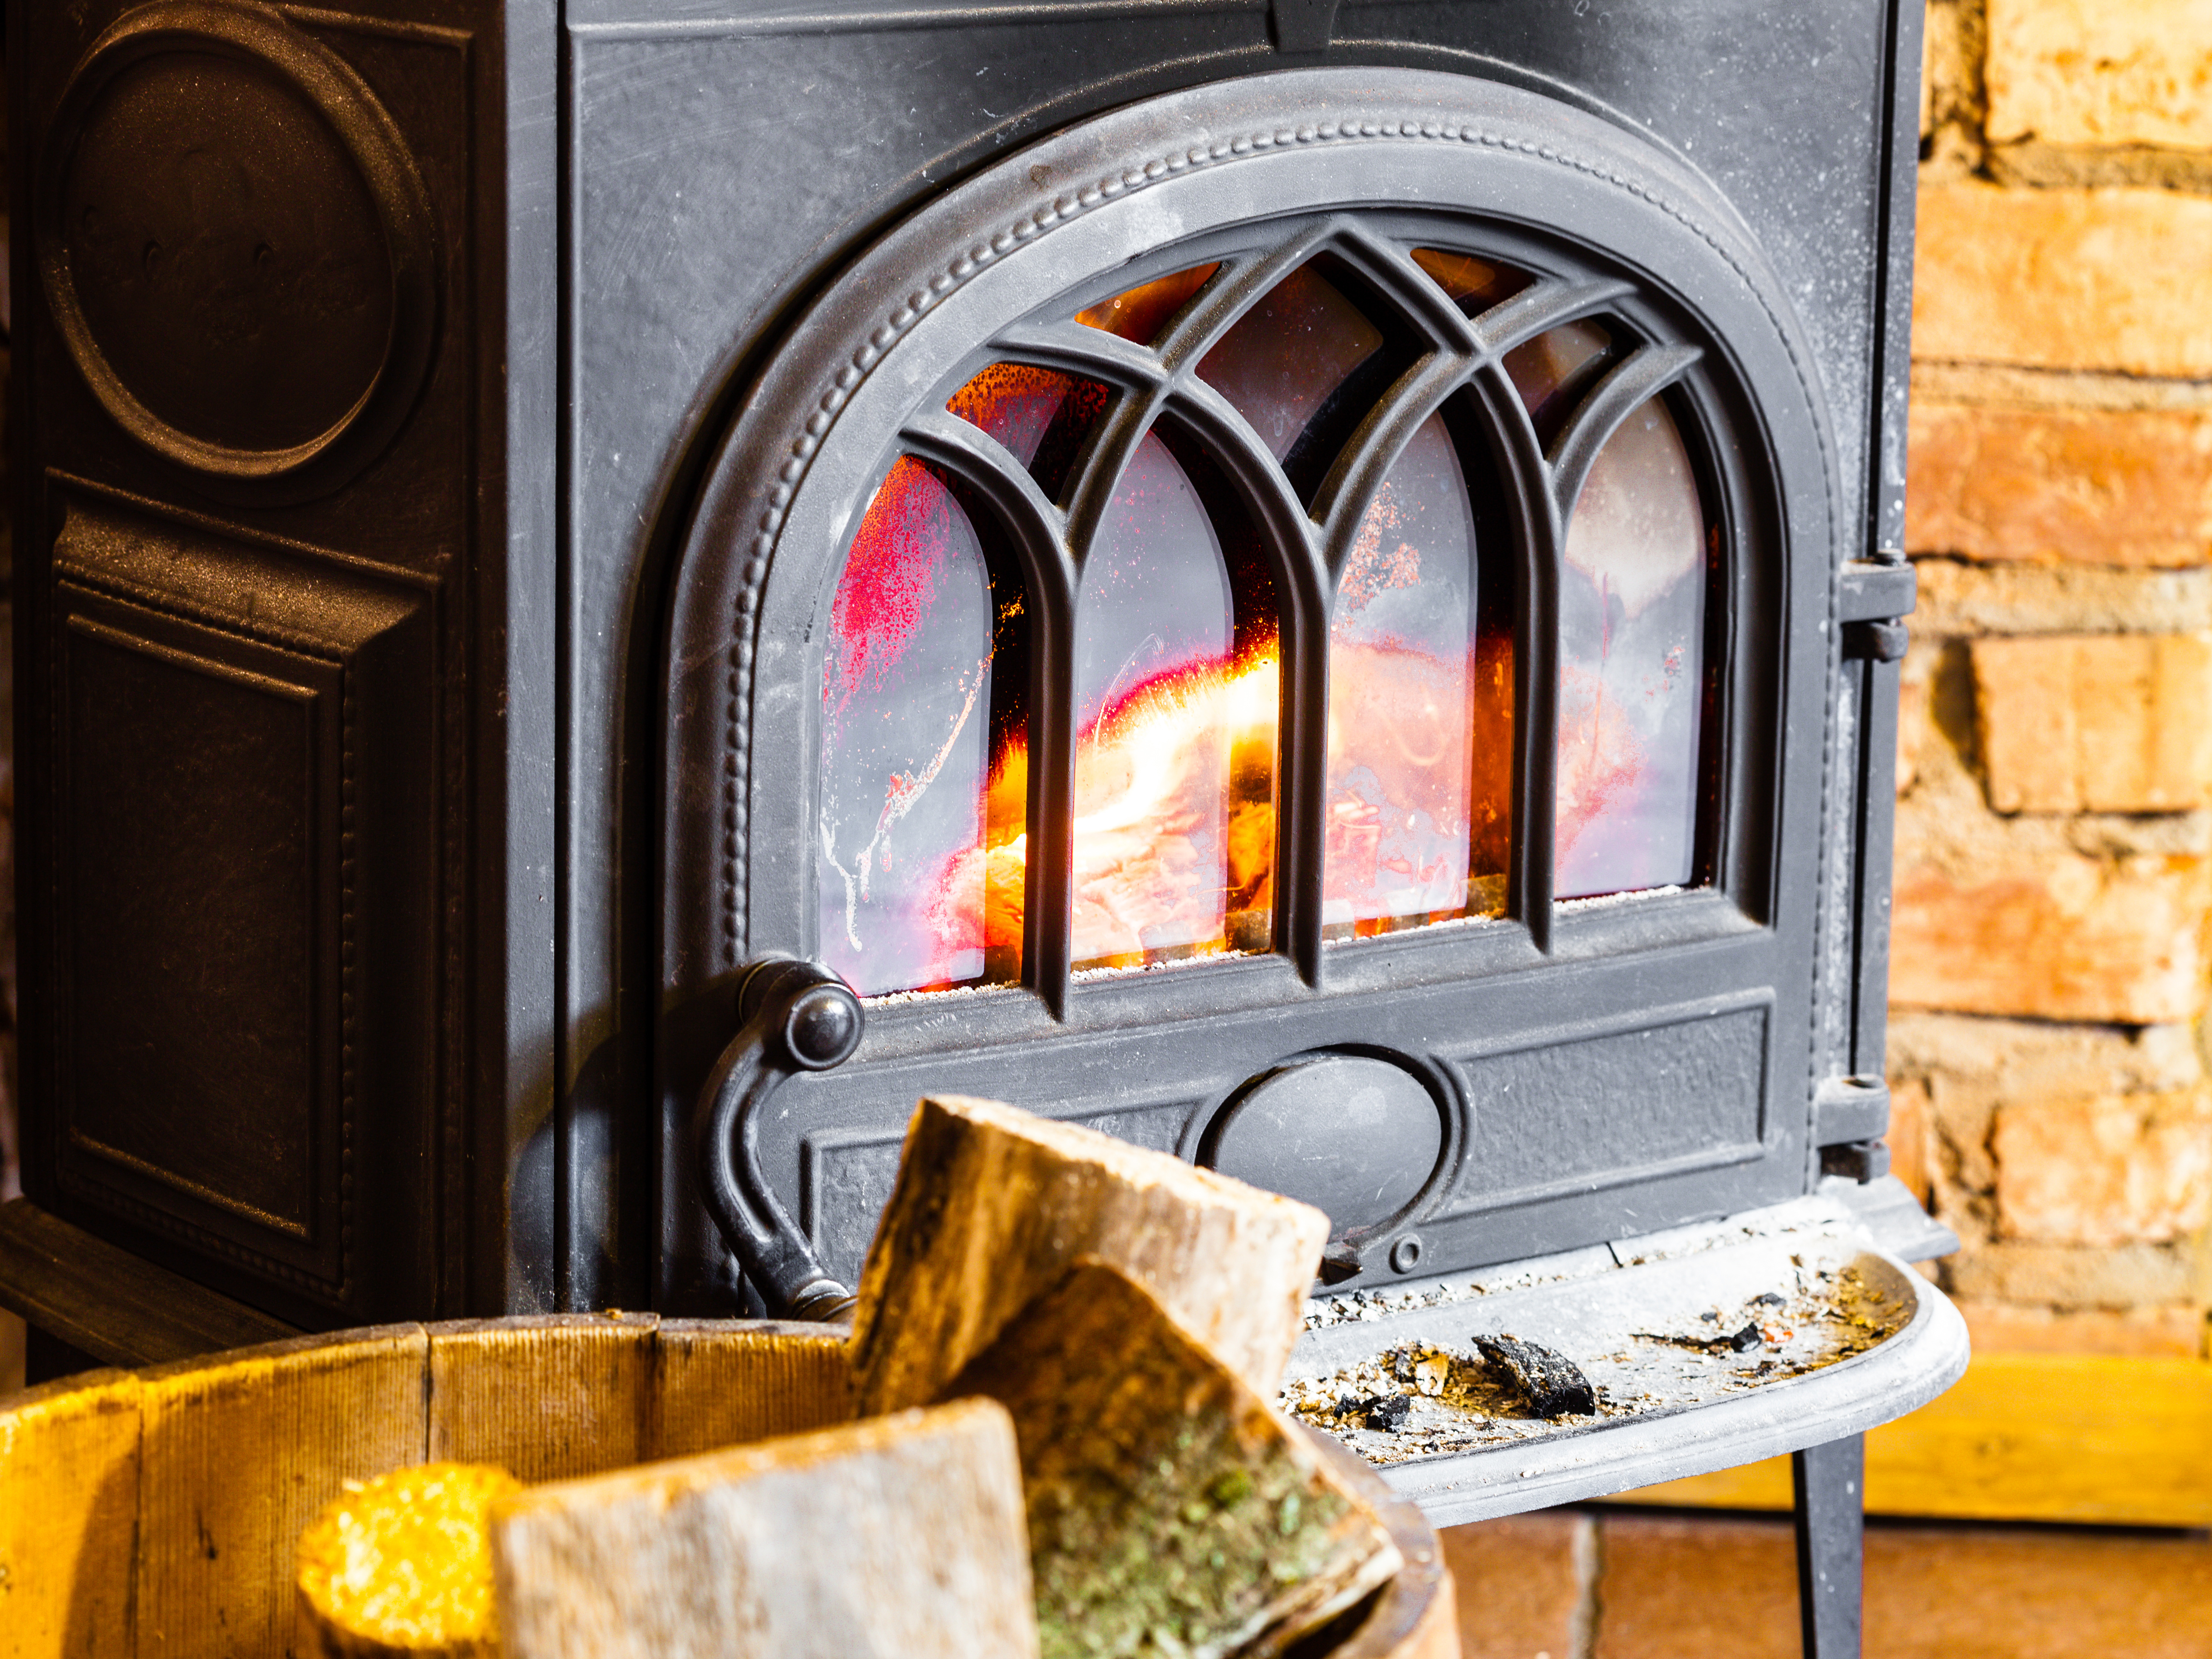
There’s nothing quite like the dry hot heat of a coal or wood stove. I grew up in the coalfields of southern West Virginia and most mines would give their employees ‘free’ coal each year. Every man in my family was a coal miner so I’ve been around coal stoves my entire life. I’m sitting in my WV mobile home writing this and there’s a coal stove about 10 feet away. Like I said, there’s nothing quite like that dry hot heat!
The money you can save on your heating costs is just icing on the cake. And home heating costs are increasing each year so installing a coal or wood stove is smart, for most.
Fair warning, though, insurance companies HATE wood stoves in mobile or manufactured homes. Chances are your home insurance policy will be cancelled if you install one, even if it’s approved for mobile homes.
We’ll cover all the insurance issues related to installing a wood stove in a mobile home along with other important information like how to install a wood stove in a mobile home.
Advantages of Installing a Wood Stove in Your Manufactured Home
Installing a wood stove in your home has many great advantages. One of the best benefits of a wood stove is the ability to have heat when your power goes out. Lower heating costs is another great benefit of a wood stove. If living an affordable or debt-free lifestyle is important to you a wood stove is one of the smartest long-term investments you can make for your home. In addition to the convenience and savings, little can compare to the beauty of a fire along with its comforting snaps and crackles.
A warm fire is the epitome of a cozy home and you can have it in a manufactured home. Of course, there are guidelines that need to be followed and safety concerns that should be addressed. We’ll go over general guidelines for choosing a wood stove for your manufactured home as well as the basic installation steps in this article. Get ready to be warm!
There’s just something about that dry hot heat from a wood stove.
You just can’t beat it!
Dealing with Your Insurance Agency
First and foremost, you must buy a stove that is approved for mobile and manufactured homes. Insurance companies will drop your policy if they find that you have installed an unapproved stove and we all know it’s hard enough to find insurance. Whether the stove will be your single source of heat or just a supplement seems to be a big factor to the insurers – if a stove will be your single source of heat you may have more difficulties so call your insurance agency and discuss the following issues:
Will your insurance raise or be dropped by installing a wood stove? What if the stove is the sole source of heat?
Will you need to have an inspection after the installation?
Does the stove have to be installed by a certified contractor?
Is there a list of accepted stove manufacturers or models that they recommend?
Do they offer guideline sheets or brochures on installing a wood stove?
There are differences between a regular wood stove and a manufactured home approved wood stove and luckily most major stove manufacturers have a manufactured home approved model. The major difference between a regular wood stove and a HUD approved stove for manufactured homes is the air intake, clearance, and chimney system. Because manufactured homes are so airtight it is important to have a good fresh air intake that will enable air from outside the home to enter.
Mother Earth News provides a good summary for choosing a wood stove for a manufactured home:
First, the stove model must have been tested by a HUD-approved laboratory and listed for use in mobile homes. A metal tag permanently fastened to the rear of the appliance indicates the name of the testing facility and the stove’s compliance with HUD Standard UM-84.
Second, a tested and listed prefabricated chimney system—connected directly to the stove and installed properly—must be used. Third, a hard ducting system for bringing outside combustion air directly to the stove’s air inlet is required.
And finally, some means of securing the stove to the floor of the home is called for.
What makes a heater mobile-home approved?
Mobile-home approved stoves have gone through specific testing to show that they can source their combustion air entirely from outside the house. This is required because mobile homes (or manufactured homes) are often very airtight. Should there be a lack of combustion air, harmful levels of CO (carbon monoxide) could accumulate in the house. This is why mobile-home approved stoves have an adapter that hooks-up to the unit and connects to a fresh air intake on the outside wall of the house through an insulated pipe.
As stated by Drolet, a leading stove manufacturer.
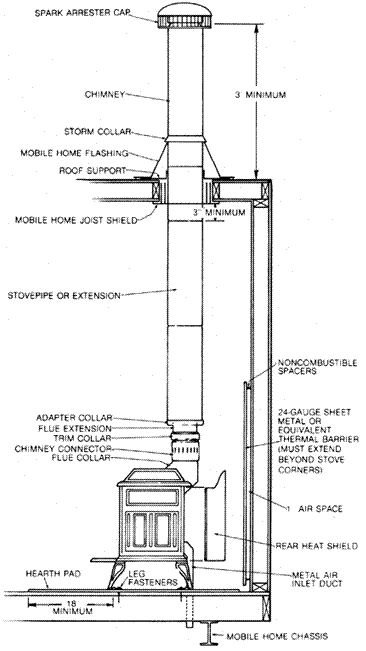
Where to Install Your Wood Stove in a Mobile Home
The first thing to consider is where to put your new wood stove. You should find an area that allows an 18″ clearance from the front of the stove and 12″ on the sides and back. You will also have to calculate for a space where the stove can be fastened to the floor.
Installing Your Wood Stove in a Manufactured Home
Now that you have chosen the right stove and decided on its location it’s time to begin the installation. We’ll go over each step and share an image of the process. Please note: The images shown are not of a manufactured home installation or an approved stove setup for a manufactured home. They are for reference use only. All images were posted on Imgur, an image sharing website, by user wijagoro.
Step 1 – Measuring and Taping-Off the Wood Stove’s Location
Measuring your distance from the stove to all combustibles is vitally important. You’ll need to do some math to get it right.
Step 2 – Building the Hearth Pad
You will need to protect the floor from any falling embers and possibly overheating. This is done with a floor shield or hearth pad. You can buy the hearth or build your own using only approved materials. The shield or hearth pad must extend 18 inches past the access door for wood loading and ash removal and extend 12 inches around all other sides. Before you place the stove and heat shield in its final location a few guidelines must be met: the stove must be grounded to the mobile home chassis and the stove must be anchored to the floor to prevent tipping or shifting in case you ever decide to relocate your home.
Step 3 – Preparing the Wall and Hearth for Covering
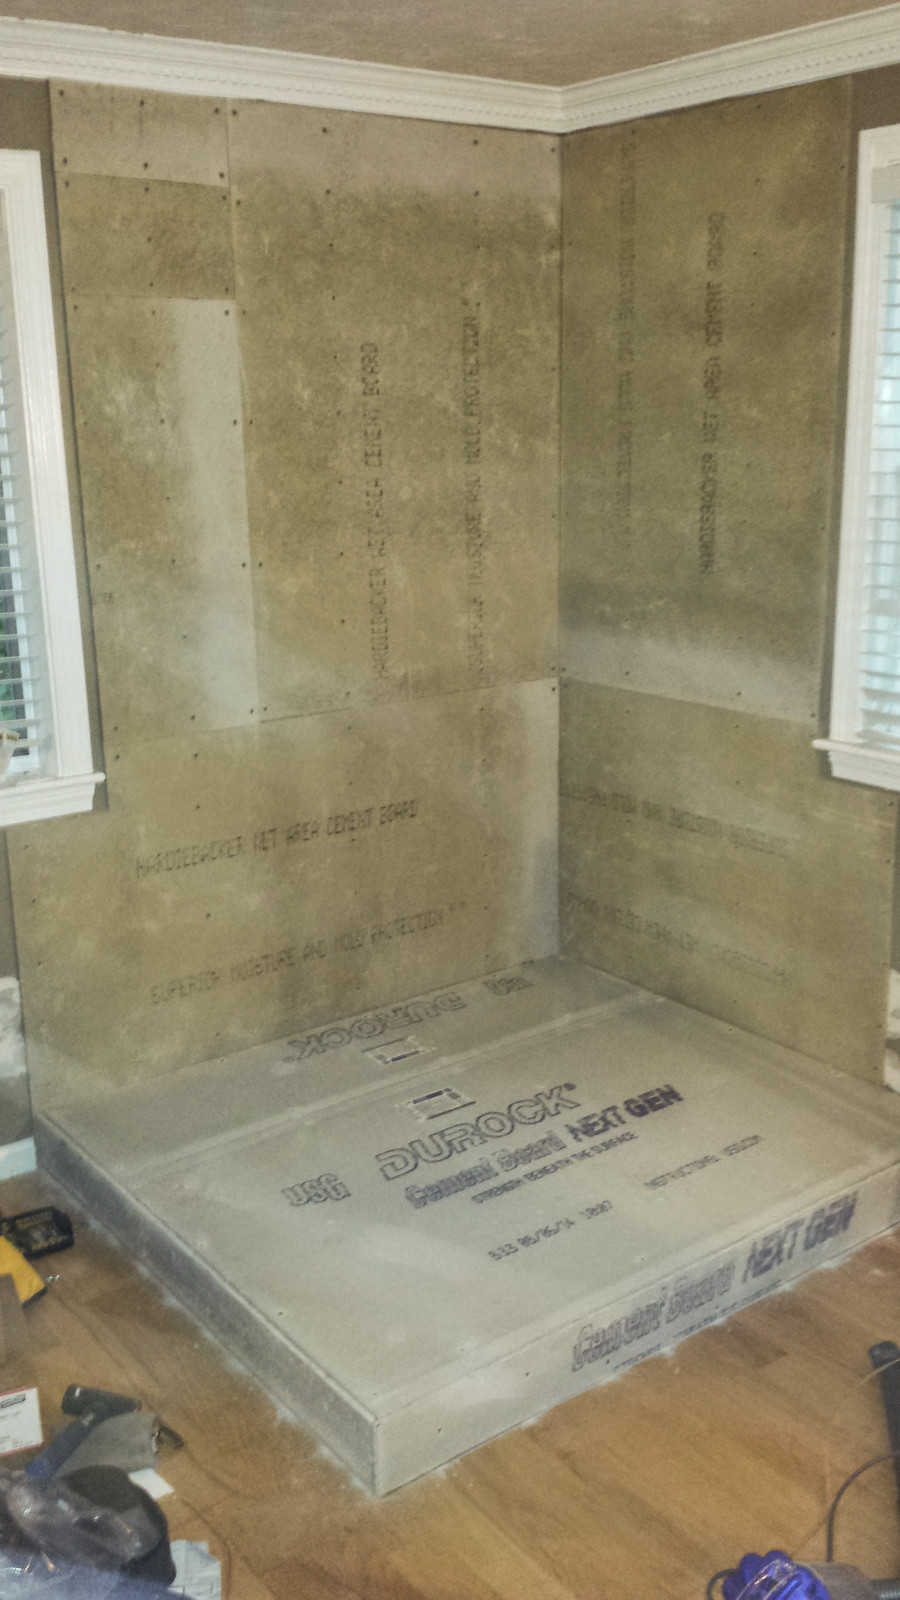
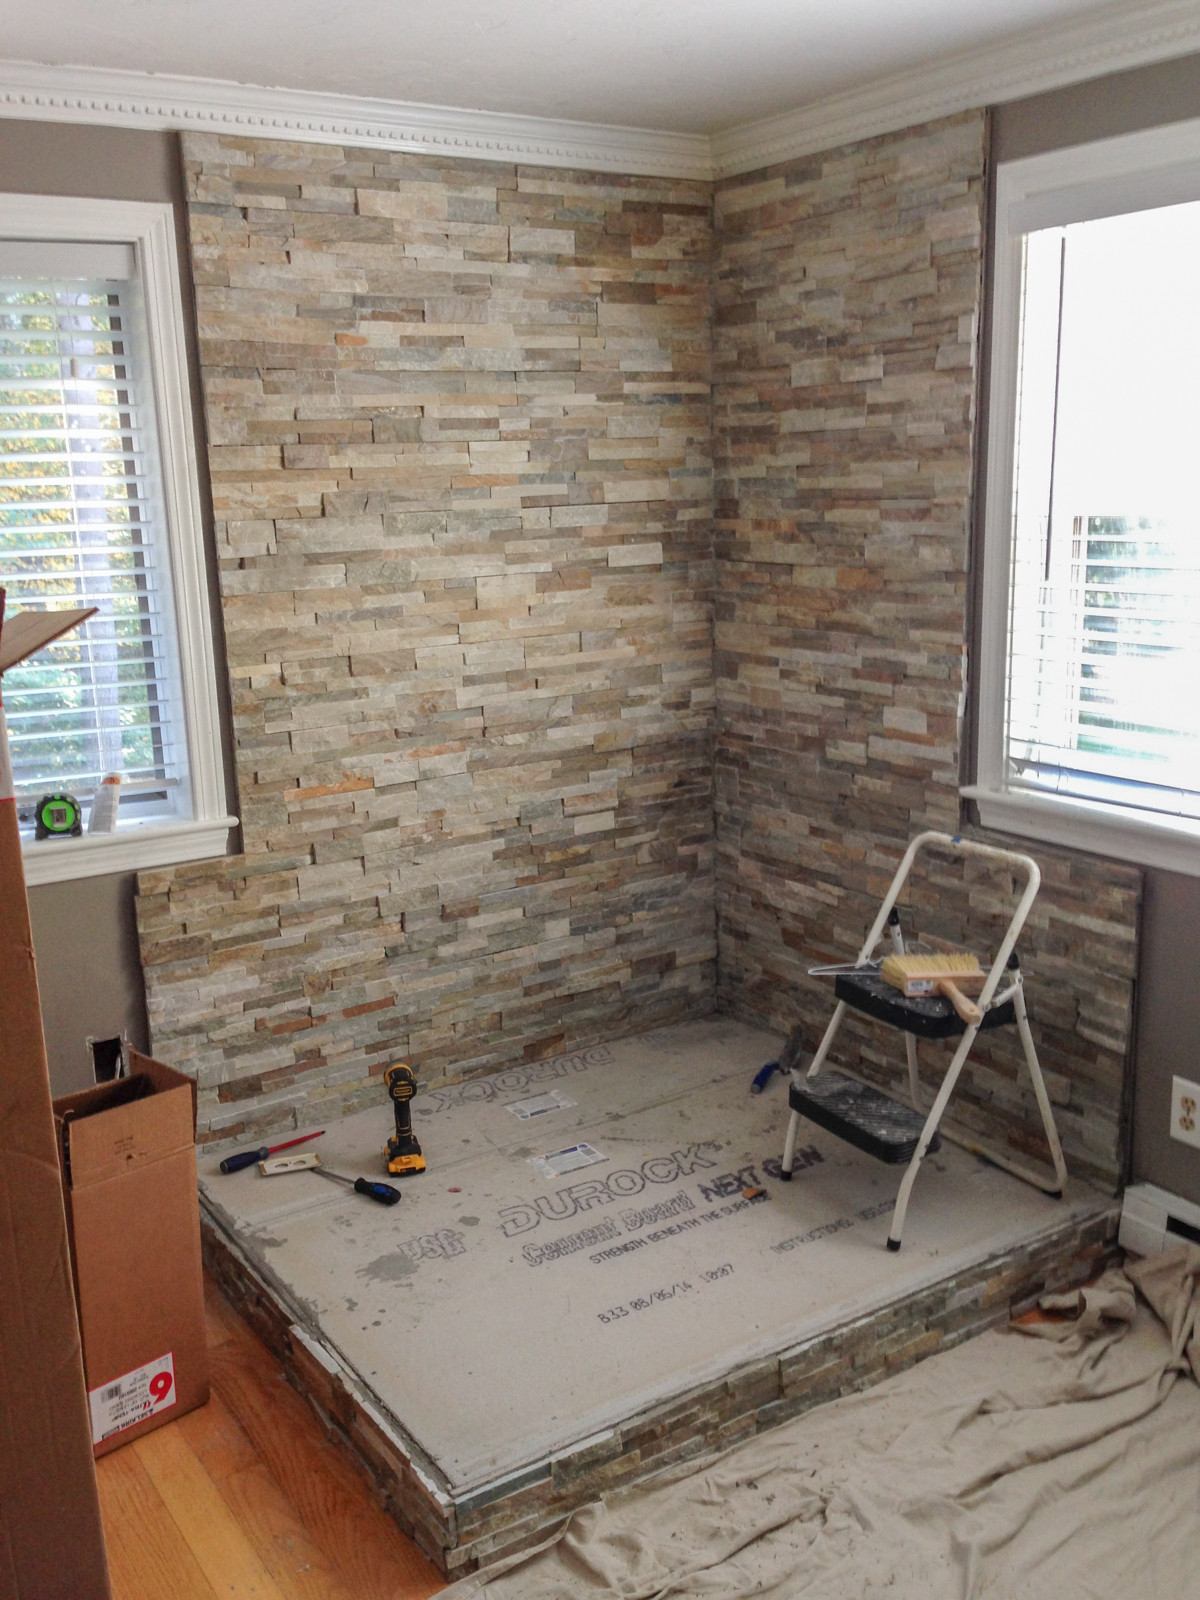
In the image above, the homeowner is covering the wall with non-combustible rock and the hearth with tile. In order to apply the stone and tile, the proper base must be built. As you can see, in this step, the area was covered in plywood first and then cement board is installed. Here you can see the layers of the hearth, notice the DurRock is the first layer, then the foundation, plywood and another layer of DurRock:
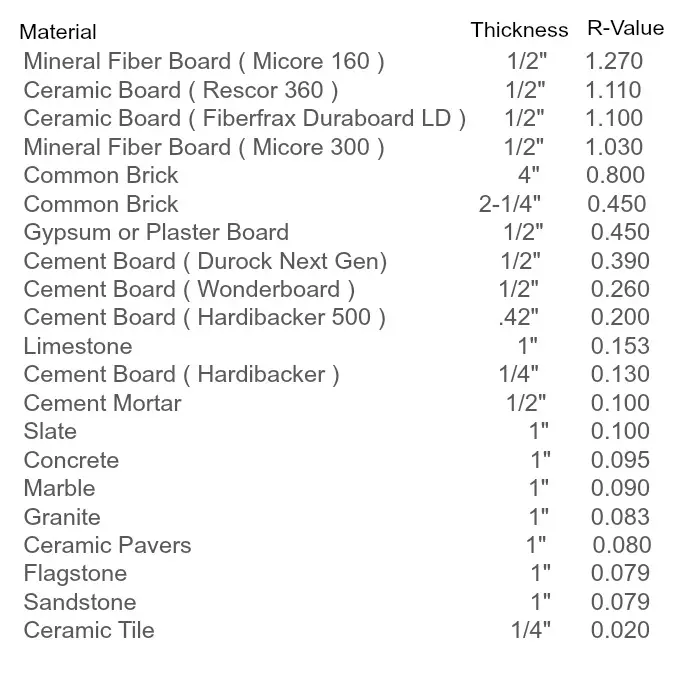
Hearth Material
There are various non-combustible materials that you can use to build your hearth based on R-values and other certified ratings. Here’s a list found on ChimneySweepOnline.com showing the various materials, their thickness, and their R-value rating:
Step 4 – Installing the Stone Surround
Installing a non-combustible material to the surrounding wall is vitally important. In the photos, the homeowner is installing real stone. If you are installing real stone or tile, you should lay the pieces out on the floor to ensure a good look and fit.
You can have a beautiful wood stove surround that is effective and safe:
Step 5 – Installing the Tile Hearth
Step 6 – Installing the Chimney
You’ll need to cut a hole through your roof or the side of your home, depending on code and preference. Either way, you will need to build a frame for your chimney pipe so that it can be supported properly.
A chimney installed through the wall instead of the roof requires the use of tees, elbows, and wall thimbles. You should only use these additional components if absolutely necessary. Offsets and obstructions within the chimney system will restrict the natural draft and take away cosmetically from the overall appearance of your home.
A wood stove that is installed to vent through the ceiling will be most efficient and produce the least amount of creosote deposits because it vents straight up and out without any bends in the structure to obstruct the draft. The best and most widely used method for a wood stove installation is through the ceiling with a high-tech pipe or through an existing chimney.
In the image above the homeowner has built a frame for the chimney. Below, the homeowner is adding the pipe:
Below you can see the pipe secured through the roof:
Black stove pipe should be used in the interior of the home from the top of the wood stove to the bottom of the ceiling or wall where it will connect to the chimney pipe. Make sure you match the correct stovepipe diameter with the diameter of the flue size on your wood-burning stove. You should never use just the stove pipe to pass through a wall or ceiling. The stovepipe is only for use inside of the home.
It is highly recommended to use a double-wall stove pipe regardless of your clearance requirements. Being safe is always a top priority! However, if you decide on a single-wall black stove pipe it requires at least an 18″ clearance to combustible materials. Single-wall black stove pipe will also radiate more heat than double-wall stove pipe, it costs less and can be cut to specific lengths if needed during your installation
Step 7 – Installing the Stove
In the last image, you can see the wood stove has been attached to the chimney. For a manufactured home you would need to permanently attach the stove through the floor as well. You can also see a heat shield sitting behind the stove as an added safety precaution.
Here are some more helpful resources on wood stoves for manufactured homes:
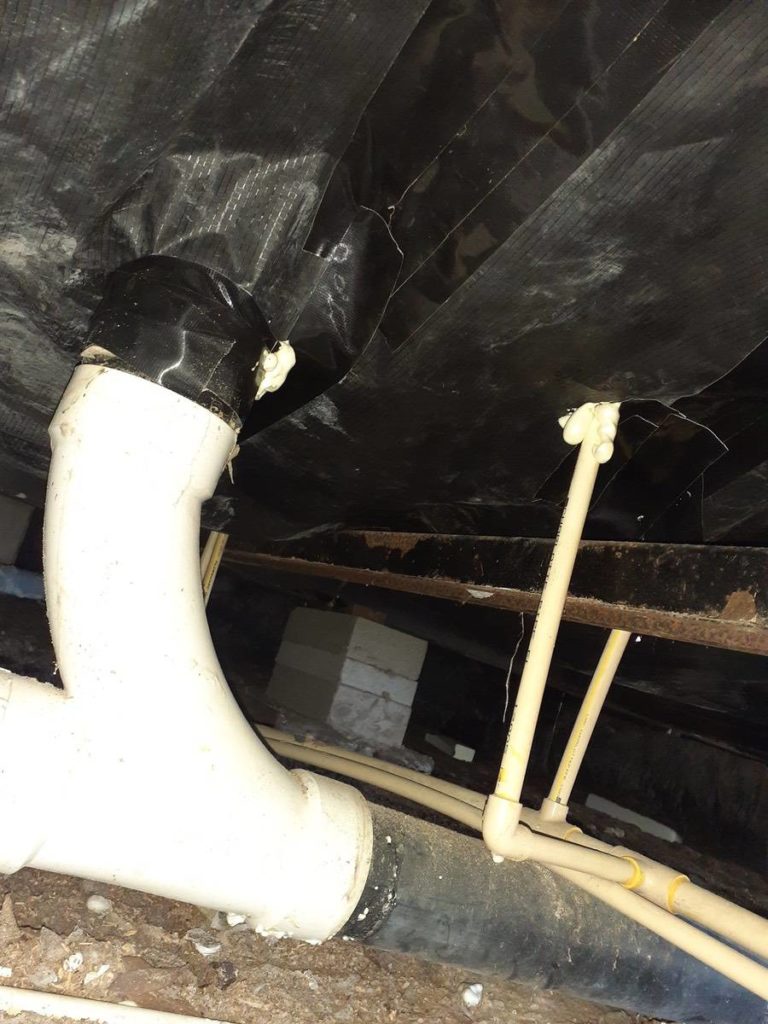
It’s kinda scary under a manufactured home which is probably why it is often overlooked by owners. However, a manufactured home underbelly should not be ignored and will need some attention eventually. In this article, we get to read about a kind reader’s manufactured home underbelly updates.
I have heard people call the area under a manufactured home and the black plastic attached to the bottom of it by many different names so it can be confusing.
Belly board, blackboard, Shepherd’s board, underbelly, belly wrap, and vapor barrier are commonly used to describe the black material attached to the bottom of a mobile home.
There are also other things under your manufactured home such as piers, pipes, footers, vapor barriers. We’ll quickly cover those too:
Underbelly
The term underbelly is mostly used to describe the entire area beneath your home but it is also used when referring to the black plastic sheeting attached to the bottom of your mobile home.
Mobile homes are constructed upside-down – or at least the floor is. The floor joists are nailed together, the ducts and water lines are attached, a thin layer of insulation is draped over the entire floor and a cover (the belly wrap) is installed. The steel frame is attached.
www.e3a4u.info
Belly Wrap or Belly Board
We use the term belly wrap or belly board when talking about either the black polyurethane sheet or the more durable fiberglass board that is attached to the bottom of your manufactured home. The insulation will be right above the belly wrap.
The black material enclosing the base of a mobile home is known by several names: bottom board, belly board or paper, black board, etc. Typically, the material used is asphalt-impregnated fiberboard or fiberglass, cloth or heavy tar paper, and woven polyethylene. All serve the same purpose: Prevent moisture infiltration.
Mobile Home Parts Store
The belly wrap is located between the home’s frame and the steel chassis. It protects the home from moisture and critters (it has an additive in it that repels them) and can help with energy efficiency.
If you have an older mobile home you will want to replace the belly wrap eventually. Materials have improved a lot over the years and chances are it has tears in it.
Piers and Footers
Piers and footers are the feet and legs that your manufactured home sits on.
The footers transfer the weight of a manufactured home down to the ground and are usually concrete rectangles (with rebar in the middle). However, there are also square ABS pier pads (mostly for homes in the southern US).
Piers are the concrete blocks between the footers and chassis (we always called them cinderblocks in WV but I’ve been told that is so so very wrong). They sit on the footers and must be stacked in a certain way for strength and stability.
The Underbelly Of A Newer Manufactured Home. Notice The Footer, Piers, Tie-Downs, And Belly Board. Source Unknown
Vapor or Moisture Barrier
A vapor barrier or moisture barrier is another plastic sheet that is laid on the ground to reduce water vapor from reaching your home. It can be any color but clear and black seem to be the norm.
If your manufactured home is on a full concrete pad it won’t need a vapor barrier since the concrete acts as a vapor barrier..
Source: Inspectapedia.com / Us Dept. Of Energy
Regardless of what we label all this stuff, they are all vital to a manufactured home’s longevity and overall health and should be updated after a few years.
Chuck’s Experience Updating His Manufactured Home Underbelly
My friend Chuck recently had his 1980’s model manufactured home underbelly completely updated. The piers, insulation, belly wrap, and vapor barrier were all repaired and/or updated. Luckily, he was kind enough to take photos and notes so he could share them with us (I owe you big time, Chuck!).
“While I was finishing the last major remodeling project of our home, I needed to go under the home to install new water lines since I moved the location of the sink. My short inspection of the underbelly revealed holes, rips, and approximately 45% of the fiber insulation had fallen down and was resting on the ground,” he explains.
“I realized that this project was beyond my DIY skill level so I called in the professionals. All that material found on the bottom of my manufactured home has been there since the mid-1980s. I now wonder how much energy I have paid for in utility bills that have been wasted.
“The purpose of writing this article is not to educate or guide you on “how to do it yourself.” It’s mainly to remind homeowners of the importance of having your manufactured home’s underbelly properly maintained and to share my experience.
“After meeting with several mobile home insulation contractors, I discovered that the cost of the project varies greatly depending on the installation methods and quality of materials. I ultimately decided on TLC Anchor and Barrier, a local company that is owner-operated – meaning the owner was onsite for the entire project.”
Smart Updates for Your Manufactured Home Underbelly
Installing new insulation and properly attaching a new belly board to the underbelly is probably one of the most difficult repairs on a manufactured home because there’s little room to work.
Here are the steps that Chuck’s contractor did to update his underbelly:
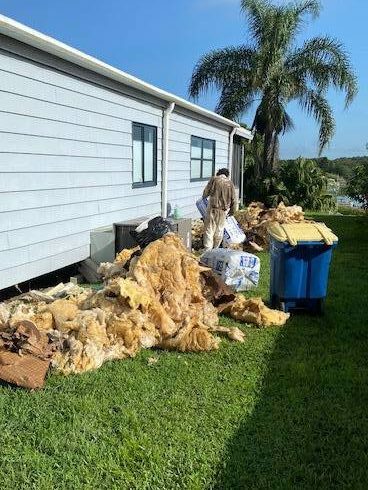
Step 1: Removing the Old Belly Wrap and Insulation
Of course, the first step to a manufactured home underbelly update is to remove the old belly wrap and insulation.
It’s a dirty job so be prepared.
Make sure to wear protective gear such as goggles and a face mask so you don’t inhale the old insulation particles.
Step 2: Repair Sagging or Weak Subfloor
Now that you have easy access to the entire underbelly of the home it’s a great time to repair or replace your manufactured home’s subfloor. There were just a couple of weak spots in Chuck’s subfloor so they just screwed 2x6s into the wooden joists to stabilize it.
2x6s used to stabilize soft spots in floor.
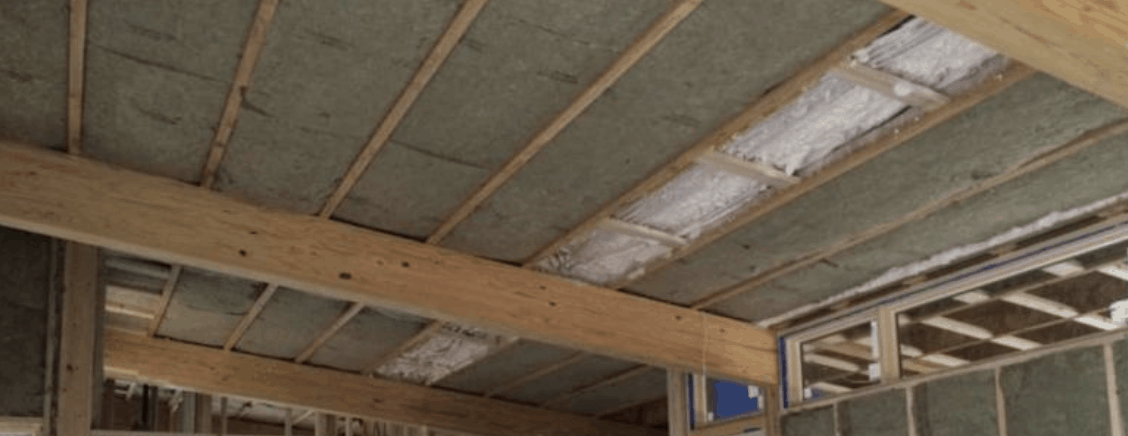
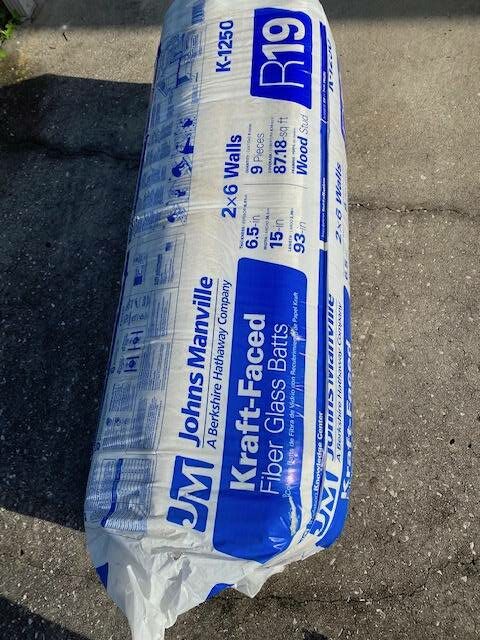
Step 3: Install the New Insulation
The third step is to install new insulation. Chuck used R-19 John Manville Fiber Glass Insulation that would fit between the floor joists.
Most belly boards have to be tacked at the edges and allowed to hang in the middle since it would be impossible to install it as they did in the factory.
New Insulation Installed in Manufactured Home Underbelly
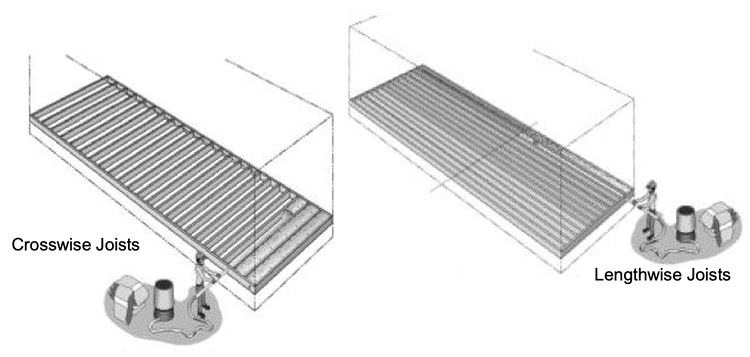
Insulation Being Installed In Manufactured Home With Crosswise Joists.
Step 4: Check Footers, Reset Fallen and Leaning Piers and Broken Leveling Shims
Piers will lean and even fall over if the ground sinks or shifts just a bit. The leveling shims can also soften and rot.
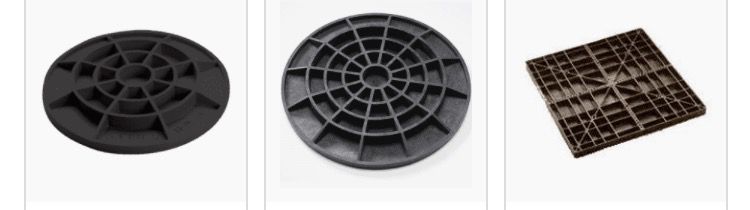
ABS Footer Pads
Step 5: Inspect and Repair Anchor Ties
Anchor ties are critical for your manufactured home and need to be in tip-top shape, especially in hurricane and tornado prone areas. It’s a good idea to inspect them every year.
First, the mobile home is checked to ensure it is level. You can learn more about leveling a mobile home with a water level here. Second, the anchors, or the rods that are in the ground, are checked for damage. The tie-downs or straps and the tension devices are also checked. You’ll want to ensure the stabilizing device on the anchors are healthy as well.
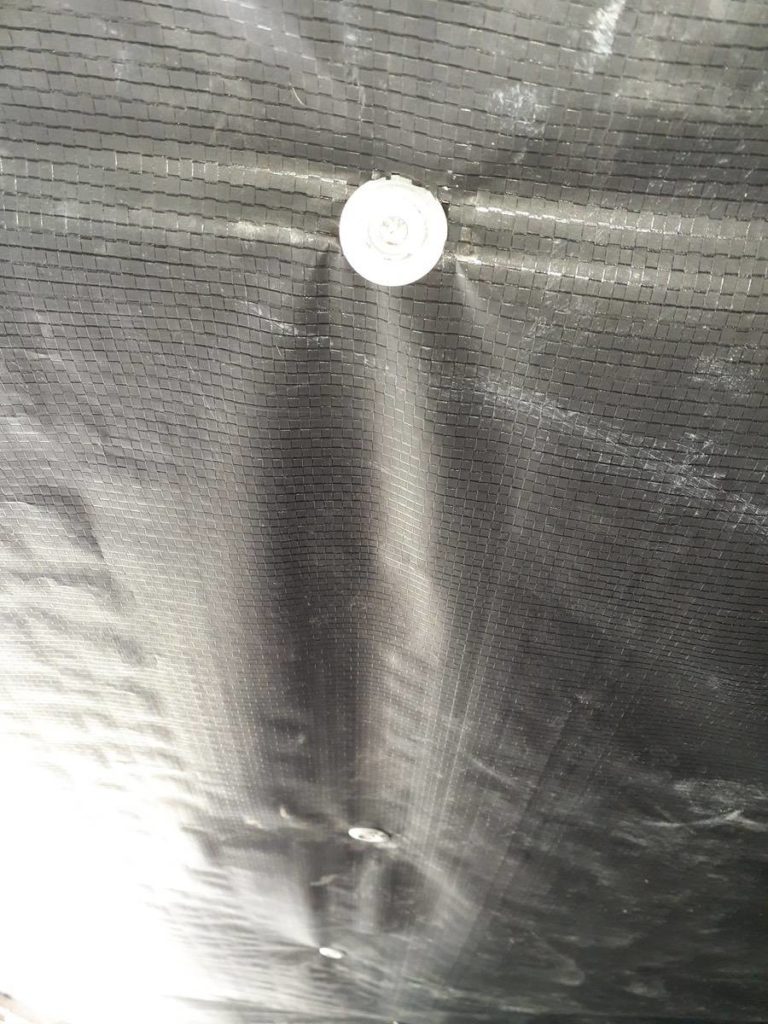
Step 6: Install the New Belly Wrap
After the insulation is installed you can install the new belly wrap or belly board. I would recommend the more rigid fiberglass belly board if possible but a new 6-ply polyurethane belly wrap is fine.
You can attach the new belly wrap with 1 ¼ “ Grip Tite Metal Nails.
Step 7: Secure and Seal Pipes and Ductwork
Pipes and ductwork tend to sag under most manufactured homes and get worse over time. Before the belly wrap is sealed around the pipes and ductwork make sure they are off the ground (using straps or blocks) and at proper grade, if needed.
This is also a good time to add insulation under and around the pipes and ducts.
You can actually strap and block the pipes and ducts anytime throughout the project but contractors could knock them out of grade while working.
Finally, it’s time to seal around the pipes, wires, and ductwork. There is a patching tape for belly wraps that works well.
Manufactured Home Underbelly Updates are Immediately Noticeable
The entire project only took two days from start to finish and Chuck said the manufactured home underbelly updates were noticed almost immediately.
The temperature of the floor while walking in bare feet feels even throughout the house.
The number of run cycles for the air conditioner during the day has been reduced and the length of run cycles has been considerably shortened.
The humidity level within the home has been reduced providing for a much improved and comfortable environment during the hot Summer.
Chuck says he considers this improvement as an investment in comfort, home preventive maintenance, and energy savings.
Thank you, Chuck for sharing your manufactured home underbelly updates. Your kindness will surely help a lot of people!
If you have an older mobile home you can make various improvements to ensure its better energy efficiency. Your main aim should be to reduce heat loss, reduce heating fuel usage, and to use improved appliances and light bulbs for lower energy costs and reduced pollution.
One of the upsides of making your mobile home more energy-efficient is an increase in value and more comfort for you and your family. The improvements don’t need to cost a lot to make a big difference.
Admittedly, your best updates to make a mobile home more energy-efficient can have a substantial upfront cost like window or window pane replacement and installing insulation. However, they tend to improve the look of your home while reducing energy consumption so they can pay themselves off pretty fast.
However, there are some simple ways to reduce energy consumption that we cover below as well.
HVAC System Maintenance is a Smart Start to Make Your Mobile Home More Energy-Efficient
Before making any other attempts to make your mobile home energy-efficient, make sure that your HVAC system is in good condition and well maintained.
There are a variety of HVAC systems used in mobile homes.
There are a variety of HVAC systems used in mobile homes like RMS multi-head split system, this type of system provides cooling and heating in single and multiple rooms without eating up your electricity bills, provide quiet operation, and support cleaner environment.
Due to space constraints, many air pumps are mostly located outside. These external parts need to be maintained with regular weeding and cleaning to prevent the accumulation of dirt. Mesh on ducts and registers should be replaced if they are torn and be sure nothing is blocking the areas where ventilation is needed.
Dirty HVAC filters reduce its effectiveness and increase energy costs so be sure to clean or replace them often.
A programmable thermostat is the best way to ensure that the AC units do not switch on and off all day. This prevents expensive temperature fluctuations and reduces the risk of malfunctions in the system.
Coolant levels in the HVAC should also be checked and leaks repaired.
Finally, the free flow of air is the most important part of your HVAC system. All air passageways into your home must be dust-free and free from obstructions.
Replace Windows or Window Panes
Thin glass windows are a huge cause of energy loss in homes. In the summer, the sun heats the window panes and that heat seeps into the home. In winter, the cold window panes cool your home. Older glass windows also have inadequate sealing that can allow cold air and heat in.
Windowpane replacement with energy-efficient glass along with new seals or caulk around your window can reduce energy bills and make your home more comfortable. There are good choices and better choices of glass depending on your location. Homes in the north will need a glass that can handle colder temperatures.
Energy-efficient windows for mobile homes can be double or triple-paned. These can also have insulating gas, giving you an even better performance.
Windowpane replacement is a cost-effective way to make your mobile home more energy-efficient. .
Make sure the entrances to your manufactured home are also keeping the heat in. Doors made from insulated steel and fiberglass are both safer and more energy-efficient than standard foam core doors. We’ve discussed mobile home doors quite a bit because new steel front doors are the best home improvement you can do based on return on investment.
The three common methods used to install mobile home roof insulation include:
Inside or ceiling drilling and tube blowing
External drilling and tube blowing
Opening the roof and filling the cavitywith Blown fiberglass insulation
Save Energy in the Kitchen
There are various ways to save energy in the kitchen.
Reduce cooking time by using a pressure cooker or placing lids on your pots and pans.
An Instant Pot is a popular kitchen appliance these days. You can cook a full chicken in just a few minutes. I like mine but admittedly I’m a little scared to release the steam when it’s finished cooking.
Another great tip I found was to not use a microwave to defrost foods. Try to plan your meals so that you can defrost whatever you need in the refrigerator.
Energy-efficient appliances are a smart investment, especially for cooking. Most of us already know that we shouldn’t use the oven for small meals. A little toaster oven or air fryer is great for meals for one or two people.
I recently learned that there’s a fine line when it comes to filling your freezer and refrigerator. I had always heard that a full freezer took less energy to cool than an empty one but you need to be careful to make sure the condenser and vents aren’t blocked.
Mobile homes are smaller and can become hot in summer because of the sun. However, their primary source of heat in the summer is from the kitchen, especially when you are cooking.
A good fan and vent that moves heat and steam out of your kitchen is necessary in most kitchens, especially in smaller homes.
Replace Ordinary Light Bulbs with Modern Energy Efficient Lighting
In most homes, approximately 12% of the energy bill is the energy used for lighting.
You can improve your energy bill by replacing older light bulbs with energy-efficient compact fluorescent lightbulbs (CFLs) or LED lights. Lights should also be switched off when not needed and cleaning your fixtures can make a huge difference (I was amazed when I cleaned my ceiling fan light – it had been neglected for a long while).
Older mobile homes can be energy efficient and comfortable!
Besides ensuring that your HVAC system is always properly maintained, two of the best improvements you can make is to insulate the underbelly and the roof and replace your windows, or at least the glass in your windows if possible.
Replacing your underbelly insulation and installing energy-efficient windows may cost a bit but the improvements will give you a quick return on your investment.
This week we are looking at questions about removing walls in a mobile home. These questions cover questions about marriage walls, load-bearing walls, and removing closets.
Questions about Removing Walls in a Mobile Home
Is The Marriage Wall Necessary?
I have the dreadful marriage wall running right through the center of my house. Family room on one side and the living room on the other. A real separation in the home. Is there any way I can take out the marriage wall? I’d settle for taking it out and putting in two columns to support the overhead.
Great question! Your marriage line is always load-bearing. That doesn’t mean removing it is impossible. Still, it would be an expensive and delicate job requiring an engineer with proper knowledge of load and shear-bearing construction techniques in manufactured homes. Even when the experts are brought in, there will usually always be some issue that arises in the future.
Simply put, anything is possible if you want it bad enough, but it’s not a good idea to modify the marriage line in a manufactured home.
Load Bearing Walls
According to the article, “In a single wide, with recent construction methods, there is no load bearing interior walls.” How recent?
From what I understand, that is a broad brush that can be applied for all single wide construction as they are designed so that the exterior walls hold the load. However, there can be load-bearing walls in the interior of a single wide – it is dependent on the home’s design.
The best thing you can do is bring in an expert and have them look to see if the wall is load-bearing. Of course, even load-bearing walls can be modified with the correct reinforcement used.
We are in the process of doing a complete remodel on a double wide. Right in the center of the family room and kitchen/dining room is what used to be a pantry that was probably 4 ft wide. I know it is the marriage wall, but have you ever seen someone take it completely out and put in a large beam to support the weight? I want to completely open up this area.
Listening to homeowners that have modified their marriage line has made me realize that there will almost always be some issue arising from a marriage line modification. It could take 5 years or 20, but there is usually always some problem that will occur. I suppose the homes are just so intricately designed to perform well in transport that even the slightest modification can cause a butterfly effect.
Of course, you can do anything with the right knowledge, people, and budget. In most site-built construction, a post and beam concept is used to replace load-bearing walls. I must recommend that you bring an engineer that is familiar with manufactured home construction to ensure that you can do the project without damaging the home.
I want to remove my daughter’s closet in our single wide to give her more space due to a tiny room. It is a 1996 Norris, and her bedroom is on the very end with a bay window. The closet takes up the entire left side of her wall beside her window with two doors. Would this be a pain to remove? It also has an electrical outlet placed 6 inches from the exterior wall on the wall we want to remove to make more space.
As far as I know, a typical single wide will have no load-bearing interior walls, so it should be fine to remove the closet walls. You’ll need to be careful, though and make doubly sure there is no load on whatever walls you want to remove (look for doubled studs and odd angles). Hiring an engineer is never a bad idea.
Since it has double doors, I doubt it’s load-bearing. You’ll need to cut the power to the room and take the paneling off very easily to ensure electrical safety. Also, plan on the way to re-route the wiring if it needs to be moved. Other than the marks left on the flooring and the ceiling, this should be a fairly easy weekend project.
I have a Redwood manufactured home that’s about 20 years old. In my kitchen, there are two little walls. One is next to the fridge and laundry room door. I want to remove it so I can get a larger fridge. Is it possible?
Typically, you can remove interior walls in a manufactured home as long as it’s not load-bearing. Load-bearing walls in manufactured housing include the exterior walls and the marriage line in a double wide. But I have to suggest that you consult an engineer before you do it (legally). Load-bearing walls are usually the exterior walls and walls along the marriage line of a double wide.
Our Ask a Mobile Home Expert Series Continues Next Week!
We hope these questions about removing walls in a mobile home have been helpful! Remember to comment below if there is a question we can help with.
Thanks for reading Mobile Home Living!
Disclosure: Any answers to questions about removing walls in a mobile home posed and any recommendations or information provided herein should not be used as a substitute of an expert or any relevant professional that has inspected the issues in person.
It’s amazing to see how far mobile home communities have come through the years. Yes, there is still a stigma associated with mobile home living, but as these 3 beautiful mobile home parks prove, that stigma is definitely beginning to fade as more of these all-inclusive resort-like communities pop up.
Our first community, Vineyard Valley is located in the Napa Valley area of California. Boasting over 44 acres of landscaped park to walk through, a lagoon, putting green and playing courts for bocce ball, this senior community offers everything a senior needs to enjoy an active lifestyle.
Related: A few months ago, we shared how mobile home communities were changing in California with parks like the Palm Canyon Mobile Club.
Large Pool Area To Get That Morning Exercise In.Picturesque Walking Trails.Look At The Size Of Those Trees!One Of The Newer Homes Available Within The Park.There Are Several Different Size Options Of Homes Available Depending On Your Needs.
Next up, we have Montauk Shores located in New York. It was actually the first mobile home park in the state of New York, established back in 1976. There is a combined total of 199 sites in the park, with 152 owned and 47 leased spaces.
The biggest draw to living in Montauk Shores would be the 1000′ of oceanfront which allows easy access to surf fishing, swimming or just relaxing on the beach. The amenities also include a professional bar, library, clubhouse, large area for social gatherings that include a full commercial kitchen, as well as many activities geared toward children.
An all-age community, there is a combination of weekend getaway residences and full-time residents. It is considered to be the area’s best kept secret and we can definitely see why.
Plenty Of Room For A Pool Party.The Ocean Is Just Steps Away.Homes Line Both Sides Of The Street In Neat Order.Tiny Homes Are Scattered Throughout.Even Vintage Homes Like This One Are Upwards Of A $1 Million Price Tag.
Our 3rd community, De Anza Santa Cruz, and is also located in California. Located on the bluffs of Monterey Bay, this 55+ community is a mix of waterfront and interior lots offers plenty to keep seniors entertained. A fitness center, library, clubhouse, and hot tubs are just a few of the amenities residents can enjoy.
Perfect Spot For Reading A Book Or A Picnic.Walking Trails Are Scattered Throughout.The Pool Overlooks The Dunes.Coastal Living At Its Best.Who Wouldn’T Love Living In This Setting?Several Homes Line The Coast.Landscaping Makes This Home Stand Out.
These are just a few examples of how mobile home communities are changing to fit the needs of seniors, families, and working adults. Unfortunately, the lot rent for these communities wasn’t readily available. However, residents have accessibility to many amenities that haven’t been available in the past as well as the added security of gated communities.
Do you live in a mobile home park? Love it? Hate it? What types of amenities if any does your community offer? We would love to hear what your experience has been, comment below!
Our state guide series concludes this week as we take a look at buying a mobile home in Oklahoma.
Mobile Home Facts in Oklahoma
Although completely surrounded by other states, Oklahoma is actually home to more man made lakes than any other state in the country, with over 1 million surface acres of water. Which makes it the perfect spot for a variety of manufactured homes, all lake front!
Here are some other facts we found about Oklahoma and mobile home living:
The average price of a pre-owned home: $67798 Average model year of a pre-owned home: 2008 Average pre-owned home size in square feet: 1477 Average sites in a manufactured home community: 96 Average year a community was developed: 1993 Number of age-restricted communities: 9 Number of all-age communities: 261
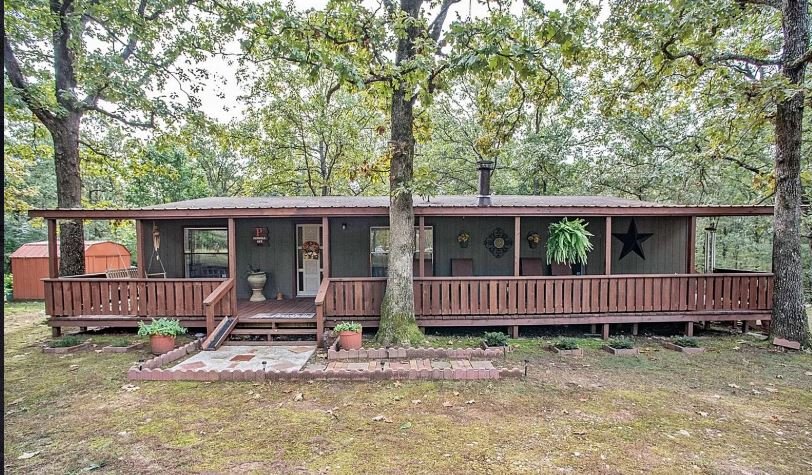
These Homeowners Did A Great Job Blending This Single Wide And Garage.
Know Before You Go
When buying a mobile home in Oklahoma, your first step is to know what you are looking for. You will want to have in mind how much home you need? How are you going to finance your new home? Are you going to place your home in a community or do you own property to place your new home on? A good place to start finding the answers to these questions, the Oklahoma Manufactured Housing Association site.
While there you can find information about why manufactured housing is becoming one of the top choices for affordable housing. You can also learn about financing options and available communities in the state.
Oklahoma MHA 6400 S Shields Oklahoma City, OK 73149 (405) 634-5050 www.mhao.org
Once you have found your new or “new to you” mobile home. You will need to make that home legal. In Oklahoma, just like most states, that means titling your home. The Oklahoma DMV takes care of the titling process. We did find a complete guide to mobile homes for the state of Oklahoma that explains what to do in most situations, whether titling your home or canceling your title for any reason.
Keep in mind, if you are buying a new manufactured home, your dealer will usually take care of the titling paperwork for you. Just make sure to ask before closing that the required paperwork is filed.
Warranty Issues
During the first year after buying a new mobile home, if there is an issue from the manufacturer or something isn’t right from installation, you have options to get those problems resolved. First, contact your dealer, preferably in writing, and let them know. Most dealers have a whole staff that handles problems after the sale. Act quickly when you find an issue, the one year warranty is in place to handle your problems.
If you aren’t able to get those problems handled directly with the dealer or manufacturer, you will need to contact the state and file a complaint. In Oklahoma, the Used Motor Vehicle and Parts Commission handles any consumer complaints regarding manufactured homes. Unlike many states, Oklahoma only accepts complaints in writing. You can download a copy of the form and mail it along with any documentation to:
STATE OF OKLAHOMA USED MOTOR VEHICLE AND PARTS COMMISSION 421 NW 13th, Suite 330 Oklahoma City, Oklahoma 73103
Mobile Home Living in Oklahoma
There were lots of awesome mobile homes for sale in Oklahoma. Almost 600 available on Zillow alone! So, buying a mobile home in Oklahoma offers a variety of choices, from single wides to double wides. From homes on acres of property to homes in mobile home communities, Oklahoma has it all.
Looks Like The Perfect Entertaining Spot.Love The Built In Porch.
If you have been keeping track, you already know we skipped a couple of states in our buying a mobile home series. Those two states, Hawaii and Alaska, aren’t really home to many manufactured homes. However, especially in Alaska, there is likely to be a rise in manufactured housing as the need for affordable housing continues to rise in the state.
We hope you have enjoyed our state guide series as much as we have loved sharing how to buy a mobile home across the country.