I'm Crystal Adkins, the creator of Mobile Home Living, and…
This is the second part of yesterday’s post The Best Mobile Home Remodel EVER. I call this the best mobile home remodel ever because after months of searching for the manufacturer and model of my home I found this one. It’s the exact same home with only a few small differences. The best part was that this one had already been updated! This gave me so many mobile home remodeling ideas and proved that it was possible to turn my home into the gorgeous home I dreamed of.
If you haven’t checked out one of the most amazing mobile home transformations I have ever found, please go to My Little River Cabin and see what a great job the owner, Kathy, has done.
We all need a little help when it comes to remodeling. There are endless decisions that need to be decided: paint color, flooring type, countertop material and lighting design are just a few things you need to choose. Not to mention the stain color, the wall treatments, and the decor. It can make anyone feel overwhelmed!
Here’s a great opportunity to learn from someone who has been there and done that. Kathy turned her 1978 single wide into a home fit for a king. Anyone, anywhere, would be proud to call it home!
Because Kathy is so generous and friendly, she has answered several questions I had. She is a true gem and a great advocate for mobile home living.
One thing I have always thought to be true, Kathy confirmed even more for me: People that live in mobile homes are absolutely the friendliest and most down to earth people you can find. There’s no pretentiousness, no snobbishness and no one tries to be something they are not. Mobile home owners know the secret to a happy and healthy life: live simply and comfortably and don’t try to keep up with Jones’s (they are probably so far in debt they can’t see straight anyway..lol).
Here is some great tips and information from Kathy:
1. Now that you have finished the majority of your remodels and your little cabin is gorgeous, can you tell us what your biggest issues were or what part of the remodel brought on the most stress?
Biggest issues: clogged drains, many mousey holes, aluminum single paned windows held together by duct tape and luck, drooping ceiling from removal of old wood stove piping (water had leaked in and caved in joists), front door was actually an interior door where a makeshift window was put in and there was a human-sized doggy door-that curse was passed on to the Restore. Most stress: Trying to get Little Cabin ready for a cabin warming scheduled 14 wks after purchase. Two days before the cabin warming we were driving the furniture over the pass in a utility trailer with heavy rain…everything made it with just fine with minimal water on the chairs (good tarping) whew!!!!
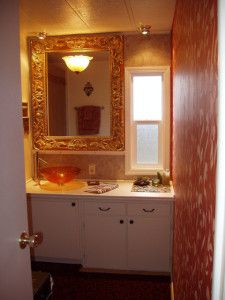
2. I noticed your bathroom light is actually attached to the mirror, which would be a great way to disburse the light in a small room, how do you do that without breaking the mirror?
First of all the mirror frame in the bathroom and living room were found at a consignment shop, and both coincidentally fit. (Destiny, Karma?) The mirror – had a hole drilled to fit the outlet. On the first run they actually glued the mirror to the wall, but then we had an electrical problem and they came over and very carefully pried it off (I do not know how they did it without breaking it) and the electricians came in and ripped apart the wall. Then the mirror guys came in and we used the molding support to hold the mirror and frame for easy removal in the future.
3. You hand painted your bathroom walls but in the photos, it looks like a rich wallpaper. What colors did you use, how did you get the swirls so perfect?
The painted walls with a rusty colored stain to hid tens of holes drilled, dings and scratches….horrible. (And as we mobile home owners know the minute you drill a hole in the wall it puffs OUTand you nearly have to scrape and sand for hours to get it flat.) Adding new walls, not cost effective! So pull out the paint stain and hand applied swirly wigglies.
4. You live just 25 feet from the beautiful Wenatchee River, does that add to excessive moisture or humidity inside the mobile home? Is there anything special that needs added or done to keep your home from becoming too humid or overly moist?
We live in an arid region. It’s actually desert converted to agriculture because of the water brought into the region. Wentachee is one of the biggest apple producers in the US.
5. I understand that your little cabin was not in the best of shape when you bought it, reeking of smoke and dog. How did you go about getting the odor’s out? Any tips?
Weeeell…I thought I could just paint it all myself but with the 14 wk schedule for the cabin warming and it took me two full weekends just to paint the bathroom), I had to kick butt, to find a painting company to come in. We had no furniture so we decided to coat everything wall to wall AND FLOORS TO CEILING. It really helped a lot to coat the floors, sealed in the odors….every once in a while in the hottest of summers, a whiff of the old aroma comes back….but that is why I bought the Bath and Body Works plug-in night lights, to camouflage…SMILE!!
6. You painted your kitchen cabinets a classic white (color name?). Any tips you can give us on how you did it? Any steps you added or special products you used?
It’s actually Bleeker Beige Gloss – Benjamin Moore. The walls in the cabin are Linen White – Benjamin Moore. Makes a rich contrast. Coincidentally, the first thing most people say when they take the tour is: Love the cabinet color!!
7. Can you remember the names of the colors you used on the exterior and interior?
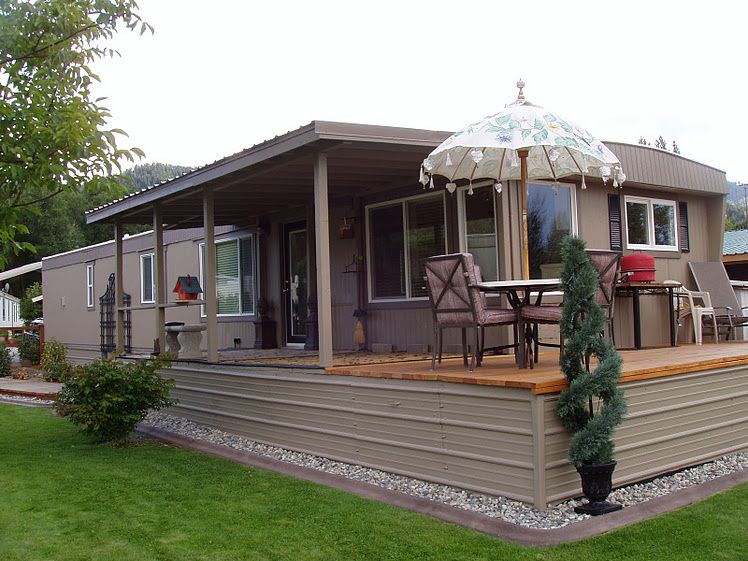
All Benjamin Moore: Exterior: Main part: Kingport Gray, Trim: Fairview Taupe.
8. The stain that you used on your patio and steps is a gorgeous color. What brand/color? Any special tips on applying stain?
Benjamin Moore: Exterior Siding, Deck & Stain – Natural. The front steps are pressured treated 2×6’s hemlock/white fir and boardwalk and deck are Douglas fir 2×6’s all stained with the same stain. Yup, I love the color too!! Tips on staining: springtime or late summer. The wood soaks up the stain.
9. On your blog, you mention that the flooring was a real pain because nothing is ever square in an older mobile home. Any tricks you learned along the way?
By hook and crook, lots of cussing, trial and error, we finally somehow got a full row to go together. They do not show how to lay an un-square walled home with a laminate floor on DIY, why you say? The second row was a bit easier and from then on we used blocks and tapped the sections together…what a pain in the ass!!! Found the maple laminate at Lumber Liquidators. It was believe it or not, $.78 a square foot. Jumped on the deal. We added the underlayment of 1/4″ of foam. Created an insulation factor and cushions the walk across the floors. It has endured fabulously not one problem…Lucky Ducks…we are!!
10. What exactly is a dragonfly dilly dinger? (You’ll see the infamous dragonfly dilly dinger on her blog)
You are sooooo funnny!!!! The garden art that has the dragonfly stuck to the top!!
Here’s a little update from Kathy:
I read some comments about cost so here’s a Monday morning quarterback’s opinion & progress cost report: As my mother used to say soap and water are cheap!
After completing the following 4 stages I could live in a mobile home very comfortably.
The first stage of the process: 5 gallons ammonia water @ $1.12 per gallon, mop & rags and vacuum cleaner. Hand scrub and clean walls, ceiling, and doors. May take hours and days. (Hidden asset-you will lose weight). Cost: $5.60.
Second stage: hand cut all the old carpeting in woman sized strips. Rip it all out. Vacuum, scrub and clean the floors. May need a wonder bar and hammer. Dumping fee none. I took 5 or 6 strips out every garbage day and after a month and a half, they were gone. Cost: sweat and tears.
Third stage: Paint EVERYTHING, floors, ceilings, doors, trim inside of all the cabinets and closets. Brushes and rollers. $20.00. 2 gallons of gloss for doors, trim and cabinets (mind you this is for a single wide) 5 gallons of velvet or satin for the walls, velvet or satin makes for easier cleaning. Flat is very hard to keep clean and hard to wash. Cost: Behr paint $33.98 gallon. Cost: $257.86.
Fourth stage: if needed, double paned windows. Our cost $1220.00 for 10 new windows. We replaced them all ourselves. Hammer, wonderbar, makita. All trim can be reused if taken down carefully and recut to fit. If the cost is too high up front…change one window each month.
As you can see anyone can live in a clean and painted home.It doesn’t cost a lot of money but it does take the willingness to work long hard hours, lose 3 sets of real fingernails, dedication, and just plain stubbornness. The fun and design can be added later and in stages. I challenge you all to make a determination/goal to complete a project no matter what. Even if the project is to save $200.00 to buy paint…..DO IT!
Please be positive…You are what you think. Let me know what you have done no matter how small. I accept no whining or negative can’t do complaints or excuses!!
No better advice could be had. I will be going today to get new rollers and paint to finally get my master bedroom painted. I needed that uplifting speech months ago..lol
There you go, great knowledge from a great mobile homeowner that has completely remodeled her home. If you have a mobile home remodel or update you would like to share please use the contact tab.
As always, thanks for reading Mobile & Manufactured Home Living!
I'm Crystal Adkins, the creator of Mobile Home Living, and I hope you've found the mobile home remodeling ideas, decorating inspiration, and repair help you've been searching for. Please consider letting me feature your remodels, room makeovers, DIY projects, and home improvement projects. There simply isn't enough inspiration available for mobile homeowners and I want to change that. Together, we can show the world that factory-built homes are as beautiful as any other at half the cost per square foot. Thank you!
That is cool, how there are so many ways to improve the energy efficiency of a mobile home. If I was doing it I would start with the doors, and windows, so that not heat would leak out during the winter, and they could keep the cool in during the summer. Need to find a place that can help.
Hi , we are wanting to install a ceiling fan in the beam that joins the two halves of our double wide mobile home, I don’t know who to ask about this,weather it would support something this heavy that moves, so I was hoping maybe you could give a little insight or maybe you know where I could go for advise. Pam
Hi Pam!
I’m not really able to answer your question personally (I’ve never installed a fan onto a beam) but I have found a few good articles and videos that should help you.
Best of luck! Thanks so much for reading MHL – I appreciate you!
Hello I just love it can you tell me if I can place the sidding over my blocks like you did in the pic.Just had my triler blocked with the gray bloc trying to fig out what would look gud.Thank you
Hi Katrina! You can install just about anything you want over your cinder block foundation. You could also paint it or add a stucco over it. If you want to attach boarding or metal, all you have to do is use the right anchoring system (screws) for masonry and/or brick. That usually includes drilling a hole and tapping an anchor into the concrete and then screwing the screw into the anchor. That reinforces it and keeps everything nice and tight. There’s lots of different kinds to choose from and your home improvement store can point you in the right direction and help you decide which is best for your type of block.
Thanks for reading and commenting!
Wow! Great job with this remodel. Like how you did things in stages. Currently looking for ideas for a vintage ’58 Artcraft (10×40) that has seen better days. I have a very small budget ($2k) so I really need to do my homework on this project. Your remodeling ideas give me hope! Thanks.
Hi Gena,Thanks so much for reading and commenting! Most mobile home doors(both exterior and interior) are not standard sizes found at Lowe's,It all depends on your make and model. Luckily, my 70's model singlewide uses the standard interior sizes that Lowe's sells for about$40.00 and there is no proof that anyone replaced them before we gotit. However, our exterior doors are your basic mobile home doors and Iwill need to order those or re-frame it completely. Lowe's and HomeDepot carry very little for mobile homes. There are local mobile homesupply dealers in just about every area (here in southern WV, I knowof 3 different ones). Hopefully, your model will have the standardsize like mine does!Our sponsor "Mobile Home Parts Store" sells interior mobile home doorsfor $59-$80 and you can click on the ad at the bottom of our page,right under the last post shown, I really need to move that up though!Changing a door is easy as long as you make sure to get the rightsize, the right swinging (in/out) and the correct hinges and hardware.Anyone could do it with a level, a screwdriver and a helper..lol!When you have to re-frame your looking at a a few hours labor but I'msure any handy hubby could do it.I do have some expensive ideas and I wish I had the money to do themall. We are in a very slow process of updating our home and I wish youthe best in all your adventures!
I am fascinated by your ideas. We live in a manufactured home and I want to replace the interior doors. Hubby says they would be expensive and special order items. Have you installed new doors or checked if they are doable? Also, do you use a local supplier, ie lowes or home depot? thanks
Of course! I will probably be showing it off on MHL like I always do…lol! I'm thinking a happy yellow for the bedroom and a blue/grey for bath..i dont know though..i keep changing my mind, decisions, decisions!
PLEASE KEEP US POSTED ON COLOR FOR YOUR SOON TO BE NEW BEDROOM…and as we mobile home remodelers know…it never just stops with the paint…would love to see the finished project. I know it will be super!!!
My recent post NEW RIVERBED!!
Thank you Kathy, I will put this up in the post as well. You are such an inspiration and motivator…dang it, I guess I'll go get some new rollers this evening…lol
Crystal this is a terrific article on Kathy's place! She has done SO much work to it and it really is a little paradise. I love your interviewing format. Thanks so much for this blog, it's inspiring and supportive!!!
My recent post Windows and Doors
Thank you Crystal for such a beautiful job of putting together and showing off other folks blogs. You have a great talent.
I read some comments about cost so here's a Monday morning quarterback's opinion & progress cost report: As my mother used to say soap and water are cheap!
After completing the following 4 stages I could live in a mobile home very comfortably.
First stage of the process: 5 gallons ammonia water @ $1.12 per gallon, mop & rags and vacuum cleaner. Hand scrub and clean walls, ceiling and doors. May take hours and days. (Hidden asset-you will lose weight). Cost: $5.60.
Second stage: hand cut all the old carpeting in woman sized strips. Rip it all out. Vacuum, scrub and clean the floors. May need a wonderbar and hammer. Dumping fee none. I took 5 or 6 strips out every garbage day and after a month and a half they were gone. Cost: sweat and tears.
Third stage: Paint EVERYTHING, floors, ceilings, doors, trim inside of all the cabinets and closets. Brushes and rollers. $20.00. 2 gallons of gloss for doors, trim and cabinets (mind you this is for a single wide) 5 gallons of velvet or satin for the walls, velvet or satin makes for easier cleaning. Flat is very hard to keep clean and hard to wash. Cost: Behr paint $33.98 gallon. Cost: $257.86.
Fourth stage: if needed, double paned windows. Our cost $1220.00 for 10 new windows. We replaced them all ourselves. Hammer, wonderbar, makita. All trim can be reused if taken down carefully and recut to fit. If the cost is too high up front…change one window each month.
As you can see anyone can live in a clean and painted home. And not cost alot of money….But it takes the willingness to work long hard hours, lose 3 sets of real fingernails, dedication and just plain stubborness. The fun and design can be added later and in stages. I challenge you all to make a determination/goal to complete a project no matter what. Even if the project is to save $200.00 to buy paint…..DO IT!
Please be positive….You are what you think. Let me know what you have done no matter how small. I accept no whining or negative can't do complaints or excuses!!
All the best and ….DO IT!! KLW from mylittlerivercabin.blogspot.com
My recent post NEW RIVERBED!!
“You are what you think!” Best advise ever. Thank you. Lynn







That is cool, how there are so many ways to improve the energy efficiency of a mobile home. If I was doing it I would start with the doors, and windows, so that not heat would leak out during the winter, and they could keep the cool in during the summer. Need to find a place that can help.
Hi , we are wanting to install a ceiling fan in the beam that joins the two halves of our double wide mobile home, I don’t know who to ask about this,weather it would support something this heavy that moves, so I was hoping maybe you could give a little insight or maybe you know where I could go for advise. Pam
Hi Pam!
I’m not really able to answer your question personally (I’ve never installed a fan onto a beam) but I have found a few good articles and videos that should help you.
Here’s what I found:
http://www.doityourself.com/stry/how-to-install-a-ceiling-fan-on-a-beam
(video) https://youtu.be/9aWOLvqnPiI
http://www.diychatroom.com/f18/mounting-ceiling-fan-exposed-beam-10064/
http://www.ehow.com/how_6505768_mount-ceiling-fan-beam.html
Best of luck! Thanks so much for reading MHL – I appreciate you!
Hello I just love it can you tell me if I can place the sidding over my blocks like you did in the pic.Just had my triler blocked with the gray bloc trying to fig out what would look gud.Thank you
Hi Katrina! You can install just about anything you want over your cinder block foundation. You could also paint it or add a stucco over it. If you want to attach boarding or metal, all you have to do is use the right anchoring system (screws) for masonry and/or brick. That usually includes drilling a hole and tapping an anchor into the concrete and then screwing the screw into the anchor. That reinforces it and keeps everything nice and tight. There’s lots of different kinds to choose from and your home improvement store can point you in the right direction and help you decide which is best for your type of block.
Thanks for reading and commenting!
Wow! Great job with this remodel. Like how you did things in stages. Currently looking for ideas for a vintage ’58 Artcraft (10×40) that has seen better days. I have a very small budget ($2k) so I really need to do my homework on this project. Your remodeling ideas give me hope! Thanks.
Hi Gena,Thanks so much for reading and commenting! Most mobile home doors(both exterior and interior) are not standard sizes found at Lowe's,It all depends on your make and model. Luckily, my 70's model singlewide uses the standard interior sizes that Lowe's sells for about$40.00 and there is no proof that anyone replaced them before we gotit. However, our exterior doors are your basic mobile home doors and Iwill need to order those or re-frame it completely. Lowe's and HomeDepot carry very little for mobile homes. There are local mobile homesupply dealers in just about every area (here in southern WV, I knowof 3 different ones). Hopefully, your model will have the standardsize like mine does!Our sponsor "Mobile Home Parts Store" sells interior mobile home doorsfor $59-$80 and you can click on the ad at the bottom of our page,right under the last post shown, I really need to move that up though!Changing a door is easy as long as you make sure to get the rightsize, the right swinging (in/out) and the correct hinges and hardware.Anyone could do it with a level, a screwdriver and a helper..lol!When you have to re-frame your looking at a a few hours labor but I'msure any handy hubby could do it.I do have some expensive ideas and I wish I had the money to do themall. We are in a very slow process of updating our home and I wish youthe best in all your adventures!
I am fascinated by your ideas. We live in a manufactured home and I want to replace the interior doors. Hubby says they would be expensive and special order items. Have you installed new doors or checked if they are doable? Also, do you use a local supplier, ie lowes or home depot? thanks
Of course! I will probably be showing it off on MHL like I always do…lol! I'm thinking a happy yellow for the bedroom and a blue/grey for bath..i dont know though..i keep changing my mind, decisions, decisions!
PLEASE KEEP US POSTED ON COLOR FOR YOUR SOON TO BE NEW BEDROOM…and as we mobile home remodelers know…it never just stops with the paint…would love to see the finished project. I know it will be super!!!
My recent post NEW RIVERBED!!
Thank you Kathy, I will put this up in the post as well. You are such an inspiration and motivator…dang it, I guess I'll go get some new rollers this evening…lol
Crystal this is a terrific article on Kathy's place! She has done SO much work to it and it really is a little paradise. I love your interviewing format. Thanks so much for this blog, it's inspiring and supportive!!!
My recent post Windows and Doors
Thank you Crystal for such a beautiful job of putting together and showing off other folks blogs. You have a great talent.
I read some comments about cost so here's a Monday morning quarterback's opinion & progress cost report: As my mother used to say soap and water are cheap!
After completing the following 4 stages I could live in a mobile home very comfortably.
First stage of the process: 5 gallons ammonia water @ $1.12 per gallon, mop & rags and vacuum cleaner. Hand scrub and clean walls, ceiling and doors. May take hours and days. (Hidden asset-you will lose weight). Cost: $5.60.
Second stage: hand cut all the old carpeting in woman sized strips. Rip it all out. Vacuum, scrub and clean the floors. May need a wonderbar and hammer. Dumping fee none. I took 5 or 6 strips out every garbage day and after a month and a half they were gone. Cost: sweat and tears.
Third stage: Paint EVERYTHING, floors, ceilings, doors, trim inside of all the cabinets and closets. Brushes and rollers. $20.00. 2 gallons of gloss for doors, trim and cabinets (mind you this is for a single wide) 5 gallons of velvet or satin for the walls, velvet or satin makes for easier cleaning. Flat is very hard to keep clean and hard to wash. Cost: Behr paint $33.98 gallon. Cost: $257.86.
Fourth stage: if needed, double paned windows. Our cost $1220.00 for 10 new windows. We replaced them all ourselves. Hammer, wonderbar, makita. All trim can be reused if taken down carefully and recut to fit. If the cost is too high up front…change one window each month.
As you can see anyone can live in a clean and painted home. And not cost alot of money….But it takes the willingness to work long hard hours, lose 3 sets of real fingernails, dedication and just plain stubborness. The fun and design can be added later and in stages. I challenge you all to make a determination/goal to complete a project no matter what. Even if the project is to save $200.00 to buy paint…..DO IT!
Please be positive….You are what you think. Let me know what you have done no matter how small. I accept no whining or negative can't do complaints or excuses!!
All the best and ….DO IT!! KLW from mylittlerivercabin.blogspot.com
My recent post NEW RIVERBED!!
“You are what you think!” Best advise ever. Thank you. Lynn