Apartment Therapy, one of the most popular home decorating blogs in America, boldly proclaims that wood paneling is cool again. We hate to brag but we’ve been dealing with wood paneling in mobile homes for decades so we’re way ahead of the game!
One of the biggest complaints from manufactured homeowners is our limited wall choices. We can send a man to space but we only have three choices for mobile home walls: sheet paneling aka POG or VOG wallboards, ‘wood’ paneling, and most recently, sheetrock.
Using wood paneling in mobile homes has been very popular but it’s dark and can be dreary if it’s used on every wall in a room. Luckily, painting wood paneling isn’t too difficult and it can give your home a whole new look in less than a day.
This article is going to focus mainly on the old wood paneling in mobile homes and the gypsum-based wallboards that have wood paneling graphics. We’ll cover how they are made, how to paint and wallpaper them, and how to make them work in your home to create a beautiful space.
POG, VOG, and Wood Paneling in Mobile Homes
You hear a lot of different terms thrown around when it comes to manufactured housing construction. This is particularly true with walls for some odd reason. Here are the differences and similarities between the various types of walls you’ll find in mobile and manufactured homes.
VOG Wall Panels
VOG stands for vinyl on gypsum and it is popular in manufactured homes because it’s cheap to manufacture, holds up remarkably well during transport, and is super easy to install because no mudding is required. They just slap matching strips over the seams and call it a day.
The gypsum is pressed into flat sheets and a laminated vinyl is glued to the top of it. The laminated vinyl can be printed in any pattern but wood paneling and flowers are most common. The vinyl essentially holds the panel together and is a bit more waterproof than POG so it’s used in bathrooms and kitchens.
POG Wall Panels
Paper on gypsum is made just like VOG panels except the laminated top is made from paper. Clayton, the largest manufactured home builder in the nation, uses POG paneling or sheetrock in their homes. Manufactured home wallboards range in thickness from 5/16” to ½”. The 5/16” thickness used to be the most popular measurement for Paper On Gypsum (POG) wallboards, but the majority of new Clayton homes with POG wallboards are now 3/8” (source: Clayton Homes).
The POG panels have a printed graphic pattern like a wood paneling design or flowers. The Clayton home below shows a typical POG wall paneling in a neutral color:
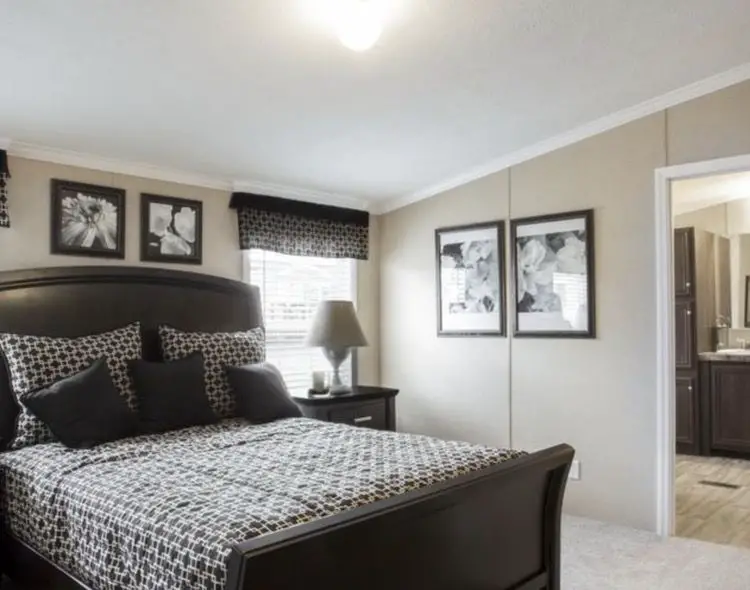
Related: This home has gorgeous wood walls.
Painting VOG and POG Paneling
VOG and POG paneling can be painted but there’s a process to it. First, you’ll need to figure out what to do with the strips or battens that cover the seams.
Most people opt to remove the battens and cover over the seams. We have an article dedicated to painting and updating VOG panels in mobile homes here.
Related: 5 questions and answers about painting VOG walls in a mobile home.
Wood Paneling in Mobile Homes
In the 1970’s, the most common wall material in mobile homes was a thinly laminated wood paneling. It would have some texture to it and the grooves would be dark and rough. It wasn’t just mobile homes, though, that stuff was in every home!
The most popular types of wood paneling:
Veneer is technically a thin layer of hardwood, usually thinner than 1/8 of an inch. Typically, a veneer is many layers of hardwood bonded or glued with adhesive, in alternating grain direction (called crossbanding) to a cheaper surface that is hidden below. A less expensive wood or particle board can often be found underneath.
Laminate is made with synthetic materials or very thinly sliced pieces of wood. In some cases, it is made to look like wood grain by using a method that is similar to printing. Laminate typically has a shiny finish.
MDF isn’t as strong as veneer, doesn’t hold screws as well, and is heavier than veneer but it’s smoother and flatter.
Particle Board is the cheapest of the paneled wood products. It’s just a bunch of sawdust and glue formed and pressed into a flat panel. It doesn’t hold screws very well and it soaks water up like a sponge.

Solid Wood is, well, solid wood. Furniture made with solid wood can be sanded, stained, varnished, treated and painted. Some woods are soft and show wear, such as worn corners and edges, after many years of use. Others are called hardwoods and have a more durable lifespan.
How to Paint Wood Paneling in Mobile Homes
The wood paneling in mobile homes is typically laminate and has deep grooves every few inches to create a look of single board tongue and groove in various widths. Like the VOG paneling in mobile homes, battens covered the seams of wood (typical) 4′ wide panels.

Here’s the kitchen after the wood paneling was painted:
If you want minimal cost and effort, just painting the walls will be your best bet. Our 1978 Homette single wide has a thin plywood paneling with a rough texture on every wall. It was a dull gray-brown and the black vertical grooves were rough. I painted the whole house in white and teal and it cost less than $75 for the whole home.

If you want to paint your wood paneling you’ll need to make a few decisions. The steps you’ll need to take will be determined by how much work and money you want to spend on your mobile home’s walls.
We’ll give you two options for painting your wood paneling below. The first is to just paint the walls and the second is to fill in the grooves and the seams. Regardless of which you choose, you will need to do a test on the paneling in an inconspicuous area (behind the couch is a good place). Old paneling may soak up the paint like a sponge and if you know this before you buy your supplies you can buy separate primer (as opposed to the paint+primer in one). Also, if you opt to go mud your walls you’ll definitely want to test the process out to make sure the result is worth it.
Best Primers and Paints to Use on Wood Paneling
Paint has gotten a lot better over the last decade but the new technology has made paint very expensive. On average, you can expect to pay at least $25 a gallon for a good paint and/or primer. Keep in mind, paint is a ‘get what you pay for’ product. Cheap paint doesn’t spread as easily or cover as well so you end up using more product to get the same coverage a single coat of the name brand paint would give. Over the last 7 years lots of readers have given us recommendations, here are the most popular:
Please Note: These are affiliate links for Amazon but I do not recommend buying paint or primer online. It’s better to go to a home improvement store and have them tint the paint or primer for you. Plus, most home improvement stores allow exchanges or returns if you aren’t satisfied or don’t like the color. The brushes and such are usually cheaper on Amazon though so if you do use the links, I will receive a small cut at no cost to you. Thank you!
KILZ MAX Maximum Stain and Odor Blocking Interior Latex Primer/Sealer
KILZ has a few different products and they are all popular. KILZ is best known as a primer that helps paint bond to slick surfaces better but the coverage is just as good as its adhesion. It also covers odors, water stains, smoke and nicotine, grease, ink, and pet stains. You can have KILZ tinted in any color at Lowe’s and Home Depot. You can buy it on Amazon here:
Rust-Oleum Zinsser
Zinsser is a popular primer that covers well and creates a even surface for the paint to adhere to.
Glidden One Coat
Glidden One Coat is a paint and primer in one and has been recommended by readers a few times. It covers very well.
Valspar
I used Valspar’s Vintage Teal to cover the original unpainted wood paneling in our 1978 single wide (see the image above with the white fireplace). It covered fine but did require 2 coats. Clean up was easy. It did bleed a bit under the tape but once I changed from the frog tape to the blue 3M tape I got cleaner lines. You may want to go to Lowe’s and buy a sample size to make sure it will work for your project.
Here’s the 3M Blue tape:
Here’s How to Just Paint the Wood Paneling in Mobile Homes
How to Paint Wood Paneling
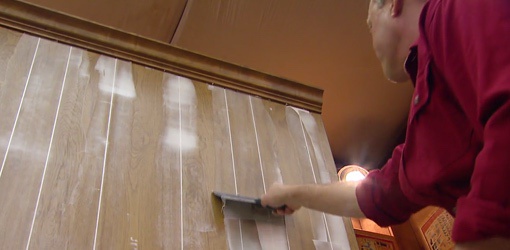
Lightly Sand the Wood Paneling
For wood paneling only, your first step will be to lightly sand the walls with a very fine grit paper. You don’t want to create scratches! All you want to do is knock the sheen off the walls and give the paint something to adhere too. Again, you do not want to mark or scar the wall!
Clean the Walls
The second step is always the most important. You’ll need to cleanu00a0the walls. You need the primer and paint to bond to the surface and it can’t do that if the surface is dirty. Even if your walls look clean you still need to clean them. Dawn dish detergent and a gallon of warm water work fine. Don’t soak the walls, ring your rag out well. Let dry and repeat.
Tape the Wall
After the wall is completely dry start taping off your trim, carpet, and ceilings. If you can, splurge on the name-brand tape (3M is my choice over the frog stuff).
Prime the Wall
Use Killz Primer or a paint and primer in one over to lighting cover the paneling and let dry. Apply a second and maybe a third coat since getting the paint in the grooves is sometimes difficult. Below is a photo of wood paneling after the first layer of paint. Notice how the grooves aren’t taking paint?
If you want to fill in the grooves of the wood paneling you have a couple of different options. You can use mud like they use on sheetrock or a tube caulk that is sandable.
We shared the steps for painting the wood paneling before filling in the grooves for two reasons. First, we don’t recommend filling in the grooves. It’s a lot of work and the chances of getting the wall perfectly even is slim.
Secondly, the paint helps the caulk to stick to the wall better. If you want to fill in the grooves, or seams, of wood paneling follow these steps:
Mudding the Grooves and Seams on Wood Paneling in Mobile Homes Before you Paint
If you really hate the grooves in your walls then this option may be the right one for you. As mentioned above, you will want to test this method out in a hidden spot before you start on the entire wall. If your mobile home is 30+ years old you never know how the paneling will react to mud and paint. You may find that the effort is too great for the result.
Step 1
The first step to mud your walls is to clean them really well. Dawn dish detergent works just as well as the expensive stuff in most cases. You’ll want to use a damp rag and go over the walls a couple of times, letting the walls dry between each.
Step 2
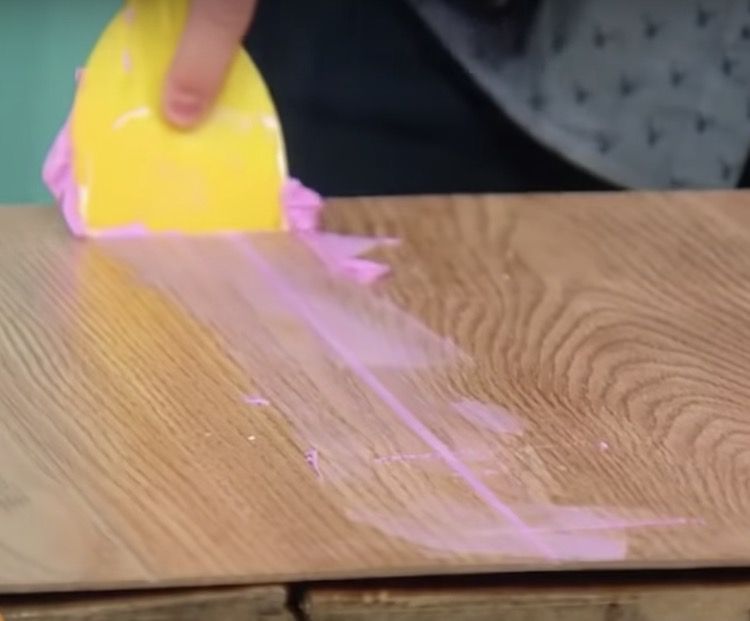
The spackling will need to be worked into the grooves using a plastic putty knife (they flex and bend better than the metal ones and newbies won’t scratch the paneling as easily). Don’t be stingy with the spackling, work it from the left and the right and then make a clean sweep downward to remove the access mud.
For the seams where the wood paneling meet you’ll want to throw a lot of mud on there and work it till you get it smooth.
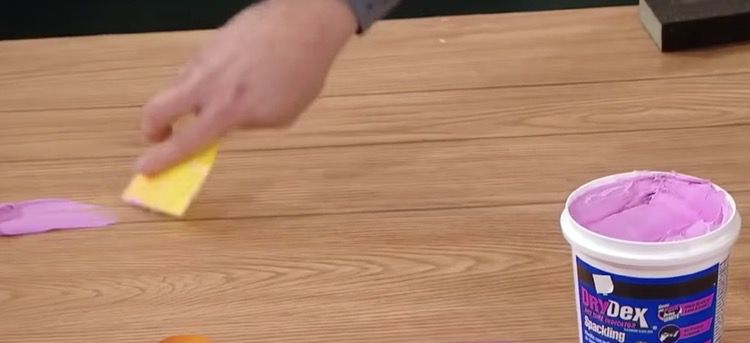
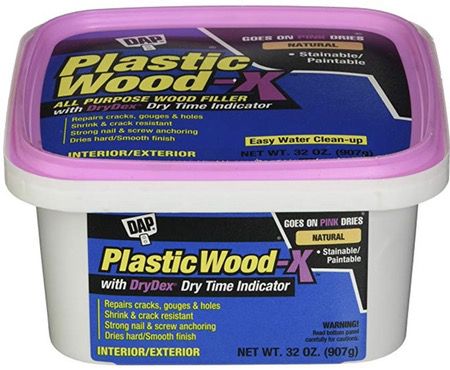
DAP DryDex has several kinds of filler and caulks. Their Plastic Wood -X filler may be a bit too thick. If you like a ‘thinner’ filler try DAP Spackling.
Here’s what your wood paneling should look like after the spackling has been done (they didn’t prime the wall first):
Spackling tends to shrink when it dries so follow the manufacturer’s instructions on drying time and go another round with the spackle. Ideally, you’ll want to give it a night between layers.
Step 3
Now you’ll need to start sanding and it is messy! There are small shop vac extensions you can use to help keep the dust down though. After you sand with the recommended grit per the spackle manufacturer you’ll want to use a lightly damp rag to clean the walls again.
Step 4
Finally, the primer and paint part! In most cases, you should only need a high-quality paint and primer in one. However, some wood panels just really soak the paint up and you’ll want to lay a couple of layers of primer down first before you paint.
The DIY Network offers a great tutorial on painting over paneling (wish I had their editorial budget!)
Mudding is Not for Perfectionists
If you are a perfectionist and your ultimate goal is to have smooth walls, mudding may not be your best option. If you can live with some variation on the walls you should do well.
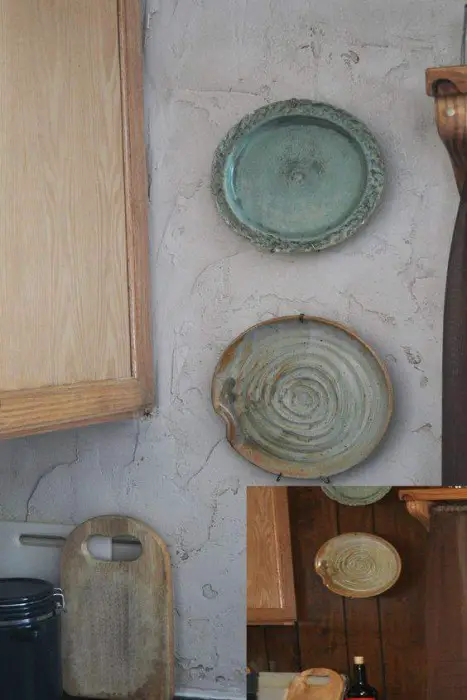
Aged Plaster Treatment over Wood Paneling in a Mobile Home
Pam, a long-time reader of ours, shared a complete tutorial on how she made her wood paneling look like aged plaster. Here’s her kitchen now (the bottom right was the wall before the treatment):
Tips to Install Wallpaper over Wood Paneling
Wallpaper is another ‘get what you pay for’ product. If you don’t fill in the grooves and seams of the wood paneling you may be able to see them through cheaper wallpaper. Expensive wallpaper is thicker and easier to install and that’s exactly what you need if you have the wood paneling with grooves in your home.
Brewster Wallcovering suggests the following steps for installing wallpaper over wood paneling:
- Step 1: If the grooves in paneling are 1/4 inch deep or more, fill them in with caulk.
- Step 2: Wipe away the overflow by running a putty knife along the groove.
- Step 3: Once the caulk is dry, prime the paneling with a stain-blocking latex primer. Let the primer dry completely.
- Step 4: Coat walls with an acrylic-emulsion sizing or one recommended by the liner manufacturer.
- Step 5: Hang a heavy-duty wallpaper liner horizontally.
- Step 6: Hang wallpaper vertically over the liner according to the manufacturer’s instructions.
- Step 7: If using paintable wallpaper, wait until the paper is completely dry before painting. We recommend painting over paintable wallpaper with 2 coats of latex paint.
When You Shouldn’t Paint Wood Paneling in Mobile Homes
Some vintage mobile homes, like Spartans, have real Birch wood interiors. If you paint over any of those walls (that are in any salvageable condition), you will be haunted by the vintage mobile home ghosts of the past.

Using Wood Paneling to Accent your Manufactured Home Decor
Since wood paneling (or wood-like paneling) seems to be the next home decor trend we wanted to take a look at it with fresh eyes. You can use wood paneling with just about any decorating style: modern farmhouse, shabby chic, beach theme, primitive country, and traditional.
Wood Paneling Accent Walls for a Traditional Home
When I think of a traditional room, I imagine an office or den with wood walls, a leather banker’s chair, and bookcases filled with gorgeous first editions of all the classics. That look is easily mimicked with the right choice of wall paneling and furniture.
Modern Eclectic Style

Mobile Home Transformation with Shiplap
Technically shiplap is not wood paneling or even tongue and groove but it all looks great!

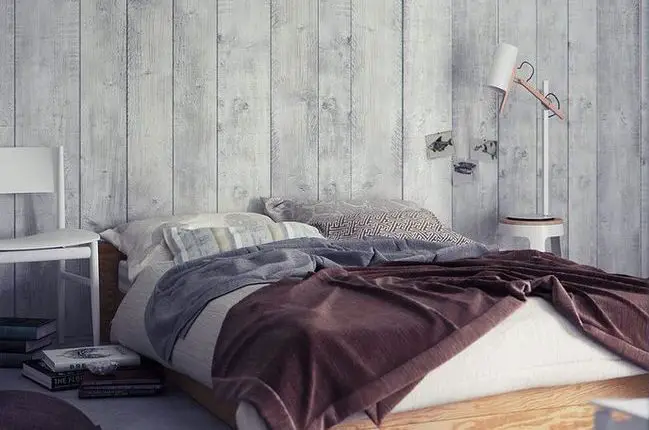
Your Beach House Needs Whitewashed Wood Paneling
Whitewashed wood paneling is a perfect choice to give a room a laid-back beach style. It works great to create a shabby chic style space, too.

Moody Modern Walls
Painting wood paneling a light charcoal gray will give your room a modern drastic feel like the image below.
Natural Wood Paneling with Black Trim Makes for a Modern Marvel
This blogger kept her wood paneling but added black trim to give it a cool modern look. I love it!
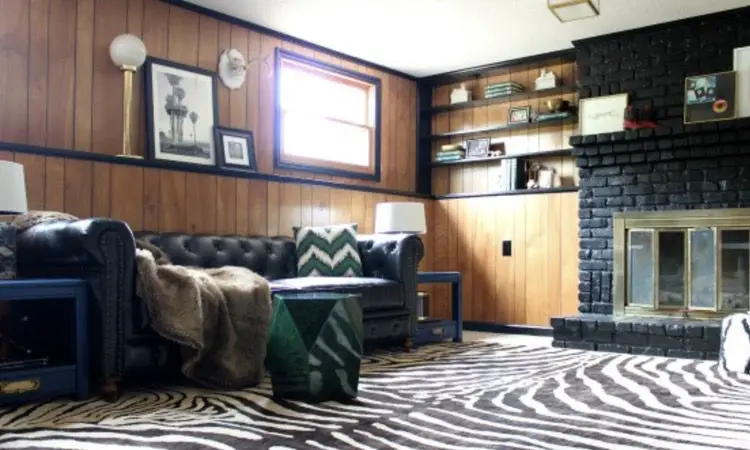
Clayton Homes has a similar look in one of their newer models:

Conclusion
Wood paneling in mobile homes was a popular choice in the 1970s but then the dreaded POG and VOG wall boards came about. They were cheaper and offered a variety of patterns so of course, the builders chose them. Thankfully, wood paneling is fairly easy to update and with a slight lean toward natural and traditional materials, wood paneling may just be seeing a renaissance.
I would love to see more real wood in modern manufactured homes. How about builders?
As always, thank you for reading Mobile Home Living!
I was updating my bathroom and taped all the door frames. When I removed the tape some of the paint came off. That’s when I realized that the wooden door frame was not real wood, but had a photo type surface. How do I repair where the paint came off without having to repaint the whole frame?
I painted some of my paneling and on the rest, I filled in the grooves with drywall mud. Our friend did a texture with a stomp down brush and knockdown, looks kind of like skip trowel. I took down the battens and all of the outside corner trim and replaced it with drywall corner bead, I was hating all that wood corner trim.
The advice I have for that is to prime the walls after filling in the groves and before any texturing. We didn’t do that and the mud in the groves rewet and swelled here and there after the texturing was done. I had to sand here and there where it had swelled and made little random stripes. A real pita.
.
I have a 1977 mobile home and it has a dining room hutch that has two glass doors and the mirror in the center the mirror mirror is attached to paneling not the hutch and the hutch doesn’t have a back to it it’s attached to the paneling do you have any idea how that could be attached we taking all the glass out and are ready to take out the structure but I don’t know what to do because it’s a really tight fit I want to keep the bottom part I wanna put my 65 inch TV on it. It Works really good as a credenza I would appreciate any help you can give me I don’t want to ruin the paneling behind it
Hi Janice,
Those mobile home ‘built-ins’ are tough to remove without damaging the wall. Chances are you will damage the wall if you try to remove the mirror because they glue them on and that glue doesn’t respond to any glue remover I’ve tried. If the hutch is just nailed you could take a Sawzall and cut it away from the wall and the base but I suspect the builder used enough glue to kill a horse.
Without looking, I’m gonna say your best bet is to cut the entire wall panel out so that you pull the mirror and the upper part of the hutch in one piece. It’ll be a lot less messy and probably quicker in the long run. You’ll need to cut the panel over a stud (so the cut is going right down the middle of a stud) to give yourself a ledge to nail and glue the new panel onto. The only problem you’ll probably have is finding the matching paneling your home has. you could always use sheetrock though.
best of luck!
love the beach cottage whitewashed wood paneling…wish i had instructions and color info…can you help?
Our 1973 Champion single wide has been painted, it is paneling. It two to three coats of primer and two coats of paint. It has really made a big difference in lighting and modernizing our home.
My question is about hanging things like larger mirrors on the walls. Has anyone used the strips that are used to hang artwork? I have a mirror with coat pegs I would like to put up but it doesn’t line up with the studs.
Hi Dee,
With anything over 5 -8 pounds you’ll want to make sure you go into a stud but those strips you’re talking about are PERFECT for lightweight items. I wouldn’t use them on anything breakable or with glass though. I’ve used Command strips throughout our 1978 single wide with paneling that has been painted and had no problem. In fact, I’ve had them rip the top layer of drywall off in the condo we lived in for 6 months in 2015. I never had that happen once in the mobile home.
Thanks for reading Mobile Home Living®!
Hello, thank you so much for this site. We are purchasing a 1978 bow trussed single wide and gutting it. I have already avoided so many bad plans thanks to your articles.
I do have a couple of questions about walls and ceilings. The first is about the wallboard. The house is situated in a park permanently and the wallboard is literally peeling off the walls all over the place and will need to be completely replaced. Is it necessary to use wallboard or can we use drywall? I also noticed a mention of needing to reinforce the wall if you were going to put tile on it?
The second question is about the ceiling. Is it possible to dispense with the fiberpad ceiling and instead go to a vaulted style instead? Can I apply wallboard directly to the roof or will it be too heavy?
Hi Kelley!
You can use drywall, just go with the thinnest that you can. You probably won’t be able to vault your ceilings because of the way the roof trusses are made. Any modification to the trusses will corrupt the structural integrity of the entire home. You can replace the gypsum ceiling panels, this article gives 10 replacement materials that will work on ceilings.
Best of luck!
I recently started living with my grandmother in her manufactured home and I’ve noticed some of the quirks of mobile home living. There has been talk of me inherit the home one day and I’m probably the only grandkid brave enough to take the task on. So in my research on improvements that can be made I came across this website and it’s been a great asset for my running list of ideas. Which brings me to my question. I know her home was manufactured in 1979 and on her renewal form for her tags I guess says the manufacturers name is “BUDGR” but I haven’t been able to find any information on that company. BUT the thumbnail photo that you used on this article looks INCREDIBLY similar to her home. So do you have information about the home in that photo? Or was it just a normal image search result? She said that there were only a couple models of the home available when it was purchased, hers, with a fireplace and the other had a bar.
Hi Savannah!
I’m not sure which image you are talking about. If it’s the image with the white fireplace that’s a Homette. If it’s the one with the bar (I assume, I’m not sure what model that is). Mobile homes are built on a regional basis – what’s available in CA isn’t going to be available in NY (based on wind zone and regional builders).
I’m thinking BUDGR is the BUDGER Company and they were best known for their ‘expando-homes’ so you may want to research that. Best of luck!
Thanks Crystal….
A GREAT informative article.